
These cheap storage shelves are fast and easy to make. They store a ton of stuff in a small footprint and, best of all, they’re a perfect first-project for beginner DIYers. If you have your lumberyard cut the boards to size, the only tool you need to make these shelves is a hammer and nails!
I created these storage shelves for organizing inventory in a small business, but they also work great for organizing craft supplies, parts, small tools, and household items. I even made a set for the lawnmower shed at Hawk Hill to organize hand tools, screws, seed packets, and small lawn tools!
Keep reading to learn, step by step, how to make your own storage shelves on a budget.


How to Build These Storage Shelves:
First, Choose Size & Supplies
These shelves are very customizable.
For the cheapest shelves, use thin plywood and basic 2×4″ lumber. These shelves will be functional but may sag if the weight of the items you store is too heavy.
For heavier items or wider spaces between supports, use thicker plywood. High-quality plywood resists sagging when heavier items are stored on the shelves.
Thinner supports, (example: 1×4″ lumber) are more expensive but tidy up the appearance and increase the amount of space available for storage.

Calculate lumber needed.
Plywood always comes in a 4×8 foot sheet, so you’ll get 3 strips of 16″ deep shelves out of each sheet of plywood.
You’ll need a 2×6 (“support piece”) at each end plus 3 in the middle. That’s a quantity of 5x 16″ boards = 80″ total. So each level of 16″ deep shelf will need 80″ worth of supports. These supports should be cut from 2×4’s (or more expensive 1x lumber that is 4″, 6″, or 8″ wide, depending on how much clearance you want for each shelf)
You can get away with using fewer support boards if you use thick, sag-resistant plywood to build your storage shelves.
When calculating lumber needed to reach the desired height, remember lumber name dimensions are not actual dimensions. Wikipedia has a full listing of nominal vs actual dimensions of standard lumber.
Cut Lumber

Cutting 2×4 boards is easy with a chop saw, but cutting plywood lengthwise can be tricky. It requires expensive tools to get perfectly straight.
If possible, have your home supply store cut the plywood strips for you. Even if there’s a small fee, it’s a smart purchase. Plus, the strips are much easier to bring home and unload than full sheets of plywood!
Optional: Paint Wood


If you want finished shelves, like these black and white shelves in my online store’s warehouse, paint now. Painting the wood before construction is so much easier! You’ll be able to paint large sections with a roller instead of fussing with nooks and crannies.
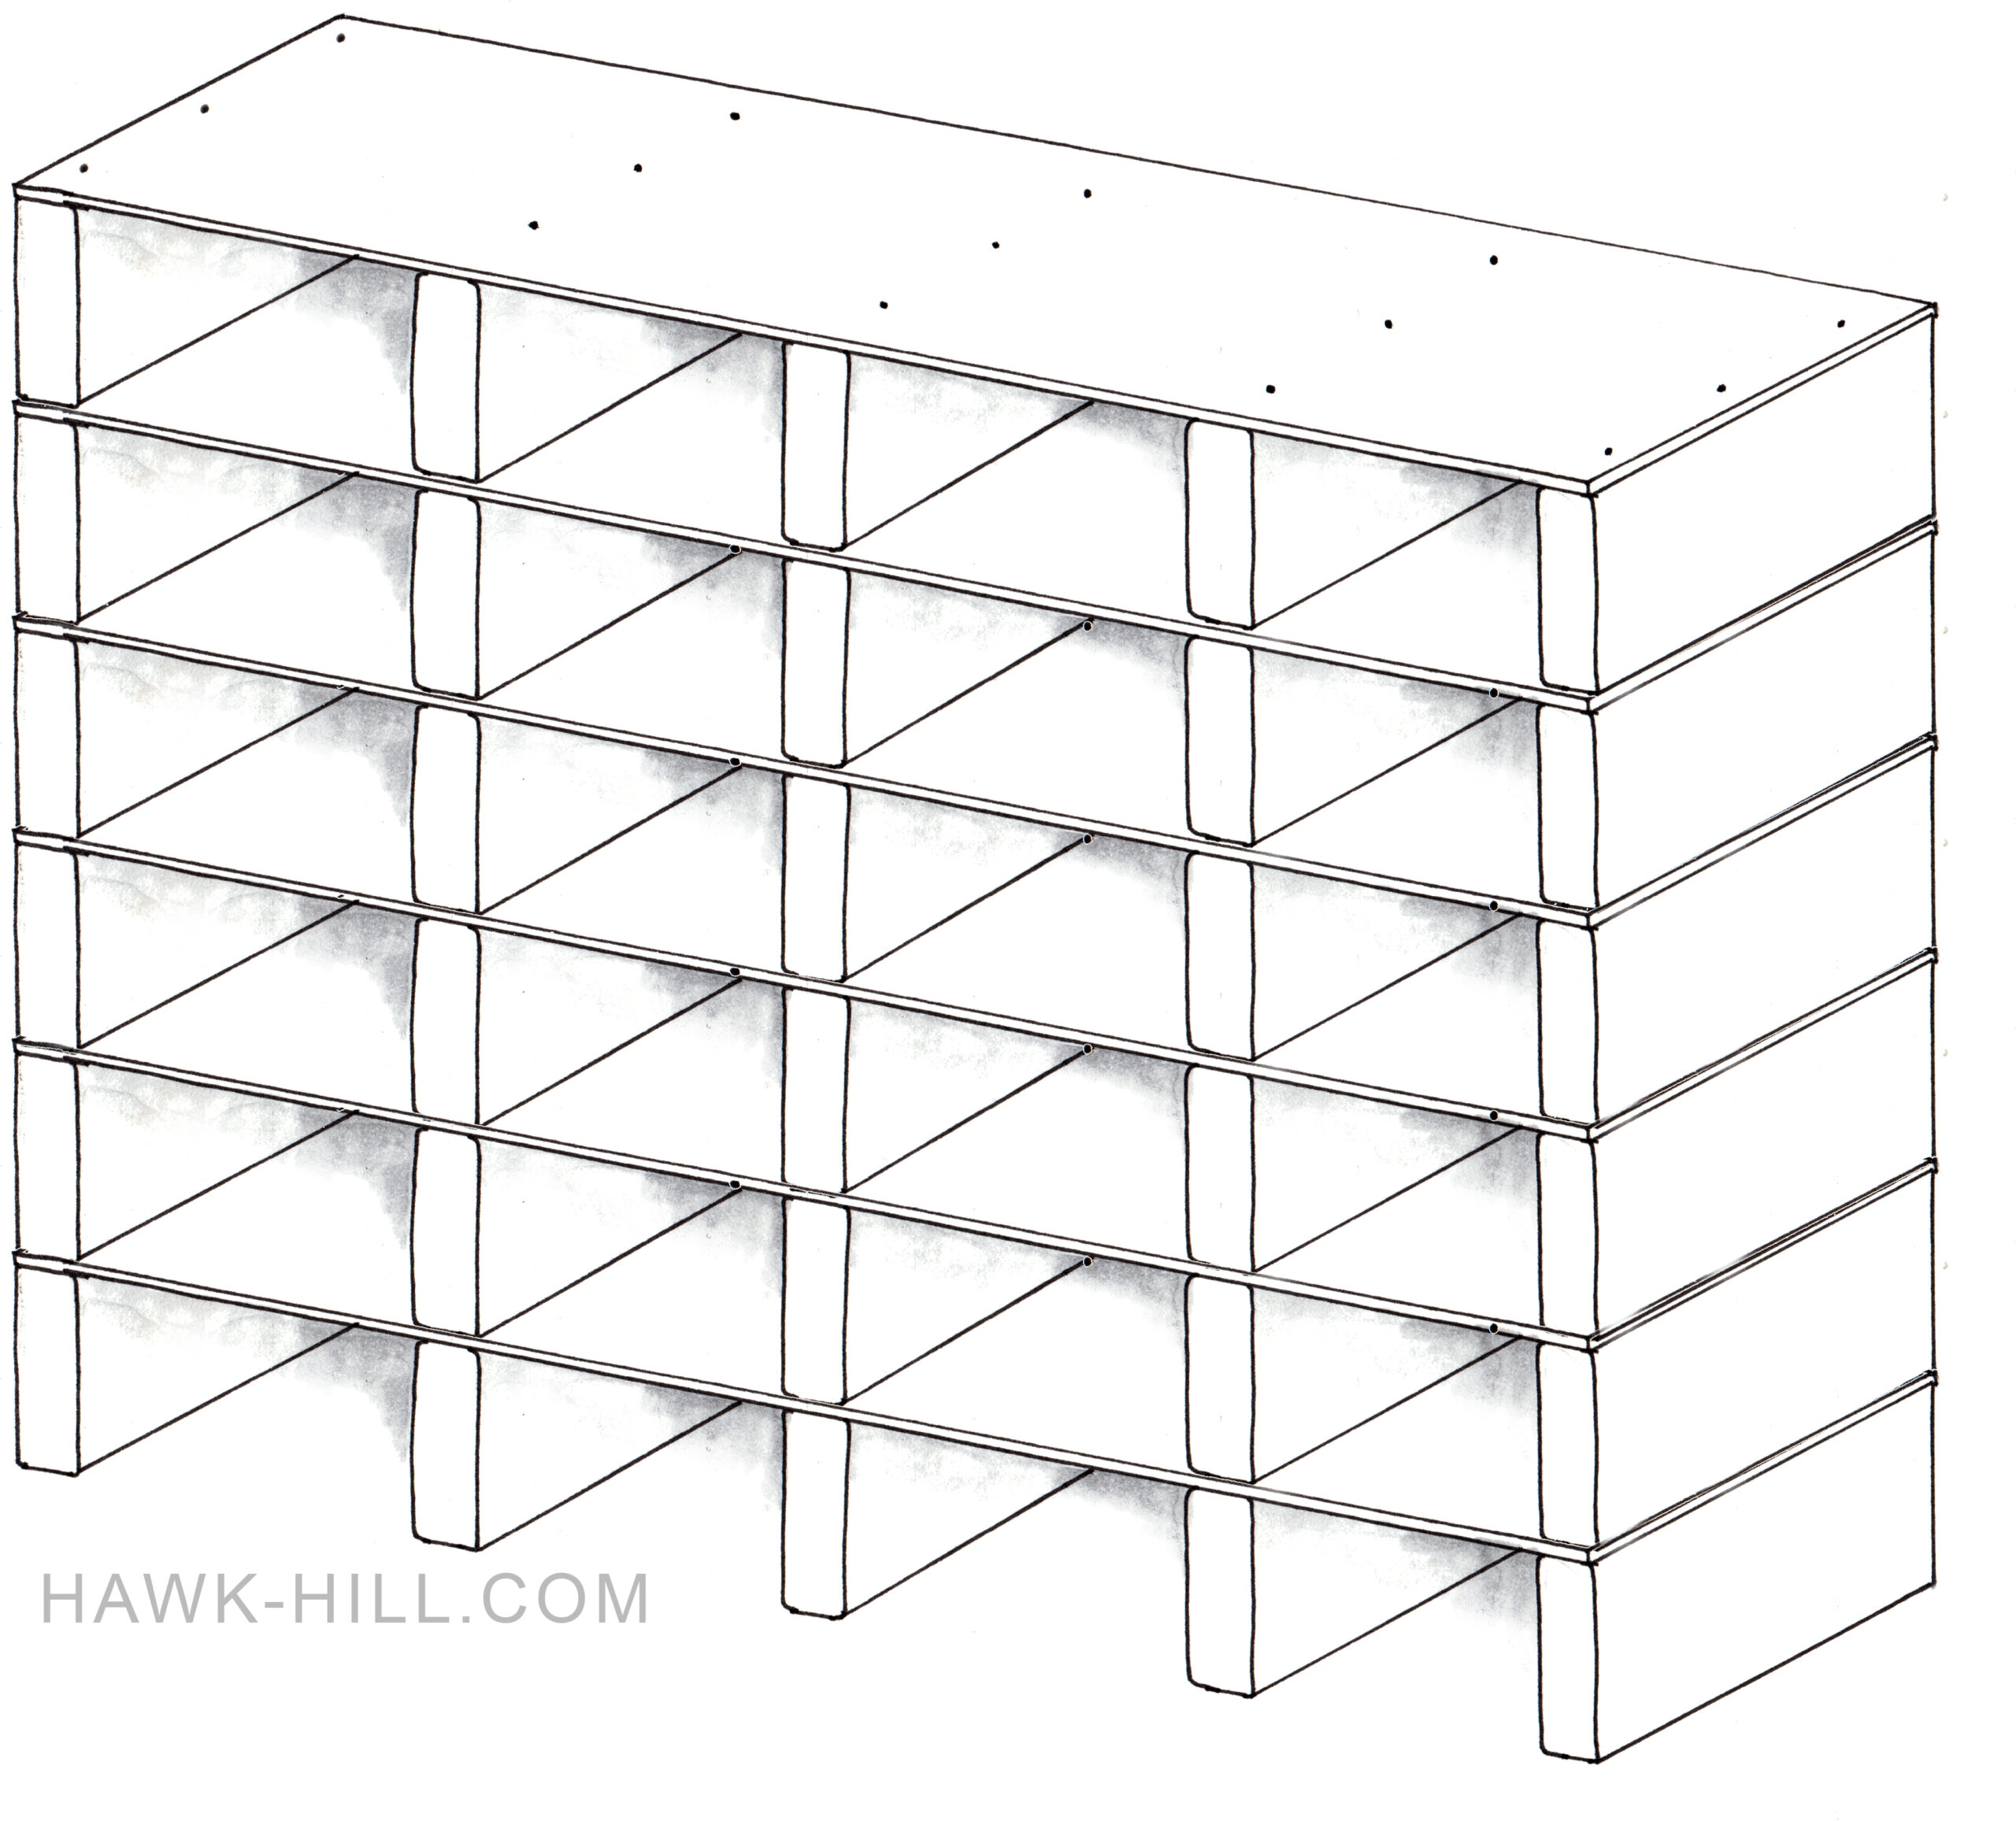
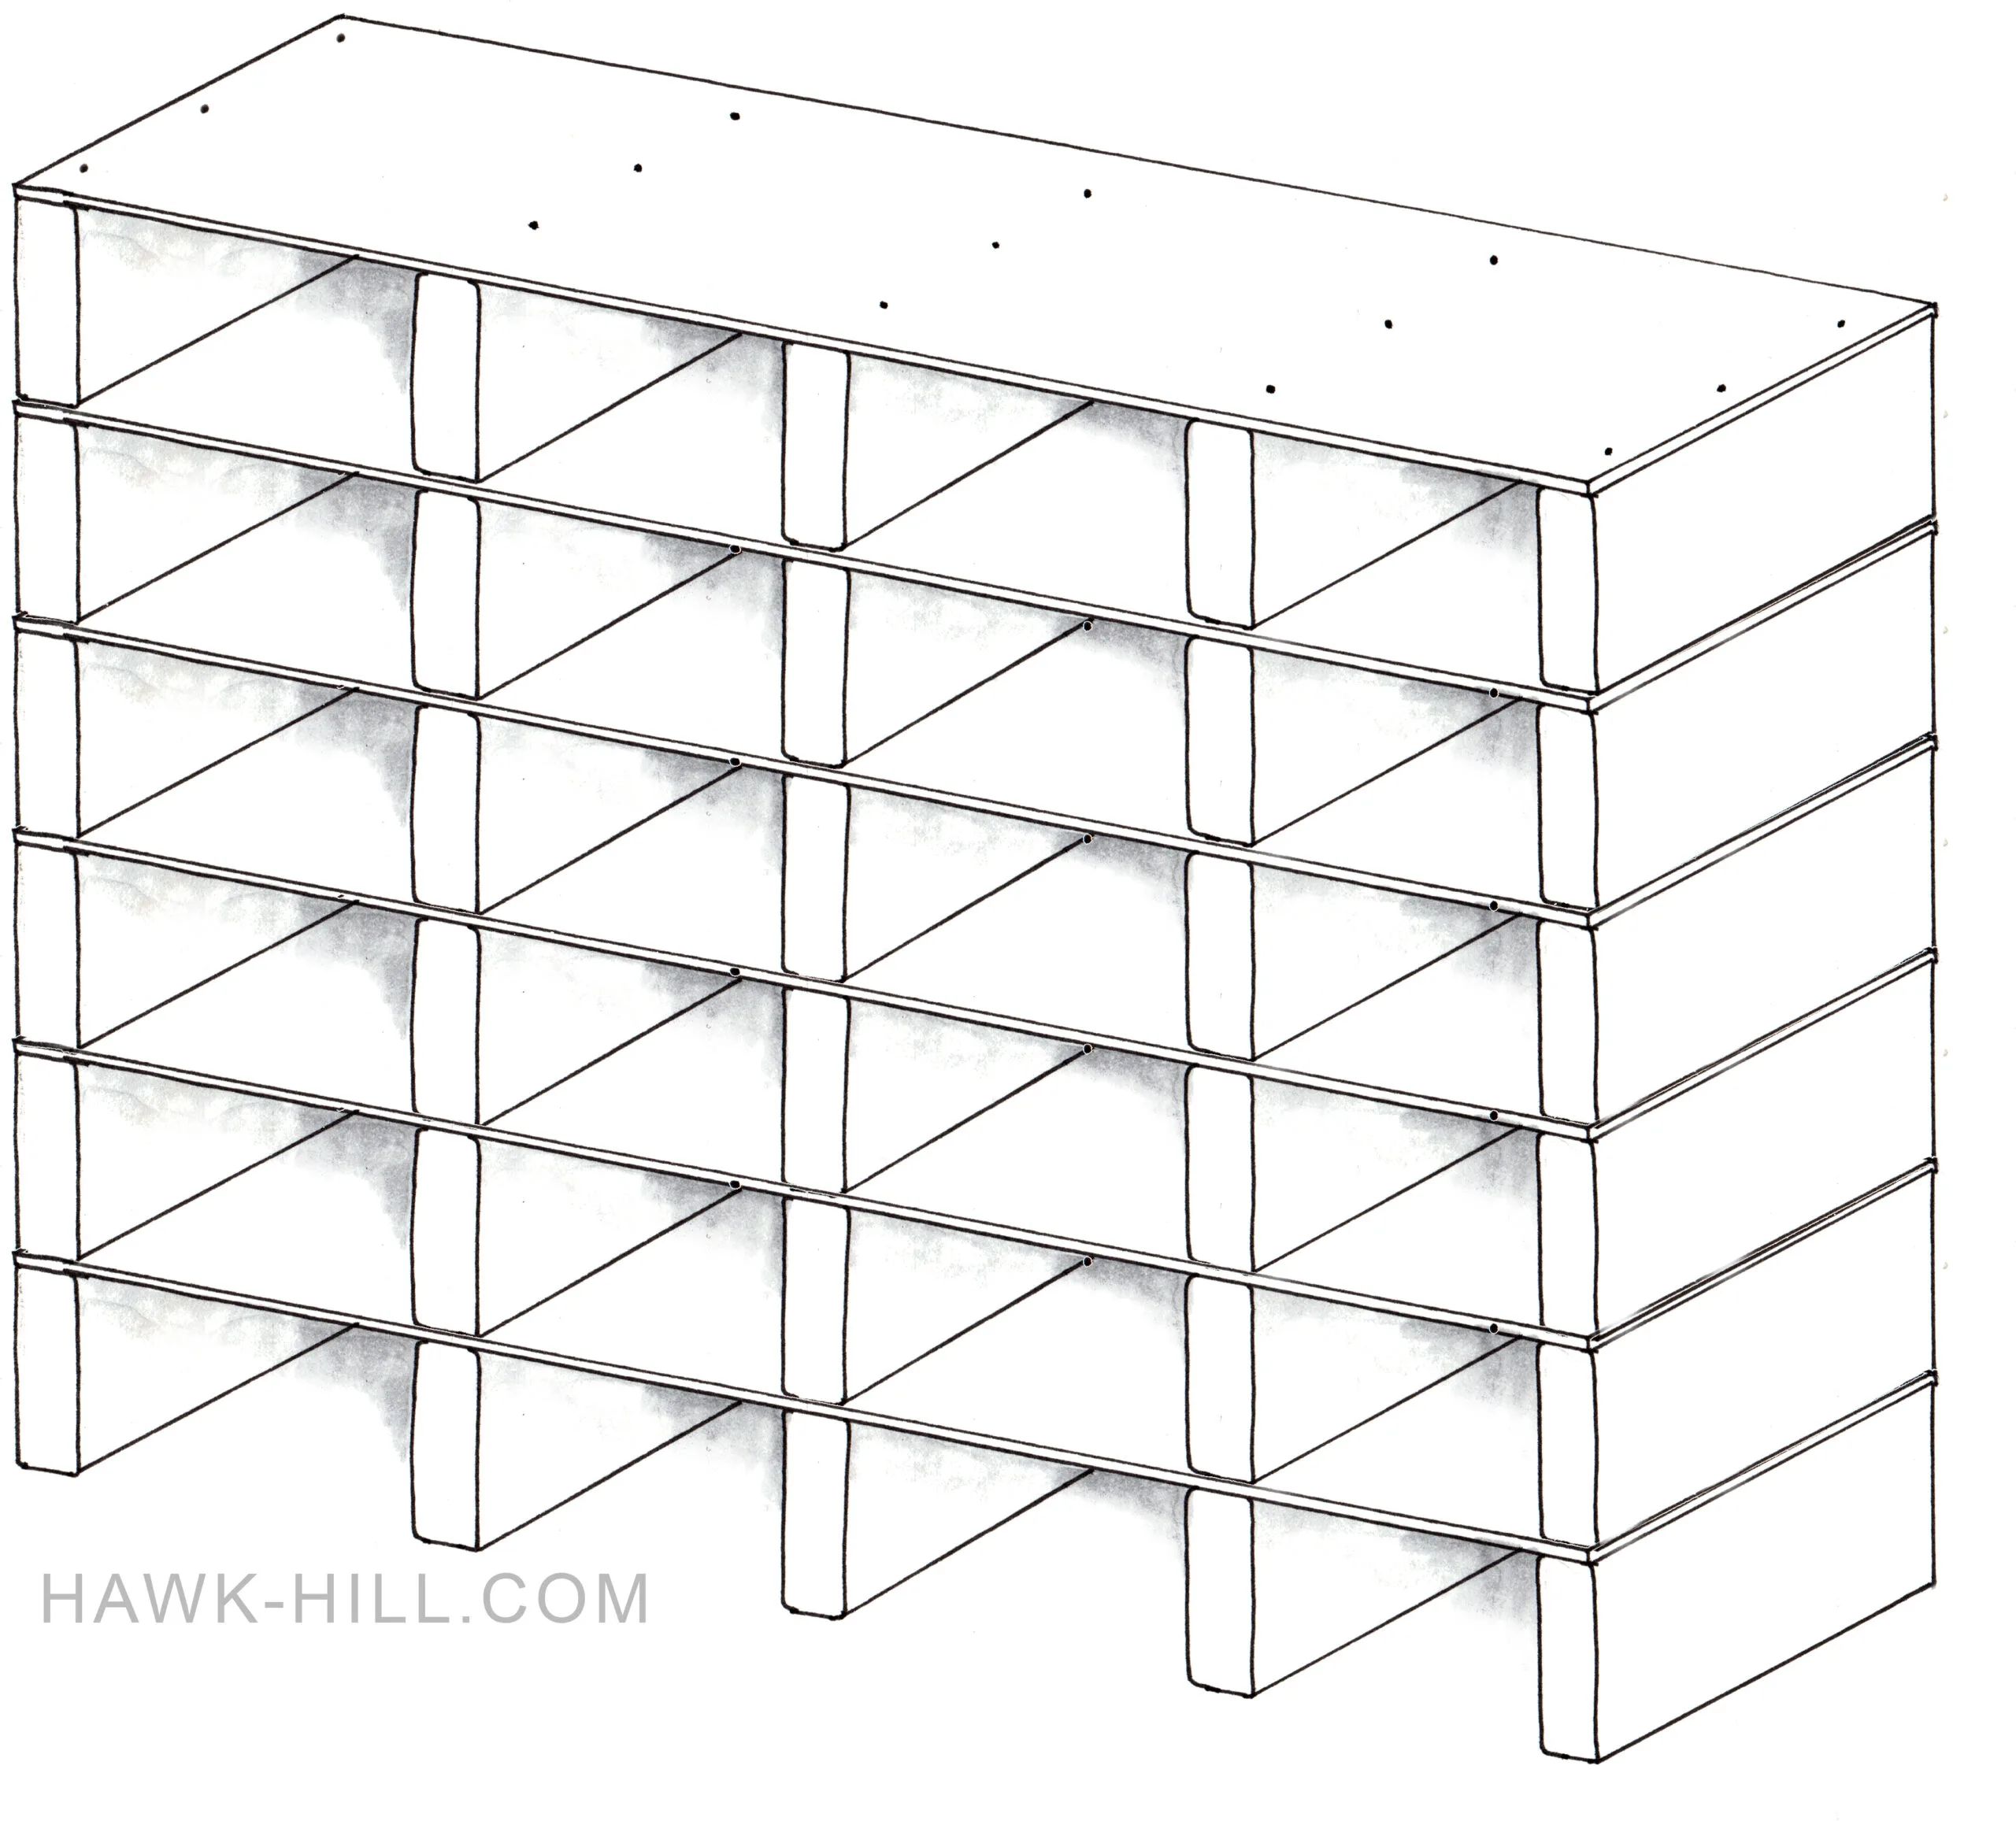
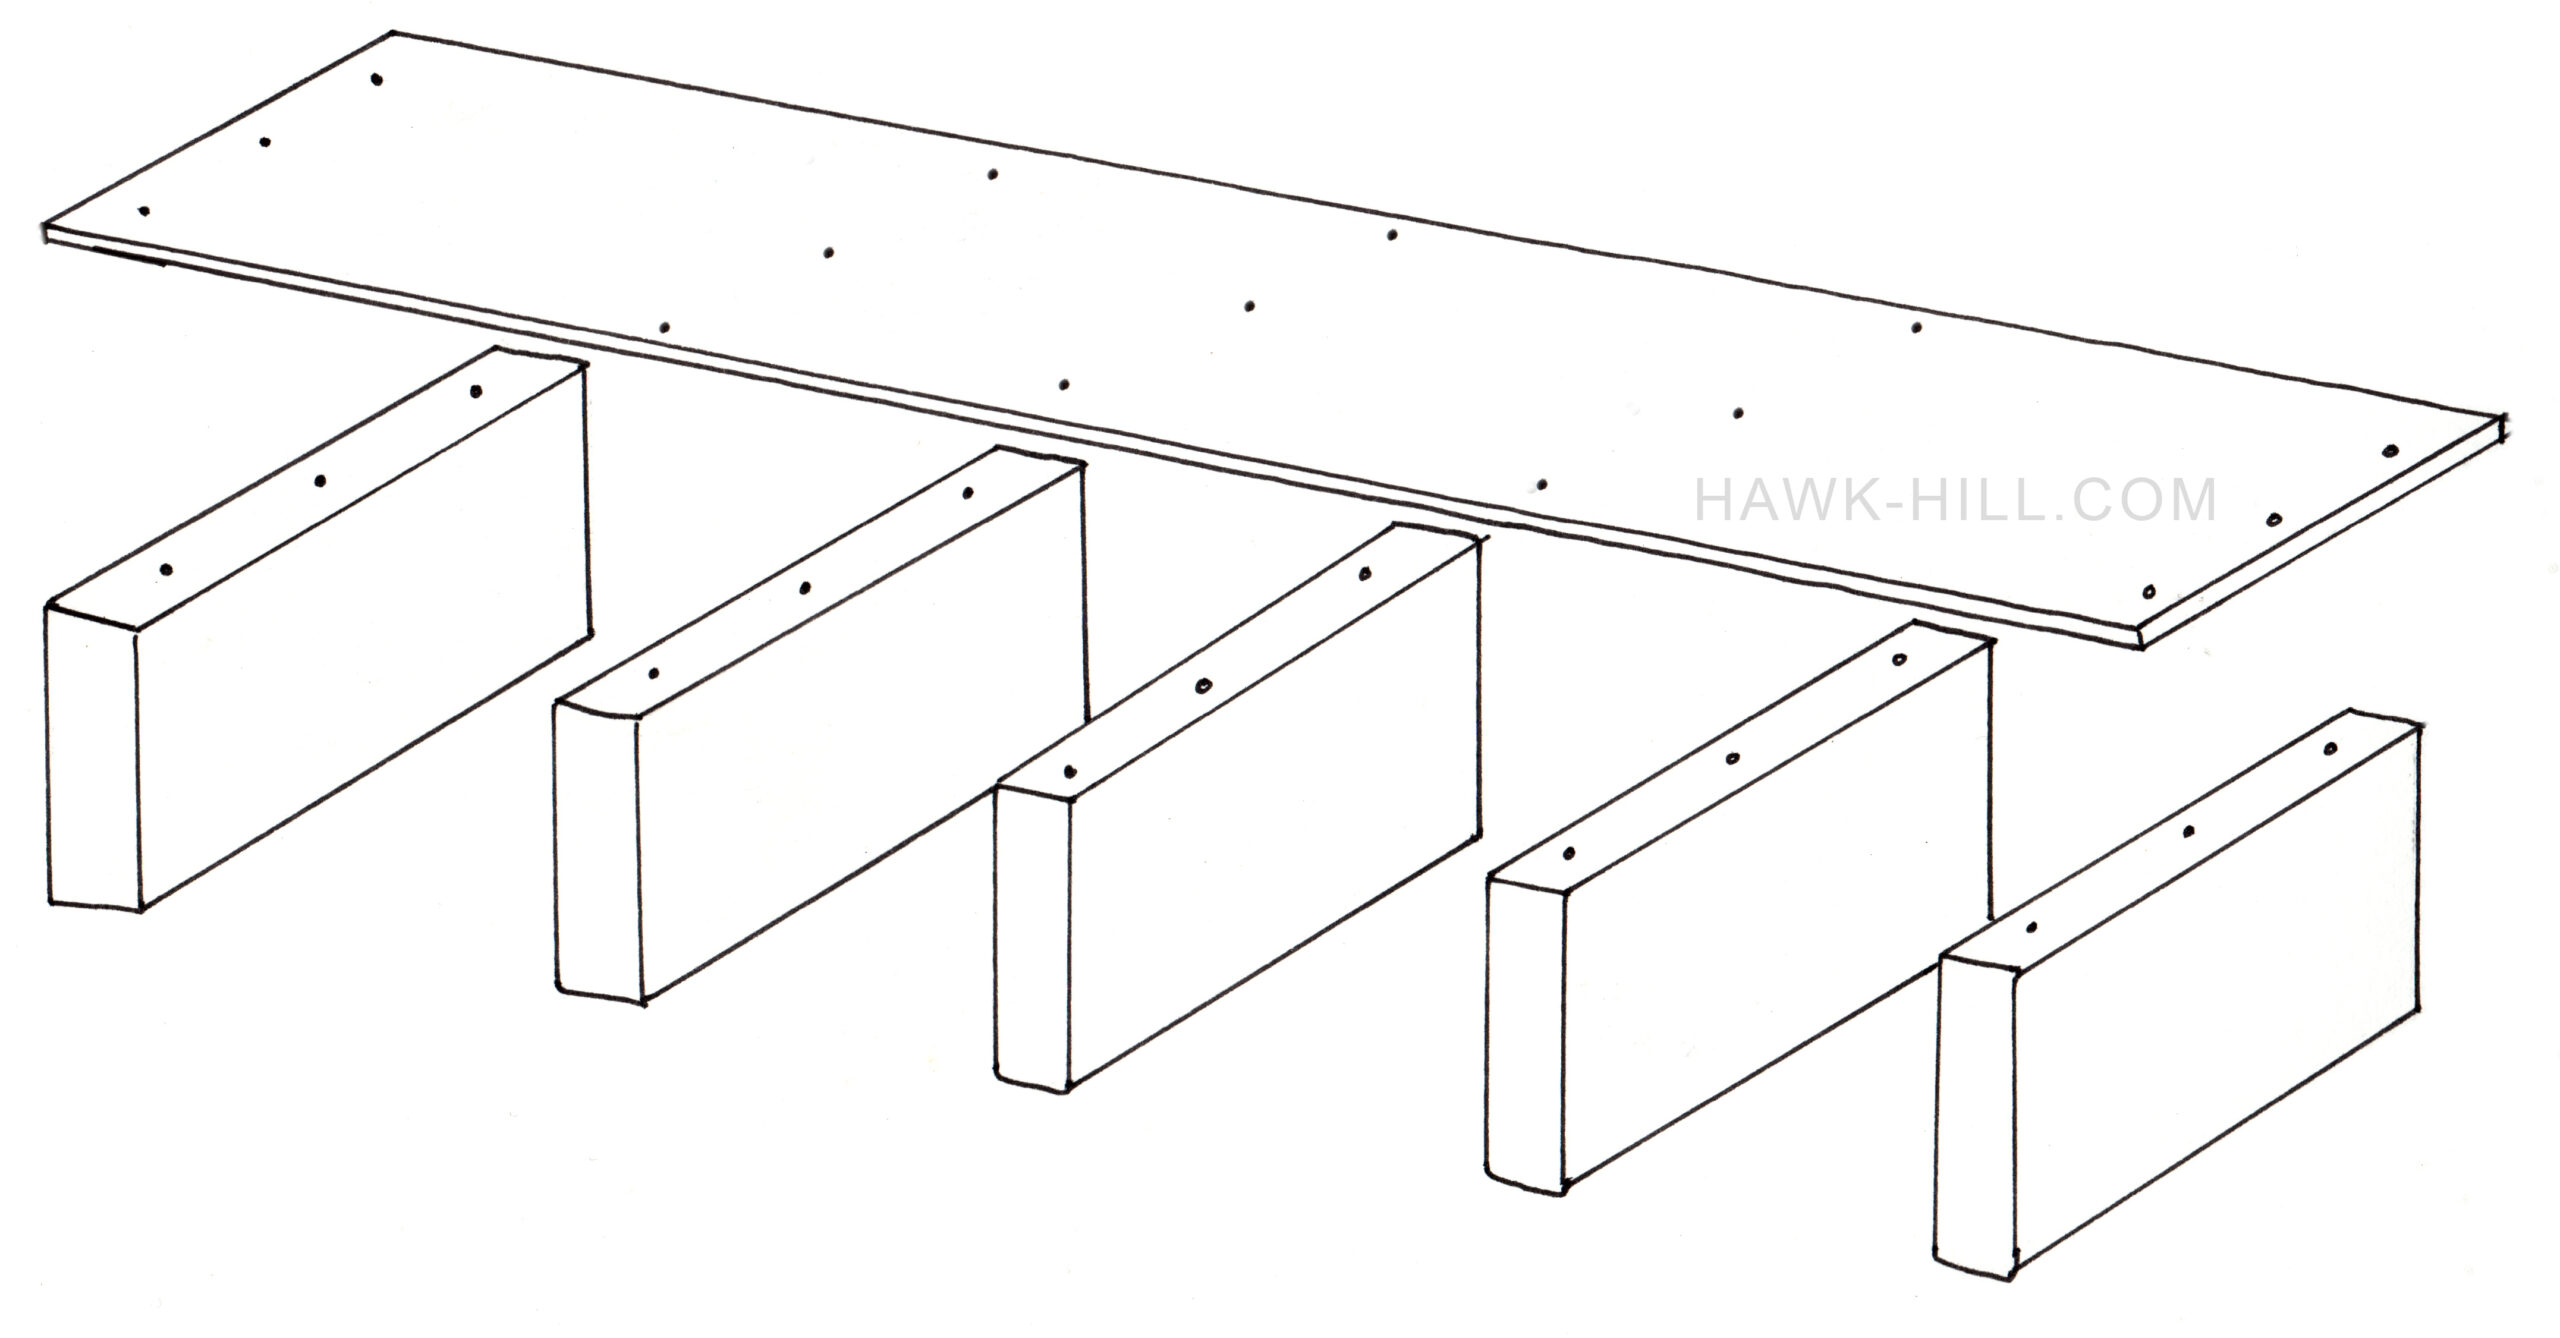
Build Each Shelf.
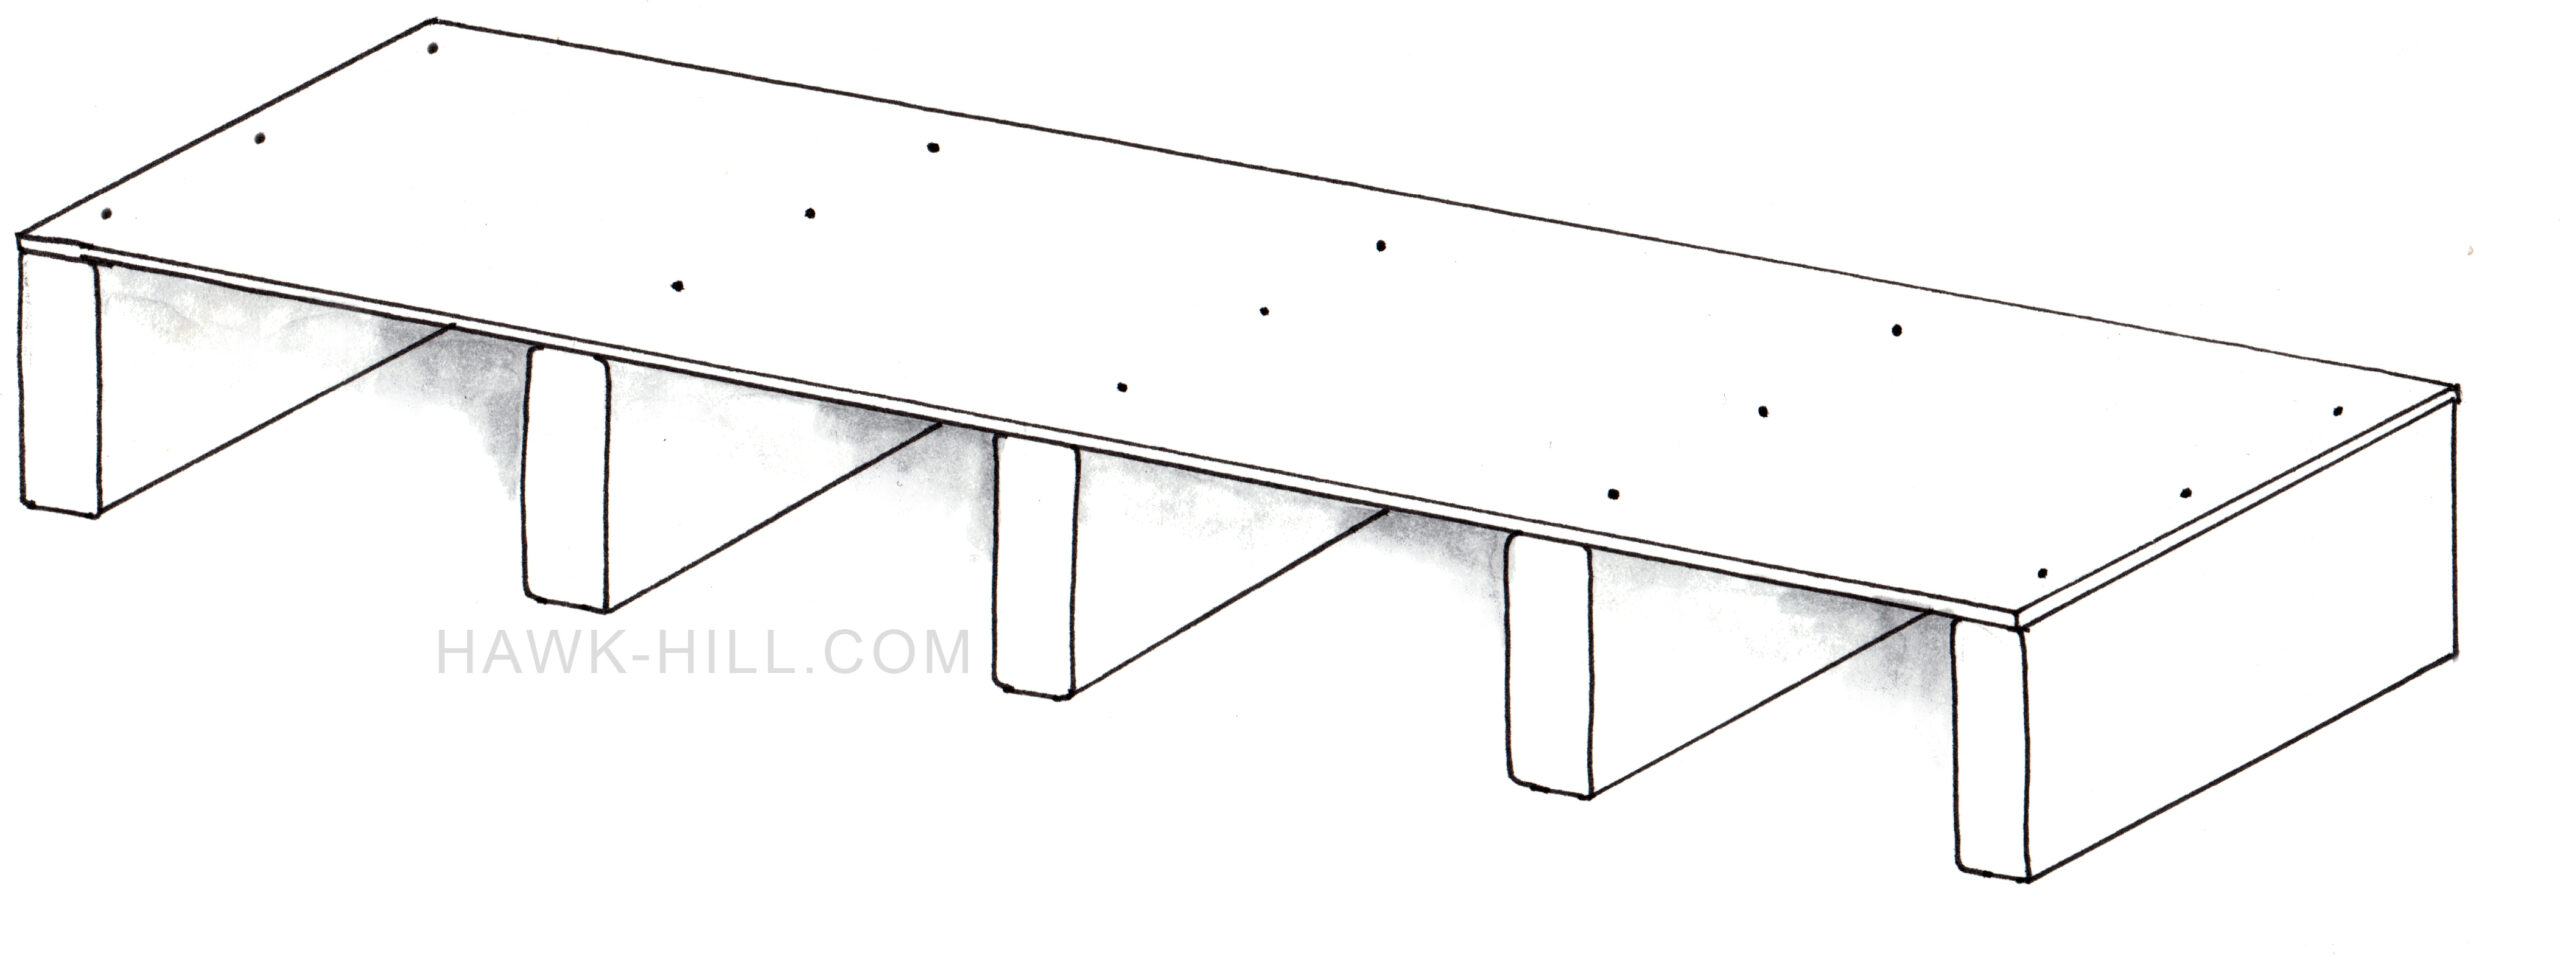
With your boards cut and painted, it’s time to measure and begin building.
Mark each plywood strip exactly where the support beam should be placed. I use one scrap-strip of plywood as a template I an use like a ruler to mark all of the other boards. Make sure each shelf has the support board placed in the exact same place. Support boards that are placed askew will make shelves as, wobble, and possibly even fall.
TIP: Don’t measure and mark boards progressively (i.e. using each completed shelf’s boards to mark the location of the support boards for the next shelf). After having built more than a dozen of these shelving units, I can tell you that usually ends up producing incrementally different placements that add up to a wobbly shelf!
Alternate supports and plywood, using exact measurements so each support beam is nailed or screwed directly over the support beam on the shelf beneath it.
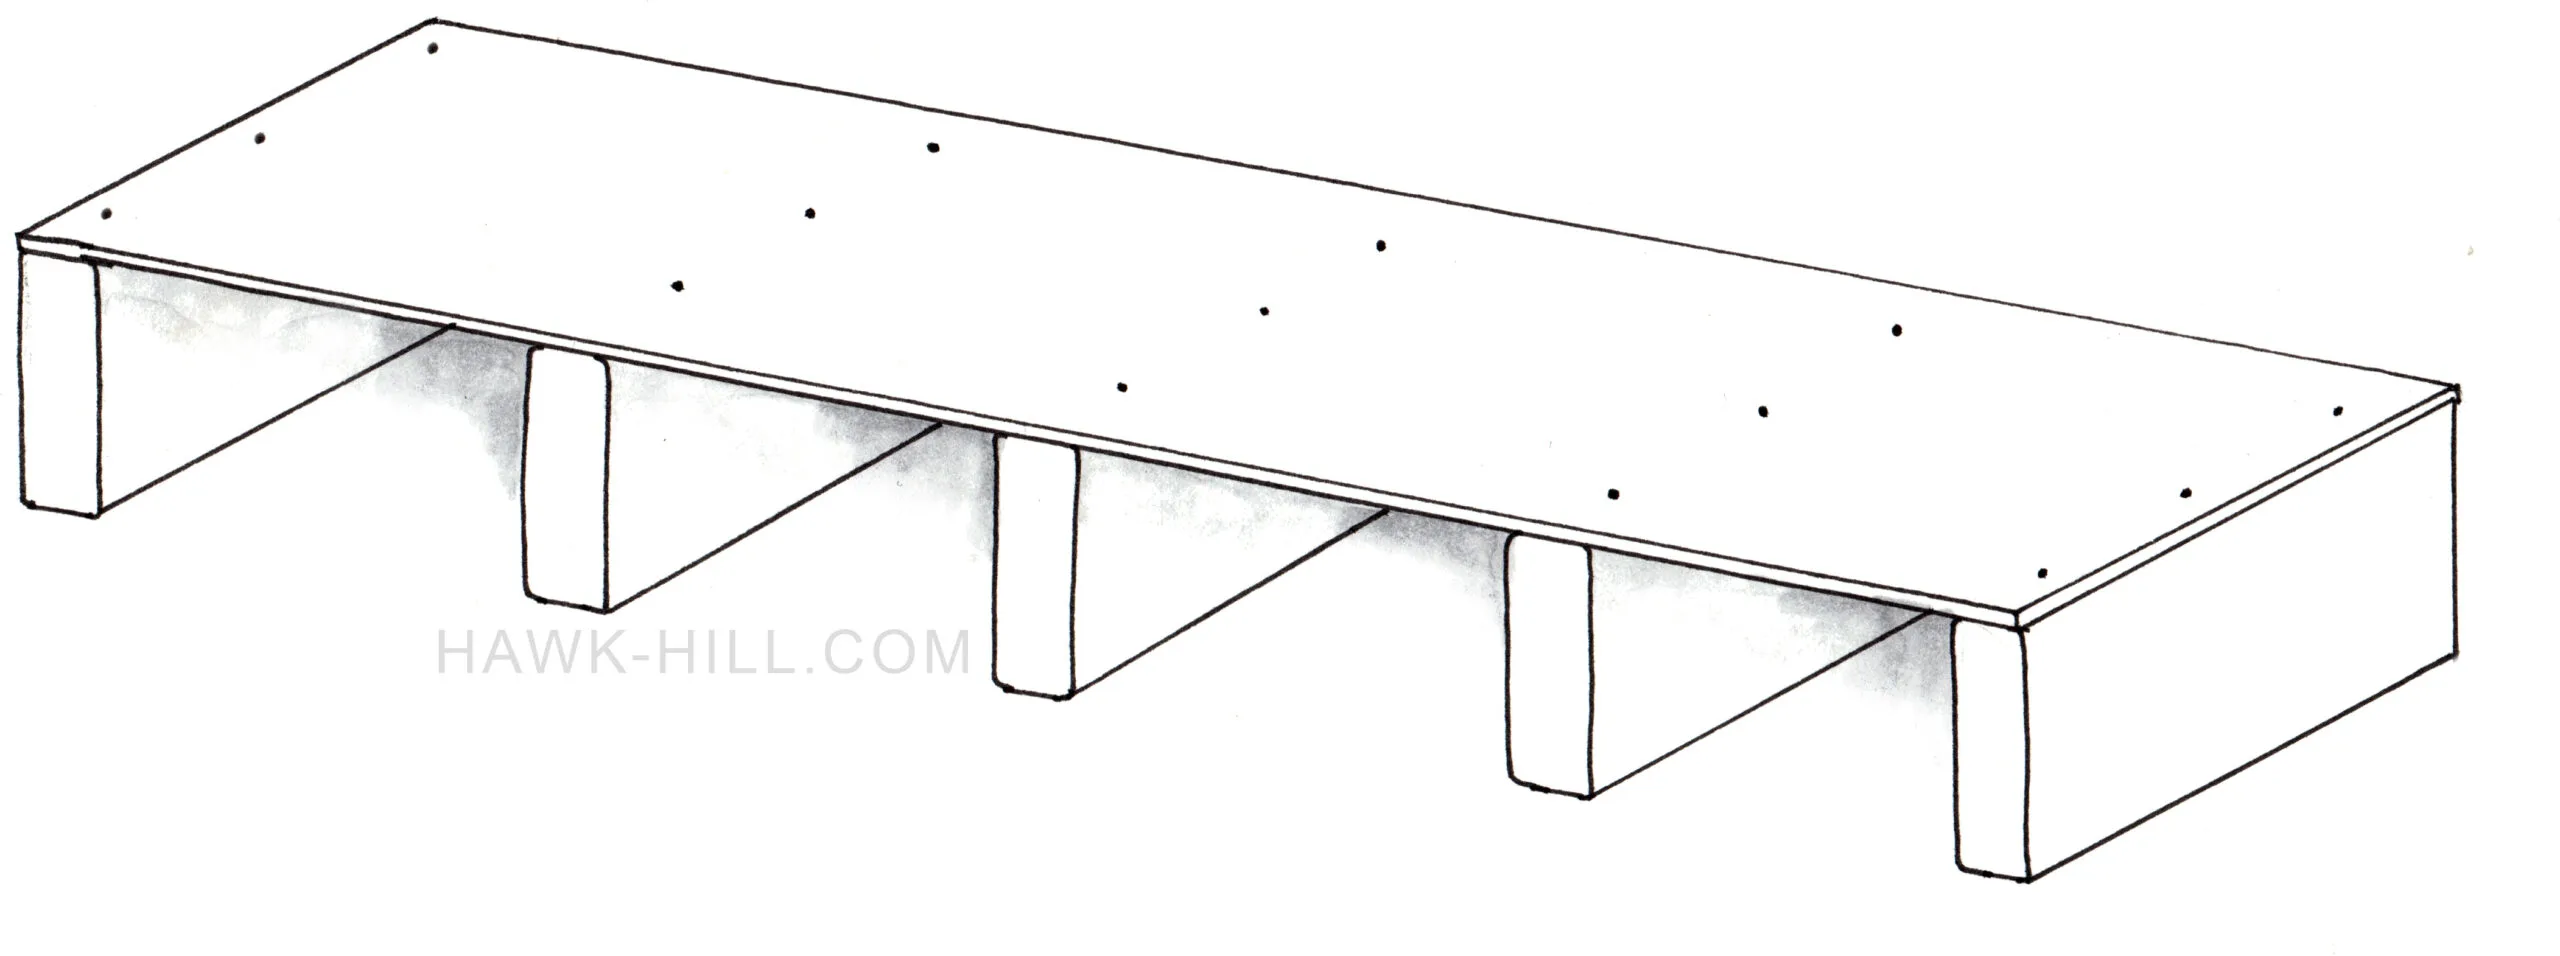
Stack Individual Shelves + Support
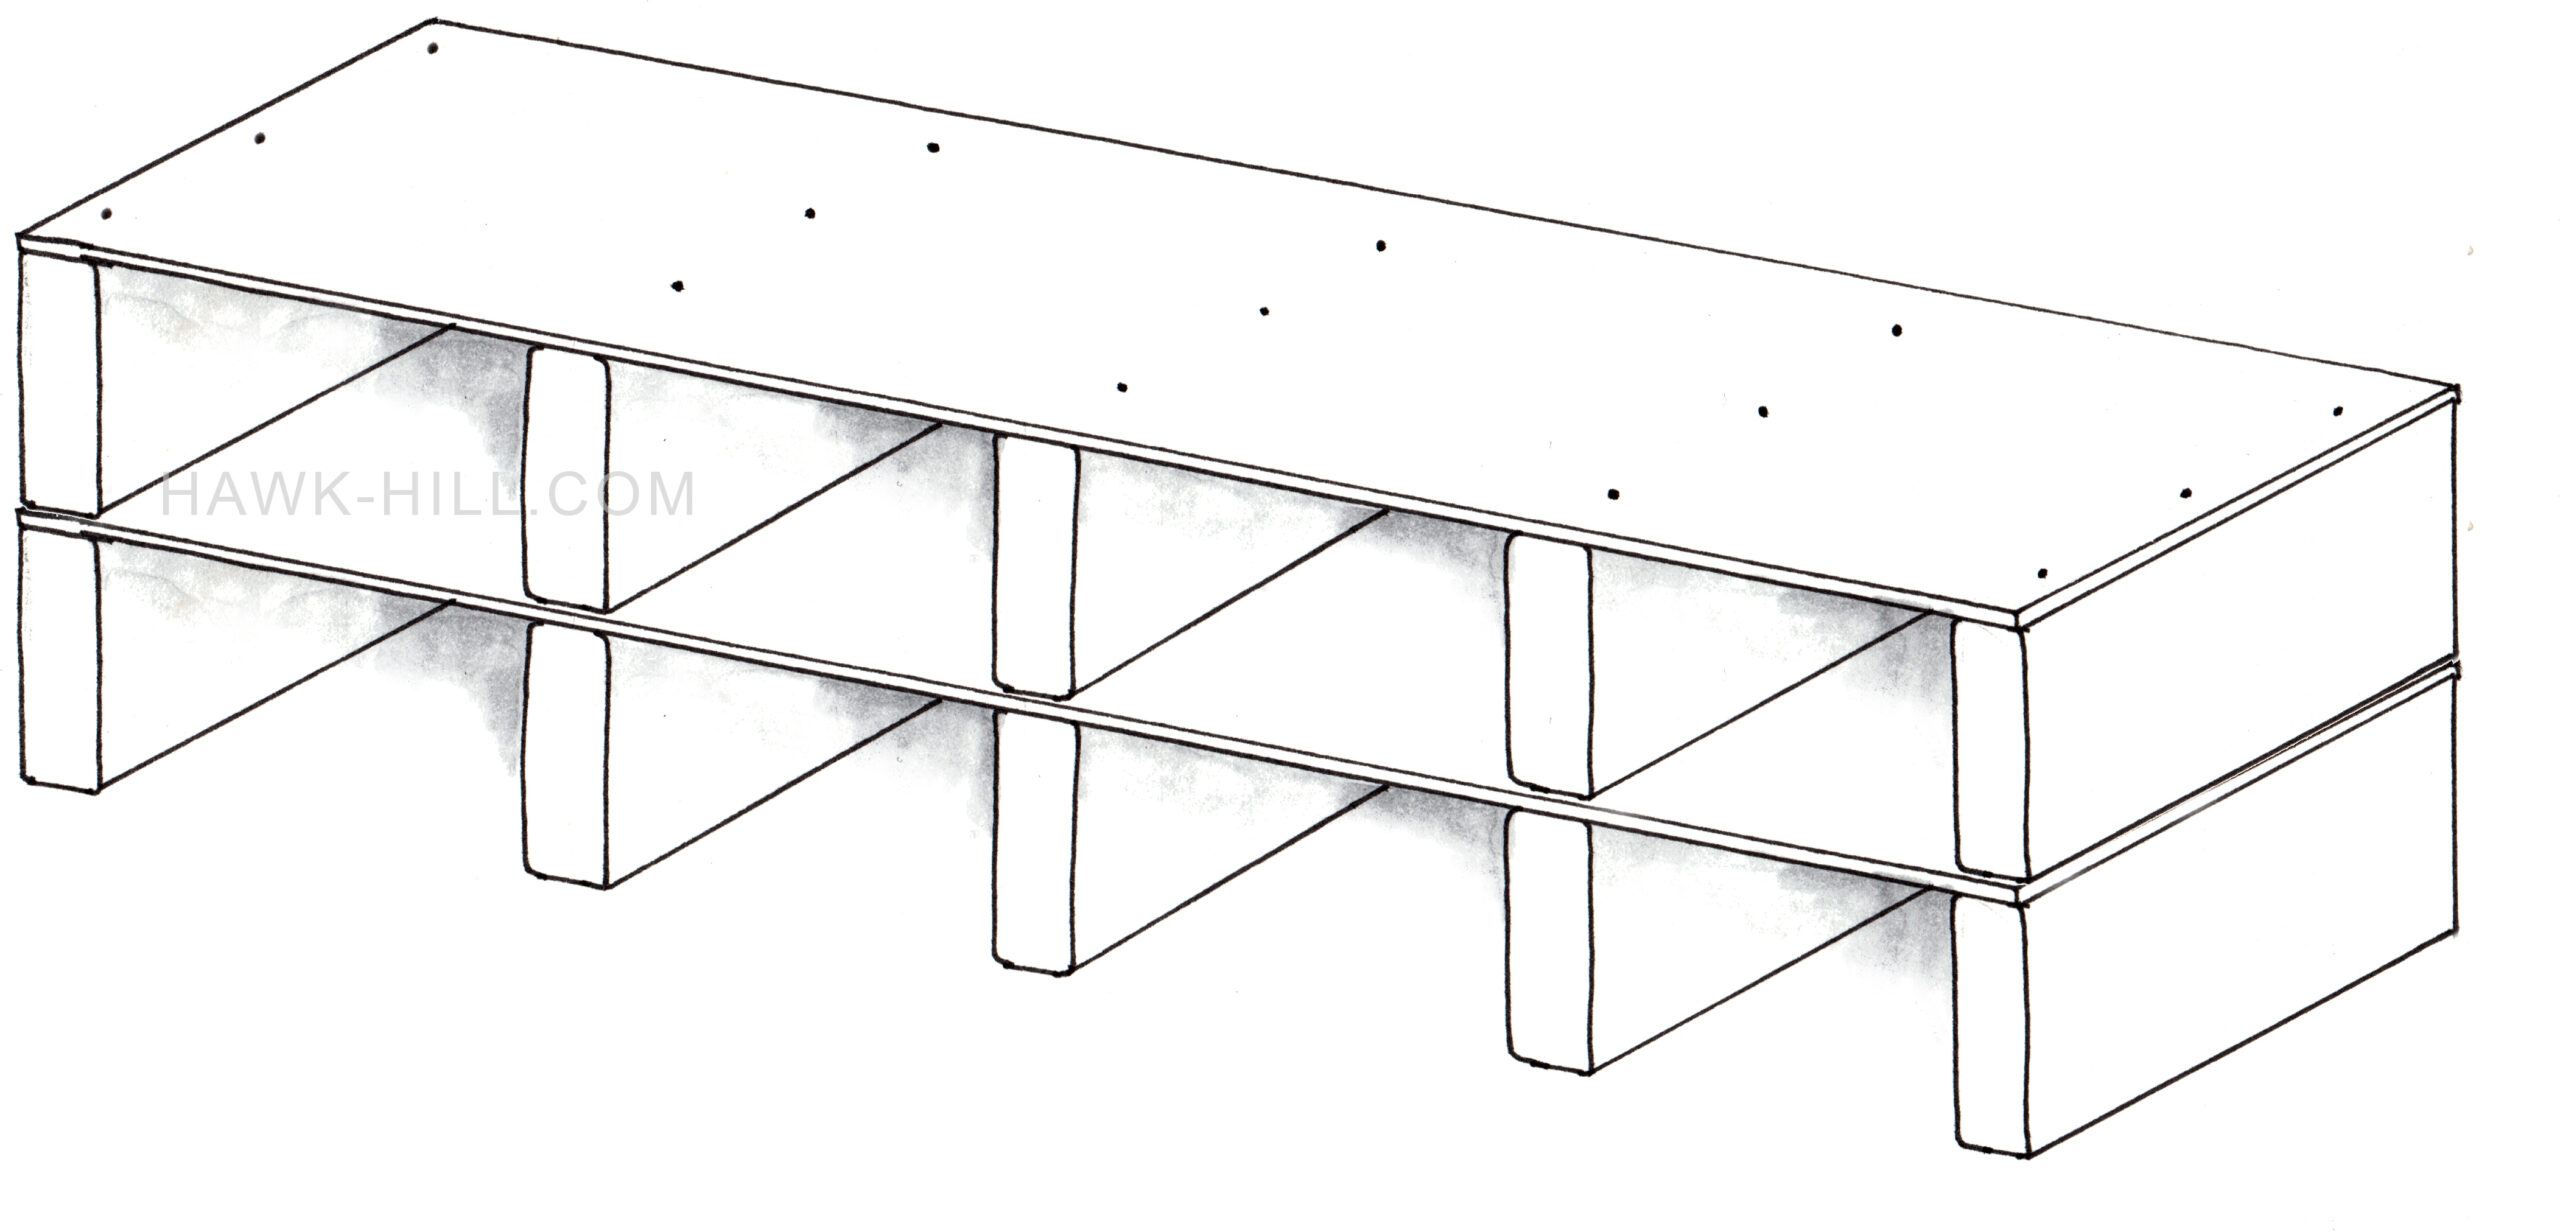
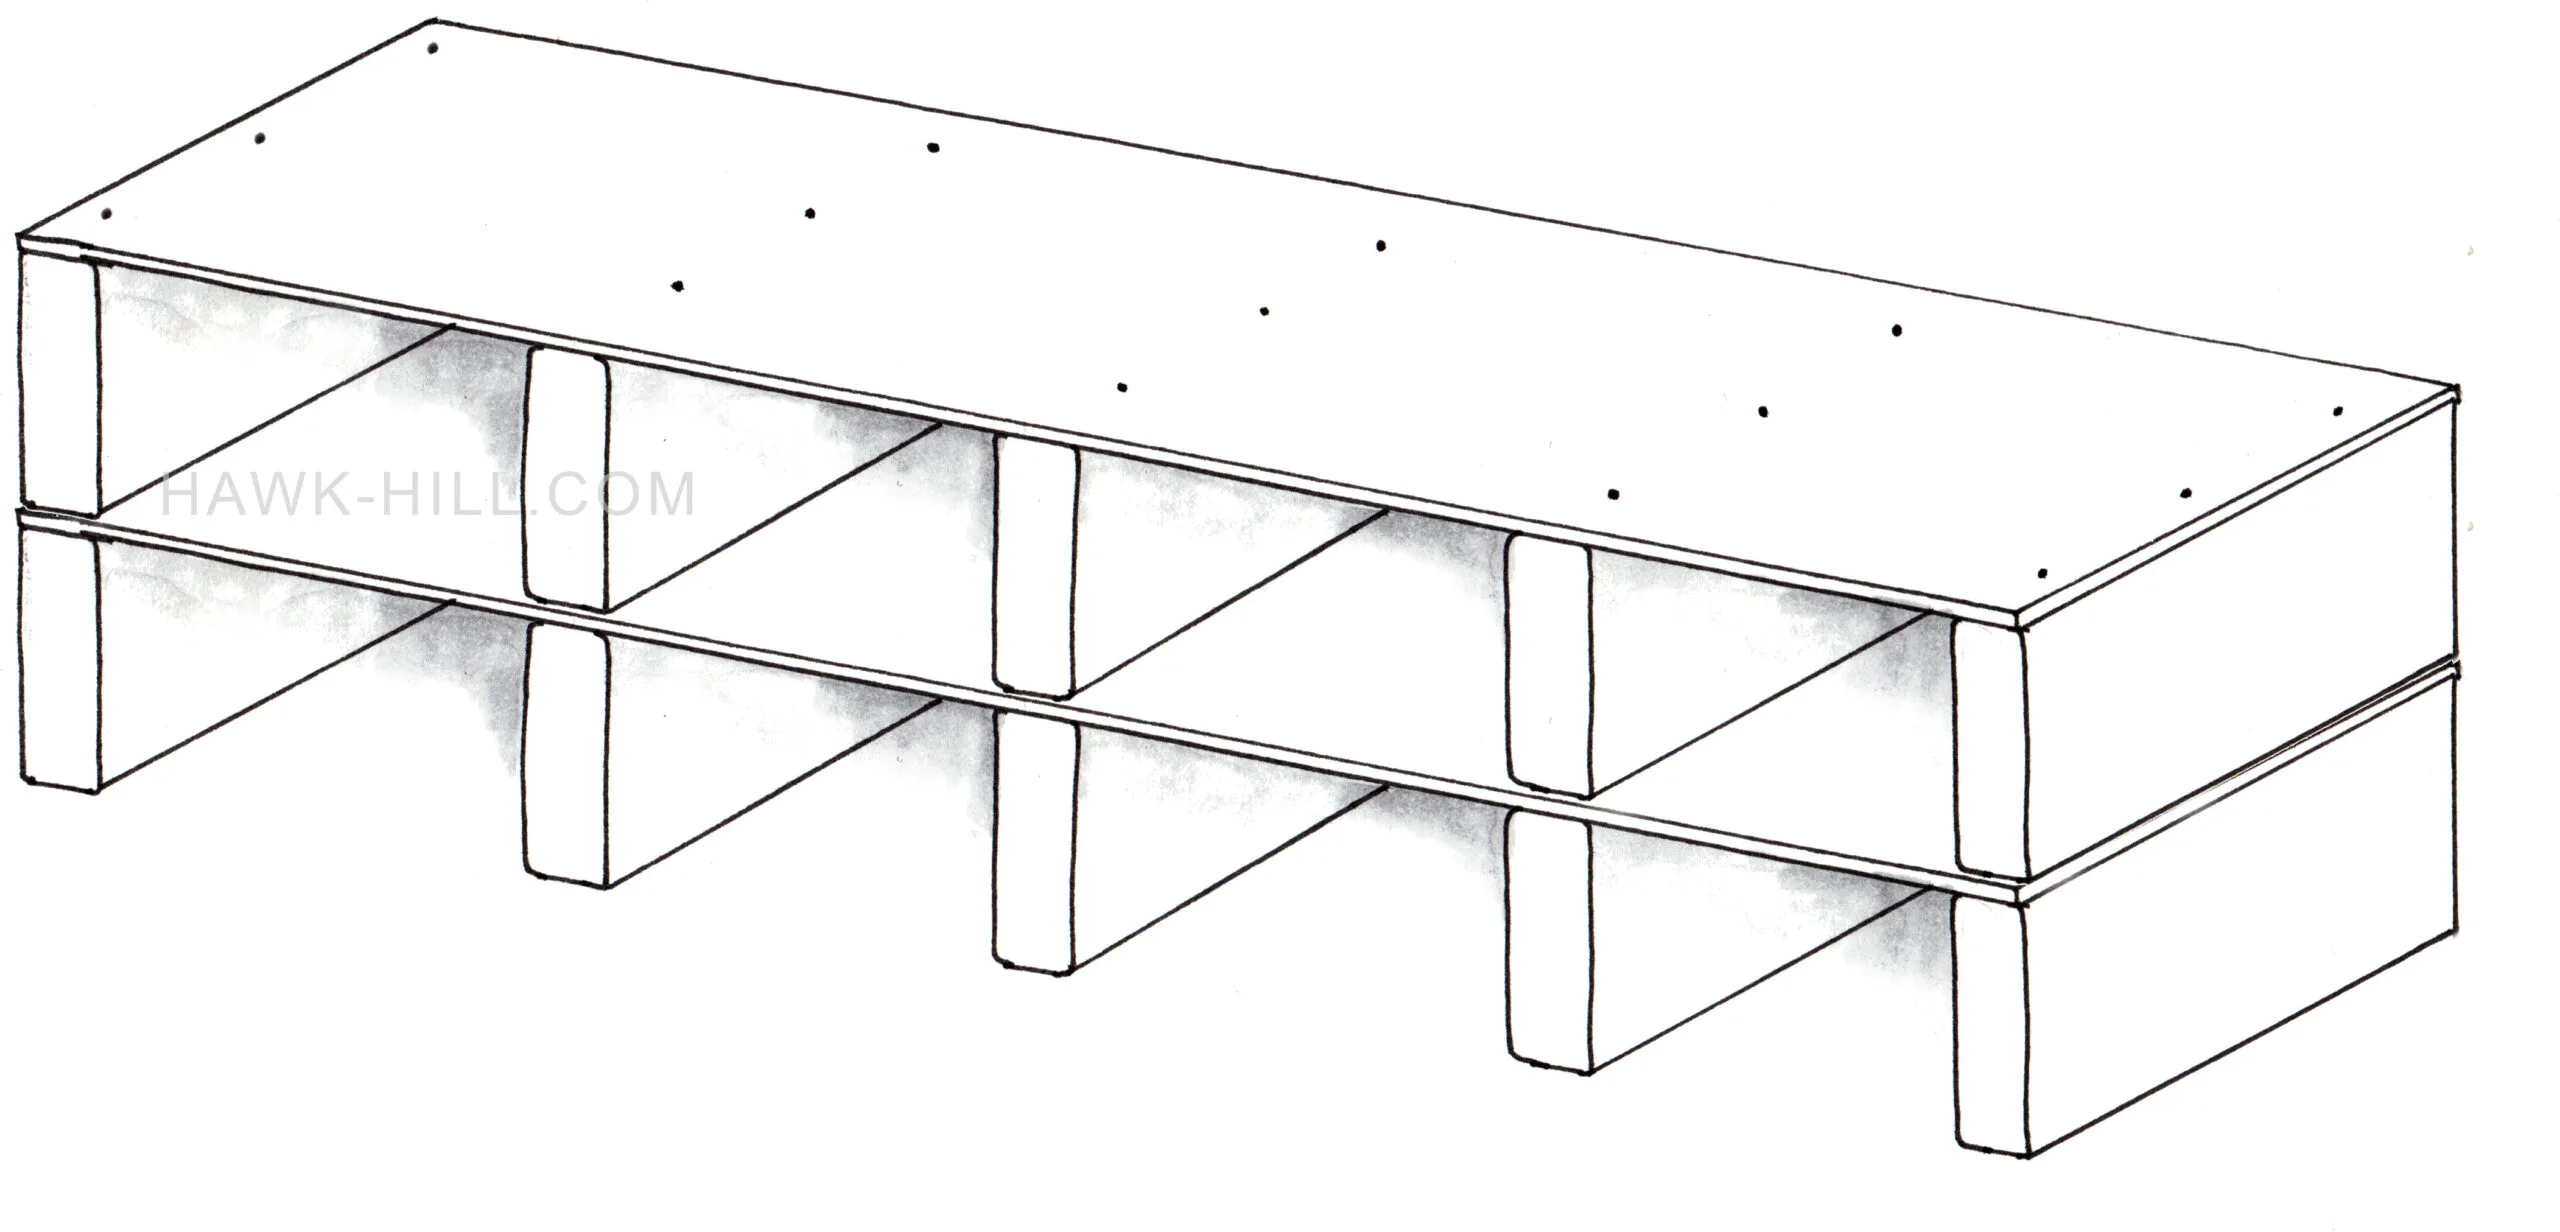
Place shelving units one on top of another and confirm the support boards line up.
Not included in my illustration: Add an additional board at each end, which extends the full height of the finished shelt. As you build, secure each layer of shelves to this stabilizing board.
Stack to Desired Height & Secure
Stack shelves until you’ve reached the top of the stabilizing boards on either end. Make sure each layer of the shelf is secured. Finally, add earthquake straps to secure the storage shelves to the wall and prevent tipping.
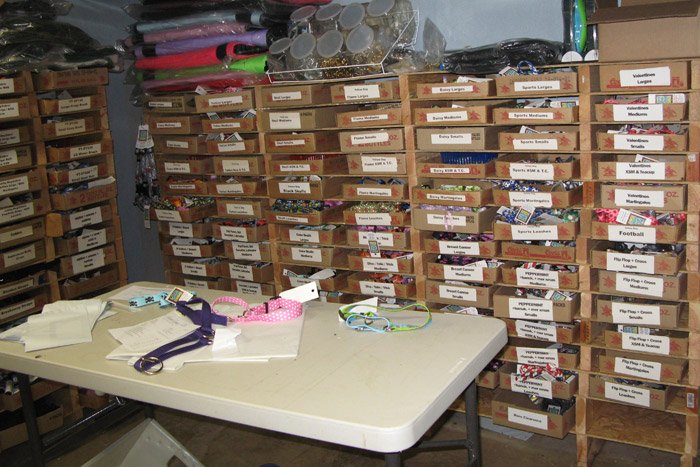
Small Business Storage Shelf Organization Tips:
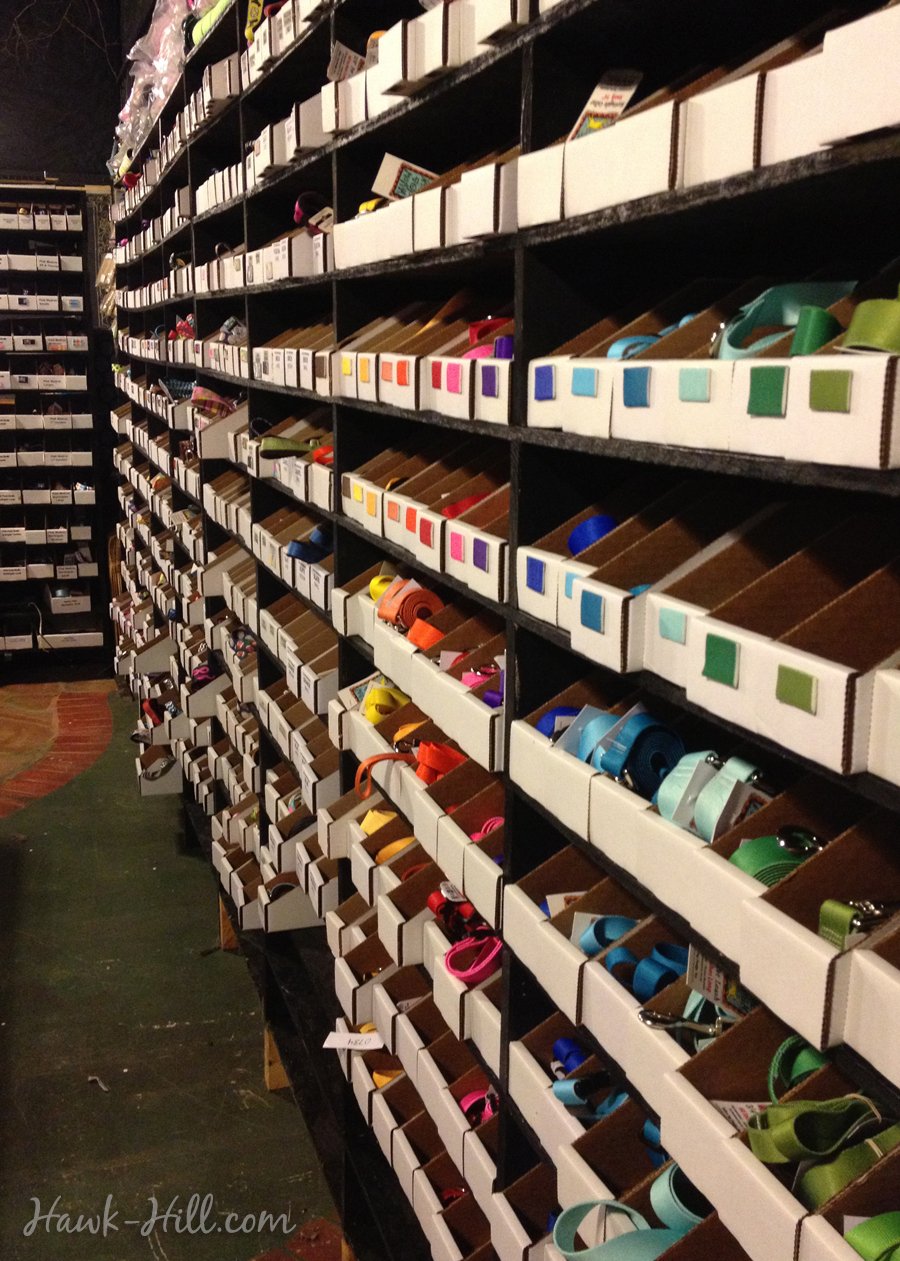
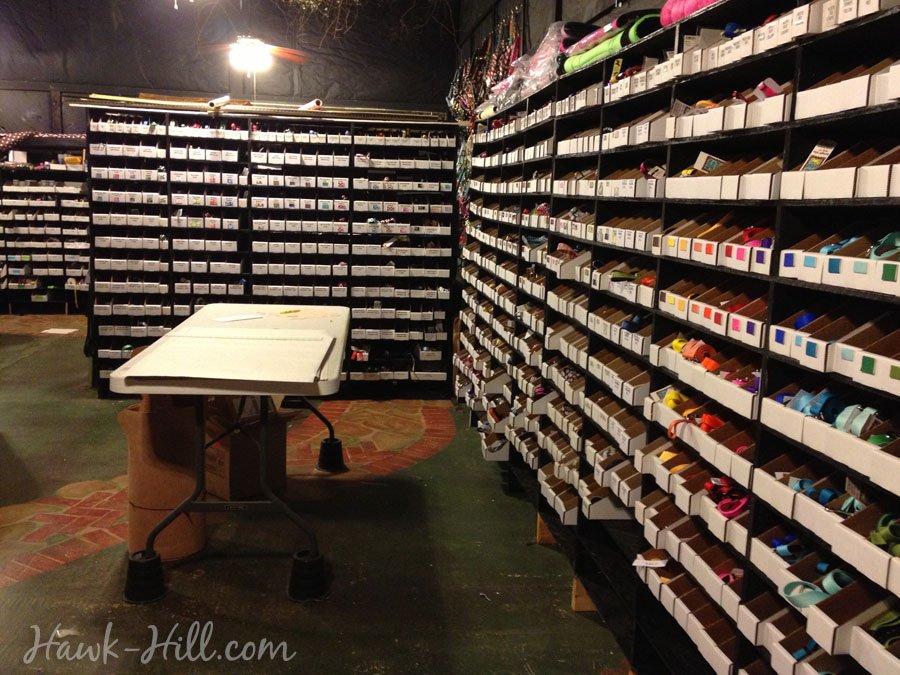
In the photo above you can see that we use a visual organization system rather than text labels. I learned over time that employees were less likely to miss-ship orders when shelves were labeled this way. When items were labeled with words rather than images, incorrect items were pulled from shelves more often.
Consistent organization plus visual labeling helped everyone find the right items quickly.
I organized these shelves by:
- Grouping similar products together. For example, all clothing was placed in one section, all hardware in another.
- Placing too-similar products distant from each other. If an item could easily be confused for another item, it was placed far away from that item. i.e. an American flag dog collar would be shelved in a different part of the warehouse than a “stars and stripes” pattern dog collar. Order-pickers developed a body-based memory, over time, that helped them pick the correct item even on autopilot.
- We always put Larges at the top, smalls at the bottom, and descending sizes in between.
- Visual Labels (such as a snippet of the pattern) on the box, instead of word tags.
For most of the time I owned this business, each time I hired a new employee I’d begin apologetically adding text labels to shelves. Inevitably, however, they’d memorize the geography of the warehouse before I’d finish!
If you build these shelves, drop a comment below or email a photo- I’d love to use your image, with your permission, to inspire more readers to consider ways these storage shelves could accommodate their storage needs on a budget.
These cheap storage shelves are easy to scale down for tucking away a yarn stash with an extreme level of organization or scale up to build cheap storage for an entire warehouse, like pictured here.

Worth noting: this style of building cheap storage shelves is highly variable. When storing heavy products (hardware, metal parts, etc) you’ll need many more supports and/or thicker plywood than if you plan to only store light-weight items.
The following section may contain affiliate links. As an Amazon Associate, we earn from qualifying purchases.
Bin Boxes for Organizing Storage Shelves

Built with 1×6’s, painted, trimmed, and with white bin boxes added, these shelves can be elevated to a retail-grade display.
The boxes in these photos are called “open front bin boxes” and they are incredible for organizing small items! You can get them at Amazon or through PackagingSupplies.com
These shelves helped provide cheap storage while my previous retail business grew from a fledgling side business -when looks didn’t matter- to a larger retail business in its own brick-and-mortar shop. At the latter location, we dressed these shelves up by adding spacer boards, trim to the top, and painting them to match the wall color. Trim and paint really helped these shelves look like they were professional built-in shelving.
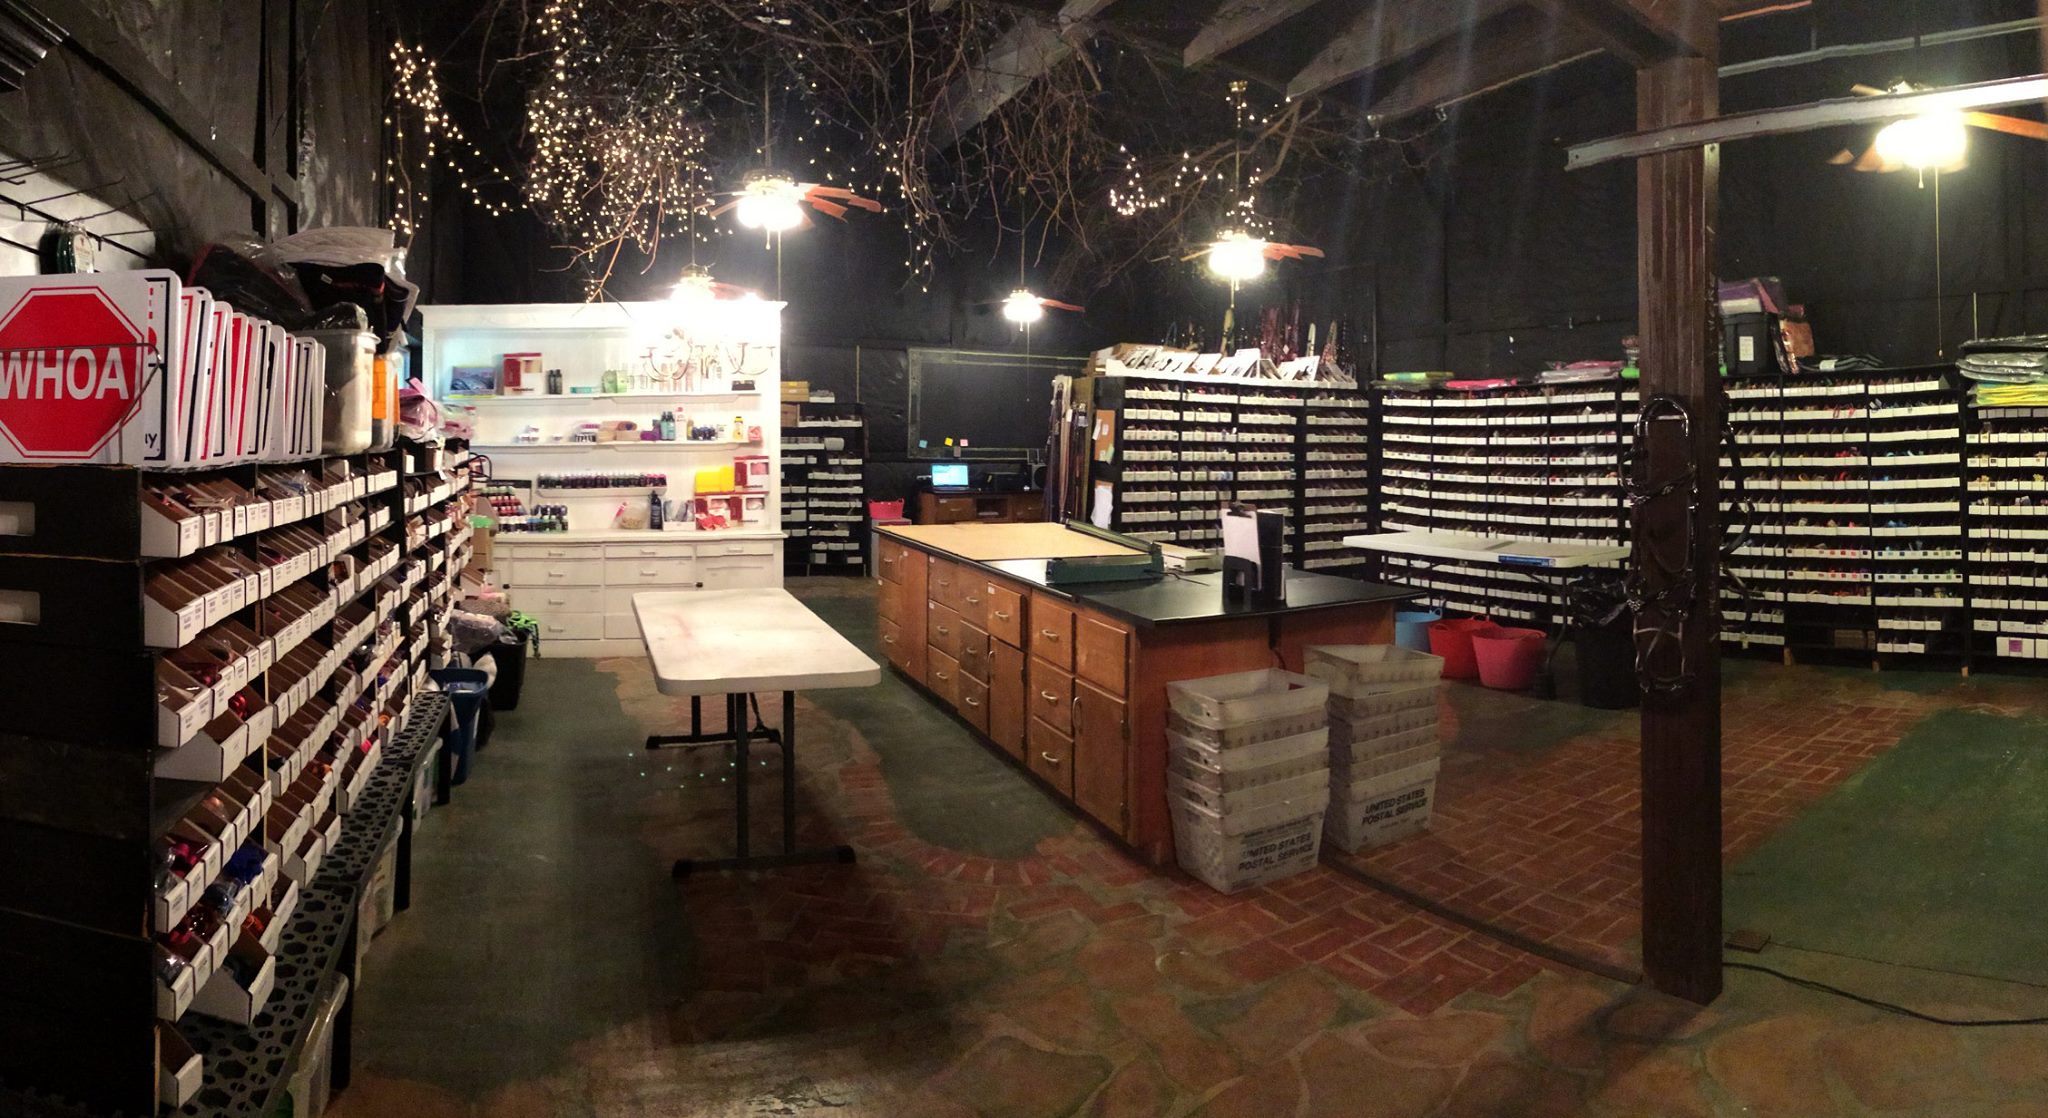
In the photos of the black shelving, you’ll notice we switched from recycling-bin scavenged “beer flats” to white bin boxes. Initially a not-small investment for the thousands of boxes shown in this picture, we were really pleased with the professional look of the black shelves and white boxes.
Additionally, the corrugated bin boxes ended up being much more durable than the beer flats we initially used. When pulling parts or inventory for orders, it’s natural to pull the box by the front lip. For drink flats this often meant the front lip broke on popular or particularly heavy items within weeks, but with the bin boxes there’s more reinforcement on a narrower section of the box, so the bin boxes look newer, longer. In fact, in the 3 or 4 years, we used bin boxes, I can only think of a few occasions when a bin box needed to be replaced.
TIP: It’s helpful to decide what kind of boxes you will use BEFORE you build your storage shelves. You can use the boxes as guides to help you determine where to place supports. Remember to add more supports (for example, every 12 inches instead of every 24 inches) if the items you will be storing are heavy.
How I Learned to Build Storage Shelves
25-odd years ago, I was a mostly feral child playing in the fields behind our home in Kansas while my parents were running a small mail-order business out of a small outbuilding on the property. With hundreds of small products to stock, my father devised a cheap way to build storage shelves designed for highly compact, highly organized storage.
Although the original form of these cheap storage shelves (and still the cheapest way to build them) doesn’t result in the nicest to look at shelves, this storage system will store thousands of small items in a very small footprint for a very small investment. It’s perfect for tiny parts, computer components, craft supplies, and so much more.
When I started my first retail business at 22 these were the storage shelves I built to hold products as my online business grew. When, at 29, I moved my business out of my basement and into a “real” retail space, I rebuilt a version of these shelves that- with just a bit more time and money invested- created storage that was cheap, dense, and not too rough to look at (This second-gen shelving is the black & white warehouse shelving).
Thanks for Reading!!!
I hope you can tell that I love DIY, researching the best affordable solutions for every-day problems opportunities and documenting / sharing solutions!🙌 Hawk-Hill.com is reader-supported.
☕ Hawk-Hill.com is reader-supported. If this article saved you time or money, please consider donating $1 to help me cover the cost of hosting this website OR If you appreciate this information and want to throw a “Thanks!” my way by buying me a coffee – I would Of Course appreciate it! :]
Reader Questions and Recommendations
Readers, do you have any favorite topics / posts? What would you like to read more about in the future? As I hope you can tell from this and other articles on my site, I really enjoy DIY / a good challenge, and I’m not afraid to roll up my sleeves to figure out a great, and hopefully simple 😁 solution. So please feel free to let me know in the comments below (or reach out via social media)!
Ok Really – I’ll try to wrap this up now😂
Finally, if you’d like to continue to learn about interesting DIY options as well as how YOU can tackle creative new projects consider checking out the latest and most popular articles listed on the Hawk-Hill Home Page. I’m always trying to enjoy and write about the creative side of life so please don’t be a stranger – check back often!😍
If you enjoyed this post you may also enjoy reading / perusing / devouring😊 one or all of these articles as well!
Emily
Saturday 29th of January 2022
We're having a tough time finding plans for shelving that will fit our all of corrugated 18in bins like yours..are there any available? Please tell me they exist lol...
Lindsayanne Brenner
Saturday 29th of January 2022
Hi Emily, I'm a little confused by your question. Are you looking for bins or shelf plans?
Lawrie
Sunday 8th of August 2021
Hi, Im just wandering what these 'white' storage items are called and where I might be able to build or buy some? I found you and your article via Pinterest.
Regards Lawrie
Lawrie
Monday 2nd of January 2023
@Lindsayanne Brenner,
Hey, I thought I had this sorted but am back looking for these again, Ive loads of stuff as a small business stock and packing etc, but will buy these now.
Thanks, Happy new Year. I love your website btw.
Lindsayanne Brenner
Sunday 8th of August 2021
Hi Lawrie! The boxes in this photo are called "open front bin boxes" and they are AMAZING for organizing! You can get them at Amazon via this affiliate link or through PackagingSupplies.com