
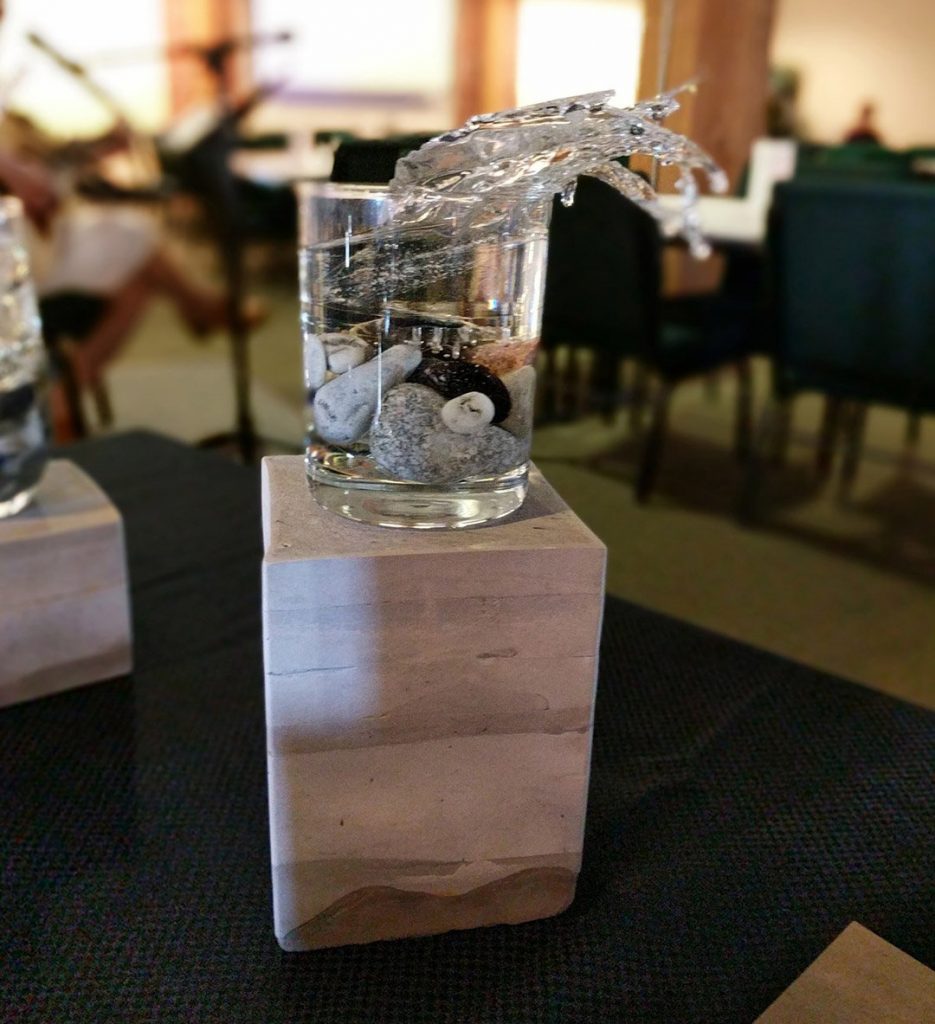
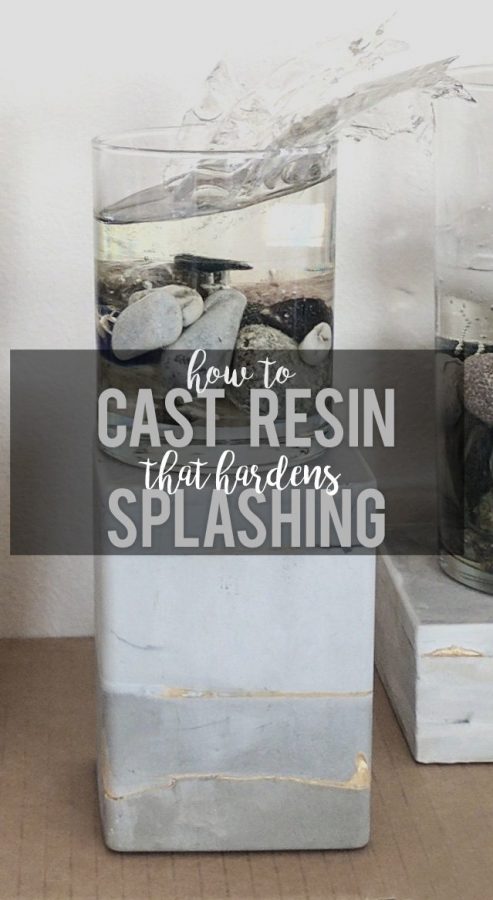
In 2017 I was commissioned to create 5 sculptures riffing on the themes in Henri Matisse’s painting “La Danse.” The interpretation I envisioned represented moving water sculpted via resin- but there was no technique at the time for getting resin to cure in a “splash,” and the months that ensued between being commissioned and delivering the sculptures were filled with a maddening course of experimentation with materials, resin casting, and finally, perfecting my method for creating a “splash” effect in epoxy resin.
Resin is frequently used to mirror the effect of water in art. Its dimensionality and ultra-clear look when pooled and cured create, by default, the look of still water. Creating the energy and dimensionality of moving water, however, is not what resin was designed for.

Even though splashing, falling, and dripping effects are not a natural result of using expoxy resin, Resin was the only material my research turned up that could create dimensional sculptures in ultra-clear material without the use of expensive and difficult-to-use glass blowing equipment. So once I settled on using this media, I set out to experiment till I could master the effect with enough proficiency to use on the 5 splashing sculptures I’d been commissioned to create.
Because there were ZERO tutorials online about this process or anything like it when I was researching, I’ve decided to publish my tutorial in the name of open-source art. If this tutorial saves you hours of frustration and bottles of wasted epoxy that it would have saved me, please consider buying me a coffee or turning off your ad blocker while on this site.
A step by step tutorial and supply list is included below, but check out this video for a quick overview of the process of making “splashing” water-like resin figures:
The following section may contain affiliate links. As an Amazon Associate, we earn from qualifying purchases.
Supply list
Getting Started making Water-Like Resin Splashes
In this tutorial, I’ll show you how to make resin look like it’s splashing out of a vessel. I used mugs and coffee cups, but any vessel – or even no vessel at all – should work with the same method.
By nature, resin looks much like water when you put it in a vessel, but I have a method that creates the effect that appears to make the resin look like it is splashing out.
NOTE: This tutorial has been tested on Environmental Technology’s Easy Cast Epoxy Resin Results may vary if you are working with polyester Resin.
NOTE #2: Getting good results from this tutorial is about 50% skill and 50% luck! After doing it a few times, you’ll start to develop a sense of when the resin is at the right viscosity for really good water-like results, but what I recommend as you’re starting out is to do a few pieces at a time. This increases your odds to hit on the “luck,” and, by working one piece at a time, you’ll increase your odds of one of them hitting that perfect point of viscosity in the epoxy curing process (in which the epoxy drips and flows, without losing its form)
To start: Make flexible resin sheets
The first step to making resin splashes is actually to make thin sheets of resin that retain pliability and can be shaped.
Initially, to make these sheets, I tried pouring resin sheets in puddles and allowing it to free flow – that was a disaster – so here’s my revised method:
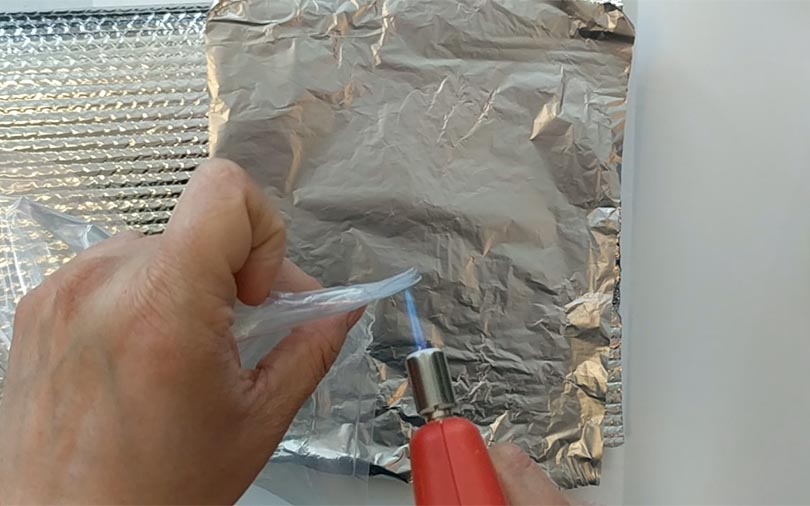
1. Start with standard zip-top plastic bags, I use 2 mil plastic bags but freezer-grade zip-locks should also work.
2. Modify the bag to have a more natural shape – resin pooling and hardening in a tight corner creates a hard angle that won’t work for this project.
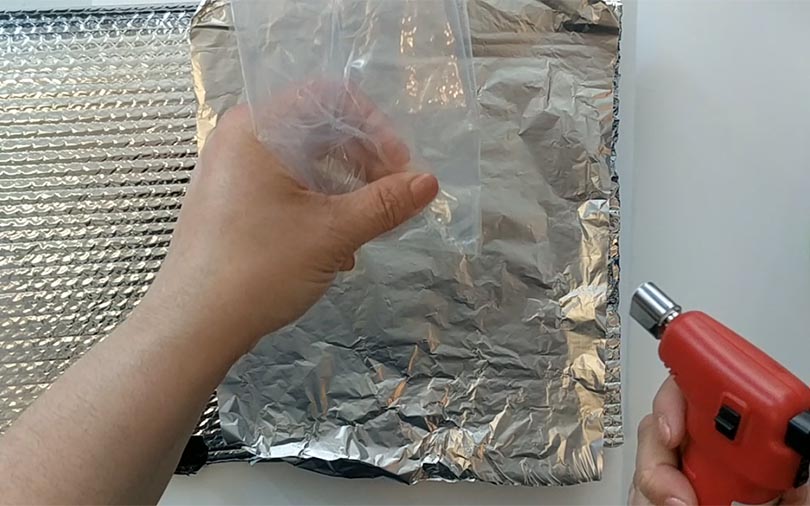
3. To get more natural edges, use a small kitchen torch to make a more natural shape. A quick flash with the heat from the torch with cause the edges to melt and pucker, creating more natural edges. Be careful not to burn the bags, and stretch any puckers out to be flat areas where resin poured inside will feather out. Folding the bags during this process can help break up the standard square shape leaving more natural shaped sheets to work with in the next step.
Using this method I make my own plastic bags in custom shapes and fill them with small amounts of resin and let them lay on their side (on a tray with the lip to catch any leaks) while the resin cures. When the resin is mostly cured – in the 24-48 hour cured-but-not-hard state- I peel the plastic off to reveal a sheet of thin, flexible resin that will form the base of my splashing water sculpture.
** BE VERY CAREFUL when using open flame and heating plastic. Work in a fire-safe, well-ventilated area, protect your body, your working surface, and anything flammable nearby.
Mix Resin and Load Bag-Molds
Remember, you only want to make the thinnest sheet of resin. It will be very tempting to overfill the bags, but that will result in a rigid mass of unusable resin.
Pouring an extremely small amount into each bag ensures that the cured sheet removed from the bag will be thin enough to bend, shape, and trim to the exact shape you need.
TIP: You can add to the water effect by beating air into your resin mixture. Normally resin should be stirred very slowly to avoid accidentally incorporating air into the mixture, in order to create a smooth bubble-free finish. In this project, those bubbles can actually contribute to a water-like effect, so feel free to experiment with adding lots of bubbles before placing the resin in the bags.
Allow the resin to sit in a warm space for 10-15 minutes (resin thickens as it approaches the end of the working window). As resin begins to thicken, stir vigorously with a sturdy stir stick to incorporate air bubbles into the resin.
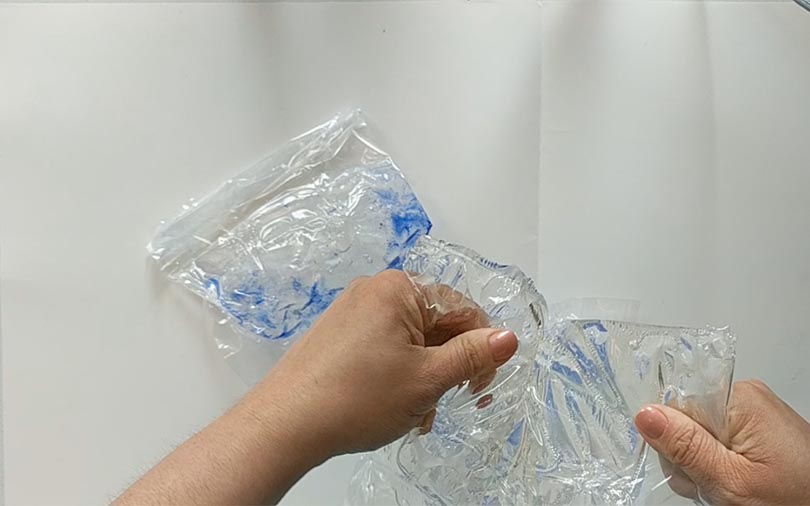
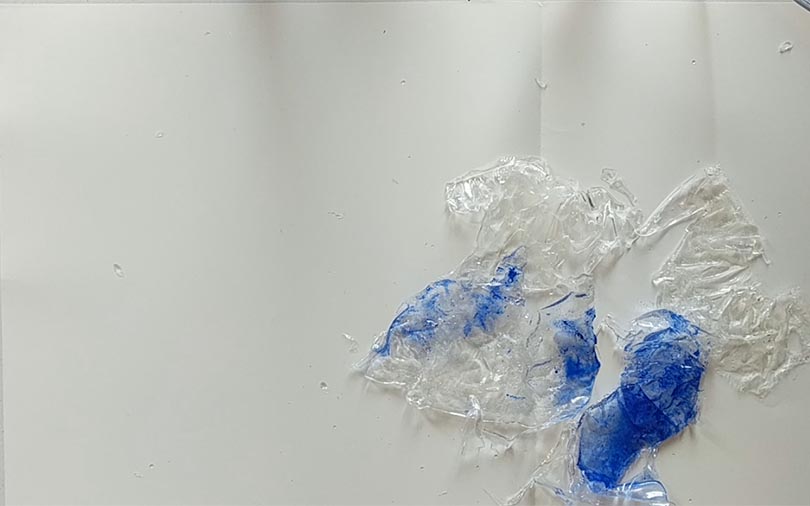
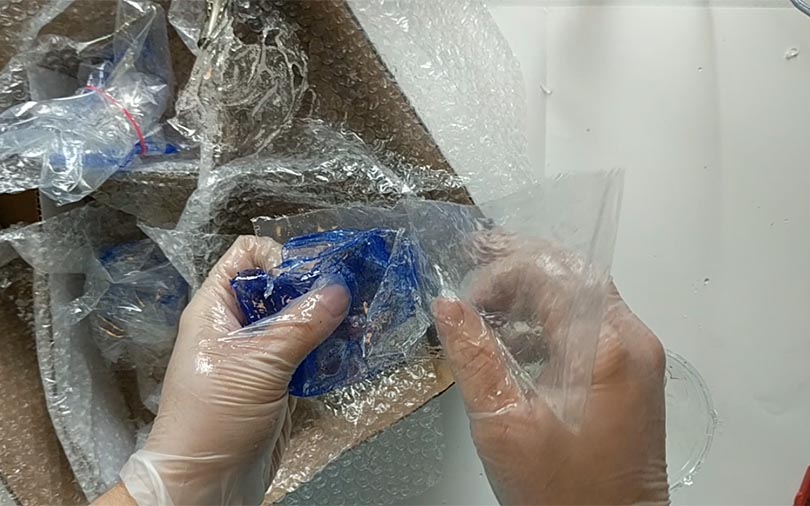
Cure resin and separate from bag mold
In this next step, my resin has cured in the bag for 24 hours. I added a bit of blue acrylic paint to this batch for the sake of making photography easier, but I prefer my resin splashing water sculptures to be clear, with no pigment added. (2022 Update: it seems that no resin is entirely UV resistant, and most of my early projects turned slightly yellow with age, I’ve since experimented with adding trace amounts of translucent blue resin dye to these water sculptures and the blue seems to successfully offset the eventual yellowing)
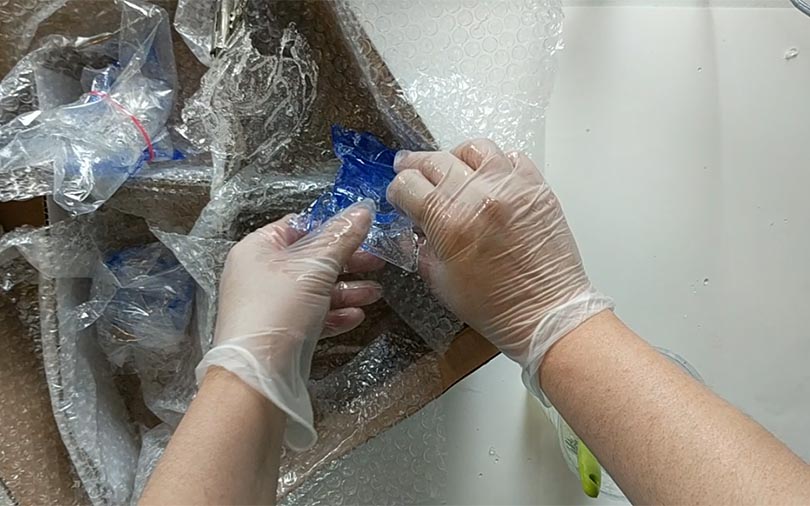
Shape Resin Sheets
Much like shaping a hand-made clay flower by adding one petal at a time, creating convincing waves of splashing water involves layering and gathering these flexible resin sheets
Once unwrapped from the bags, I take the sheets of resin, cut them to a more irregular size (if needed), bend them into a wave-type shape, dip them in a fresh batch of resin, wrap them in more 2mil plastic to force the resin to cure in a dimensional shape, and add a rubber band around the wrapping to hold the wave in place.
Forming the sheets into cones, and then bending over the tip of the cone usually creates a wave-like shape.
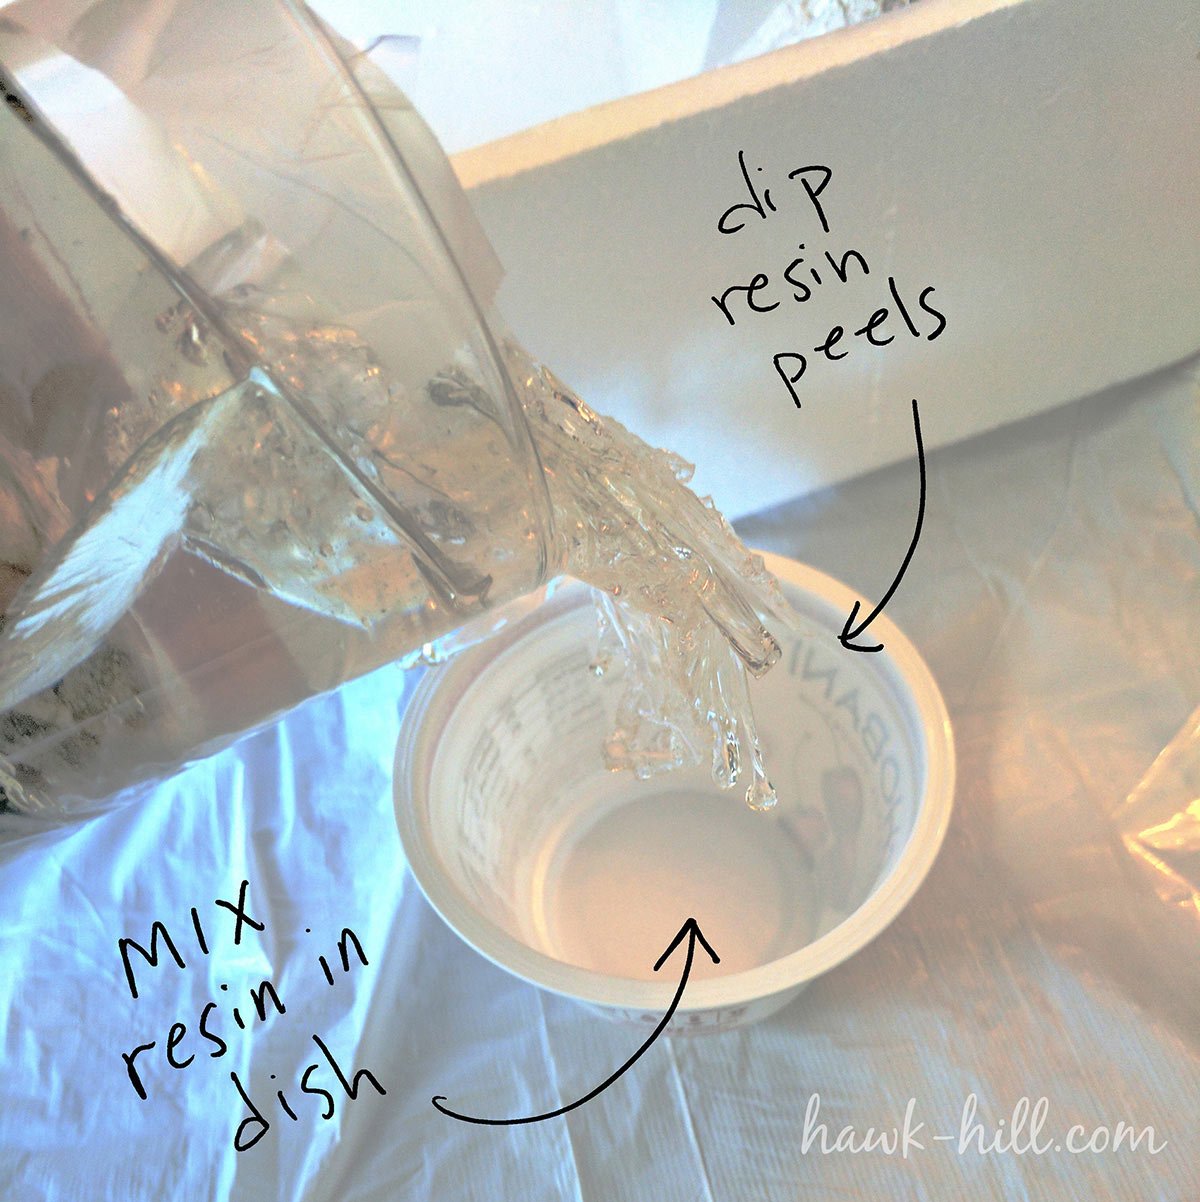
Dipped Shaped Resin Sheets in Freshly Mixed Resin
Dipping these hand-formed sheets in another coat of resin adds dimension and texture. The layering- and eventual dripping- helps form the realistic lock of splashing water
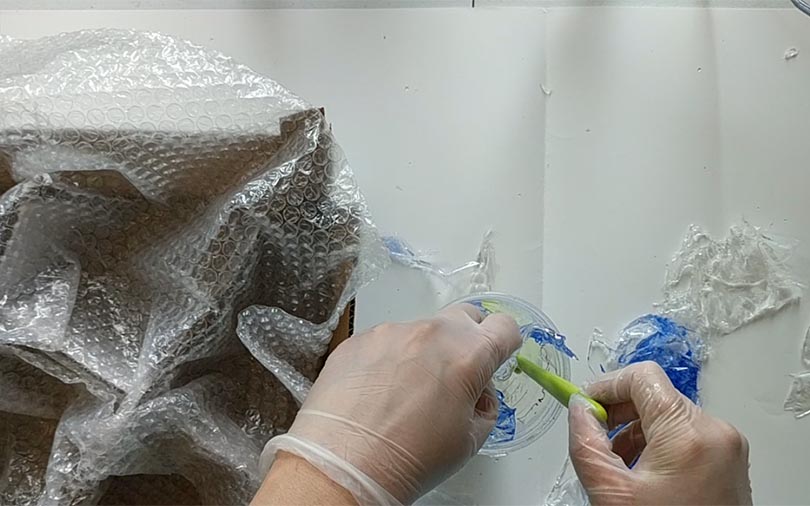
*Your hands will get coated in resin at this point. You MUST use gloves made for chemical handling or kitchen cleaning.
After I dip the formed pieces in fresh resin, I don’t just set them down on a flat surface (that would cause all the resin to settle in a uniform way). Instead, I lay them out on bubblewrap which, itself, is spread over an uneven surface. Both the texture of the surface beneath the bubblewrap and the bubblewrap itself (bumpy side up) add dimension to the resin.
I make sure that gravity will move the resin towards the head end of the wave or splash. By tilting the curing resin just so, and if I get lucky, actual droplets will form and harden before dropping- which when cured look exactly like splashing water
If your resin won’t quite stay put, as resin is known to do, you can add a layer of plastic wrap around the outside of your dipped sheet: held in place with a rubber band. You’ll need to use plastic wrap that is at least 2 mil in thickness (I use cut-up heavy-duty zip-top bags).
By continuing this process with all of my sheets, I can create layers of water-like textures to build from later. Not all pieces will be used in a project, but making lots of waves gives me plenty of options to choose from in the next step when I’m building the actual splash.
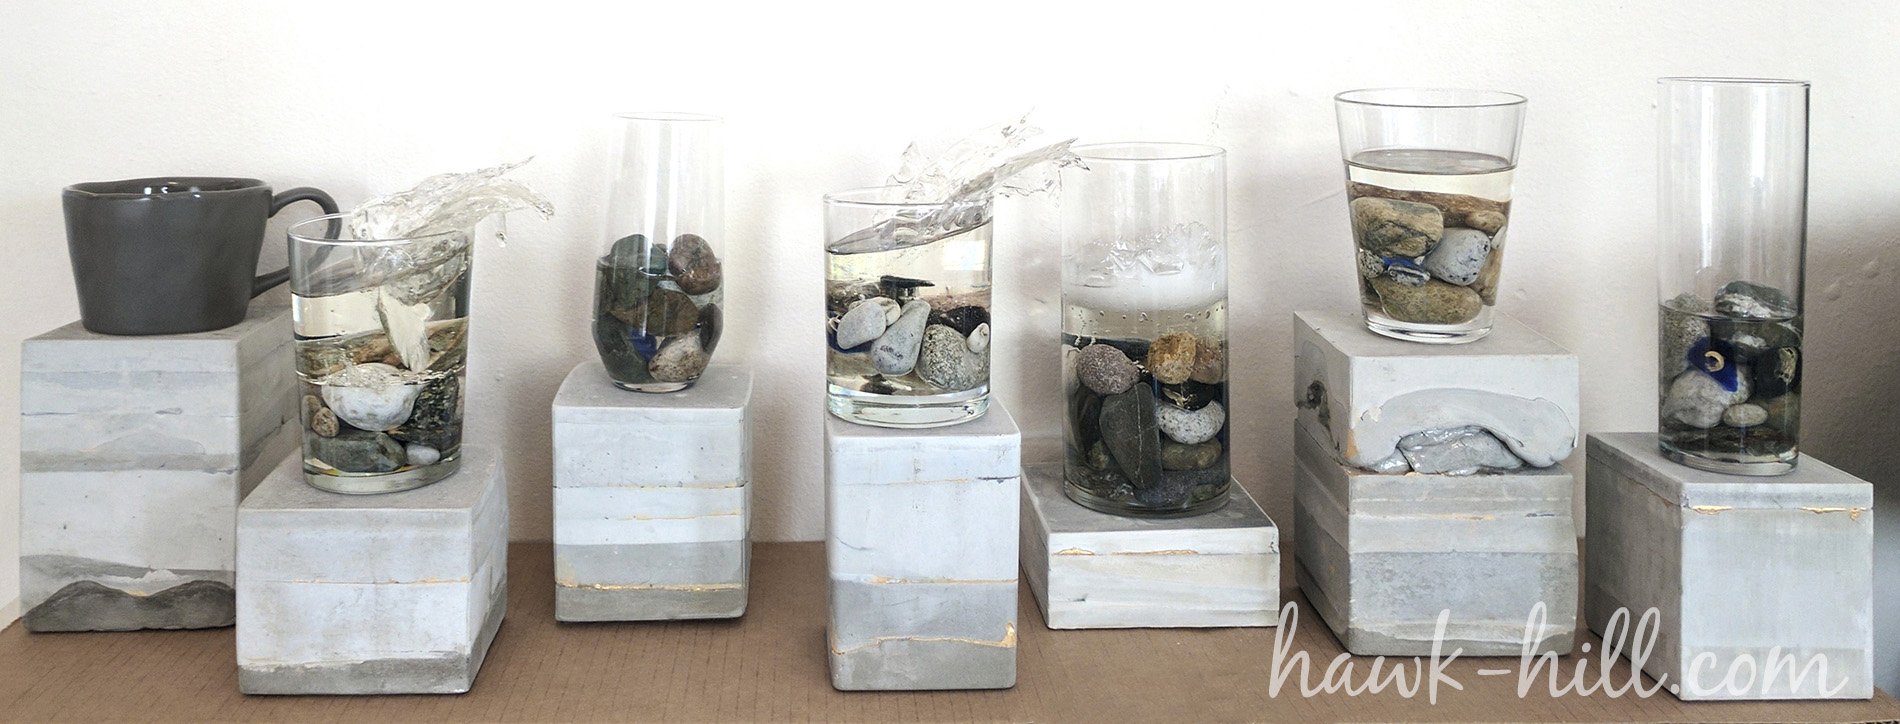
Allow Splashes to cure, then Create a Base in a Reservoir
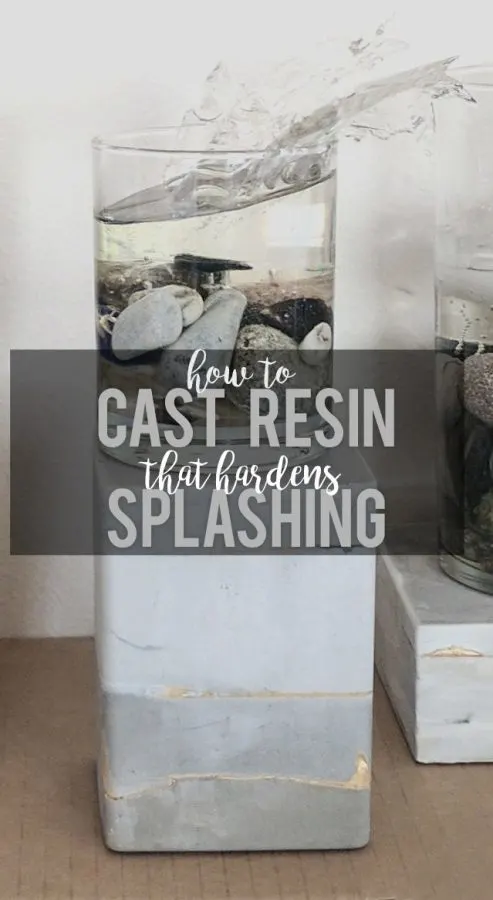
For this project, I wanted to place the splashes so they looked like they were coming out of glasses, but the process will be exactly the same if you’re working with a model railroad waterfall or any other project where you’re making the water look like it’s splashing from one place to another.
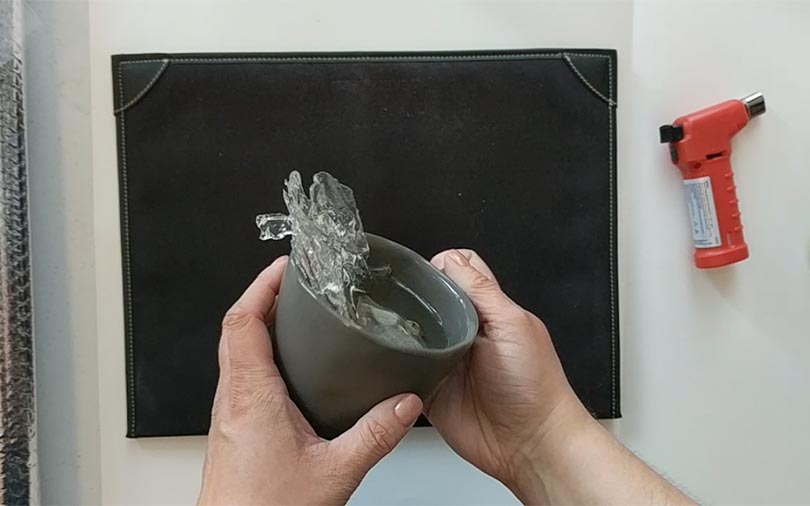
Take a little resin wave and place it into a cup or a vessel that is already half-filled with a cured layer of resin. I put my resin wave sculptures towards the side and then I pour another layer of flat resin into the vessel. Once that layer has cured, the flat layer locks the dimensional resin sheet into place, so I can begin dipping the wave and actually creating a dripping and splashing appearance.

Finally, dip the splashes to create drips and smooth curves
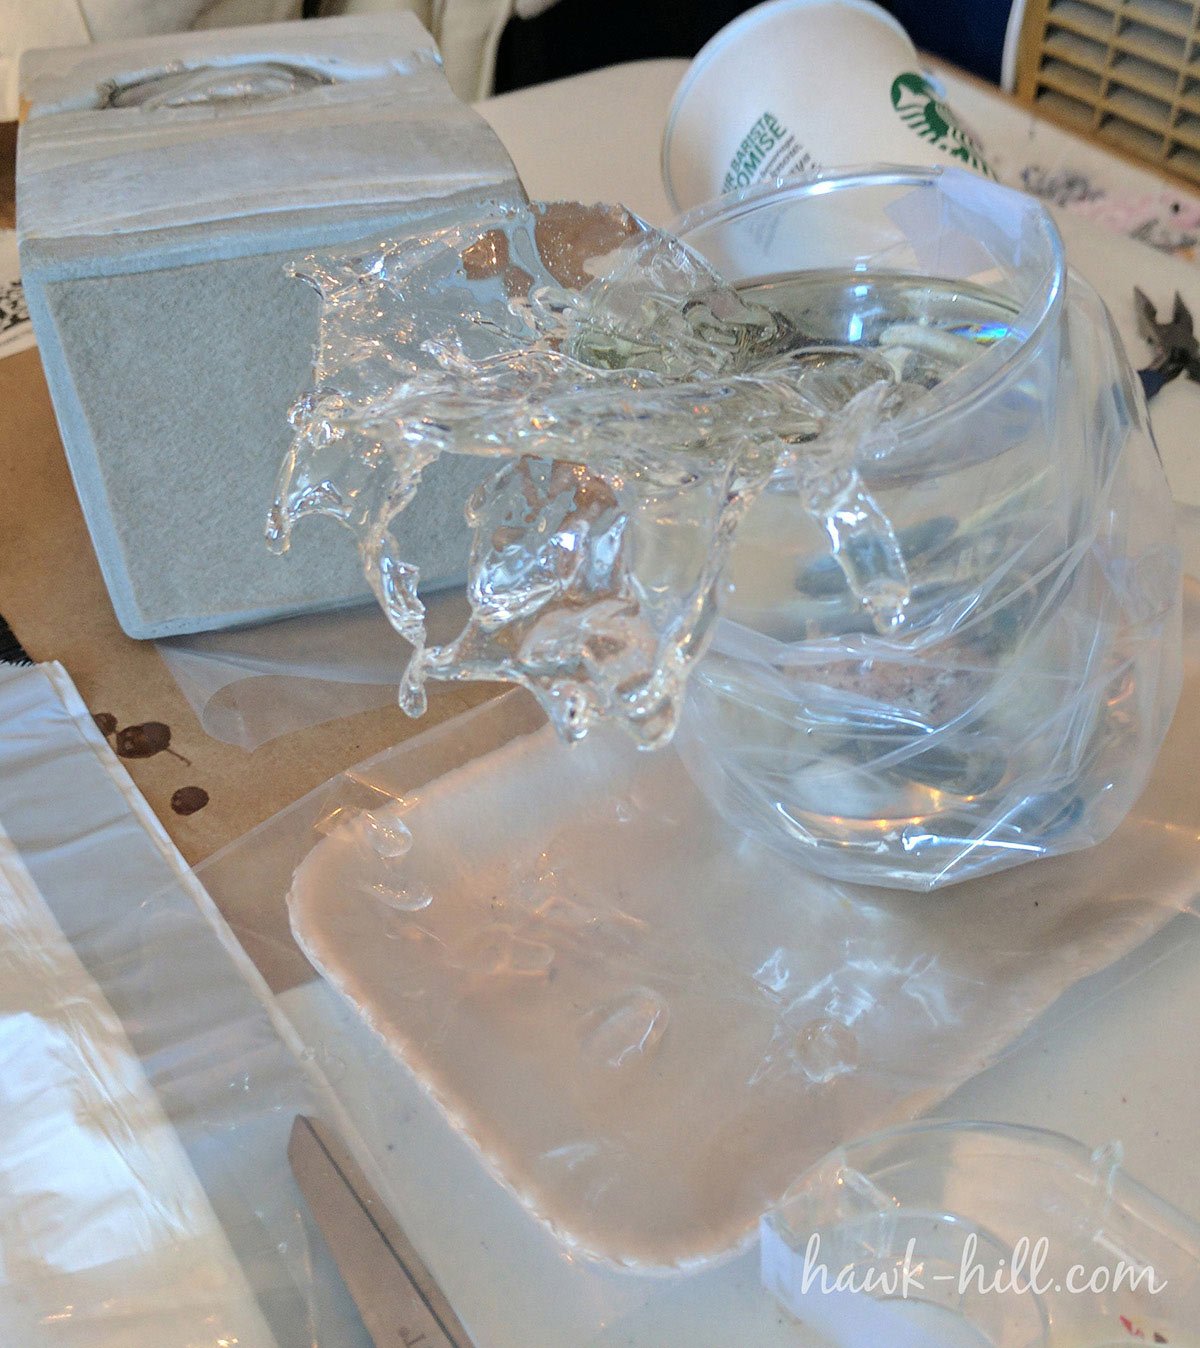
In the final step, after the resin has cured from the last step, I dip my dimensional resin wave into a cup of freshly mixed uncured resin.
After this last step, I secure the wave-in-a-cup in an upside-down or sideways position to dry. By drying upside down, the resin “flows” in the direction of the splash. It will drip- it should drip to create the texture- but it will also make a big mess so have a very well-protected surface ready.

This dipping and upside down curing may need to be repeated twice or even three or four times. But by doing it repeatedly, I actually get a dimensional sculpture that looks really like water splashing out of the container. This works well for art sculptures but I can imagine many more uses in various hobbies.
I hope this tutorial has been a helpful resource. When I was trying to figure out how to cast a splashing water shape in resin I had to forge this path without a tutorial- so I hope my work creating this walkthrough has saved you time and wasted materials. If it has, please consider buying me a coffee, shopping from the supply list, or turning off your adblocker to enable the creation of more art and DIY tutorials.
What doesn’t work
I went through no less than a half dozen attempts at creating the effect of spilling, splashing resin before finding a method that actually worked. Among the techniques I could never get to work were the following:
- 1. Pouring and trying to sculpt the resin during the hardening process.
- 2. Sculpting splashes in polymer clay and then making molds from the sculpture in which to cast resin,
- 3. Casting flexible sheets of resin by free-pouring onto a flat surface, and
- 4. as I approached a successful method, casting pliable sheets in a container that transferred it’s texture and created an unrealistic finish.
Quick Two Second Time Out for Failure Motivation:
Invention, even when it’s with resin, is a process of discovery and exploration, and trying things multiple ways is an essential part of that process. It allows us to uncover new approaches and solutions to problems, and can often lead to unexpected breakthroughs. By experimenting with different methods, we can learn what works and what doesn’t, and ultimately refine our ideas until we find the best possible outcome.
Even when our attempts fail, it’s important to remember that it’s still progress. Every failed attempt provides valuable information and insight into what doesn’t work, which can guide us towards finding what does work. As the saying goes, “failure is the mother of success.” By embracing failure as a natural part of the process, we can stay motivated and inspired to continue exploring and innovating, ultimately leading us towards our goals.
Thanks for Reading!!!
I hope you can tell that I love DIY, researching the best affordable solutions for every-day problems opportunities and documenting / sharing solutions!🙌 Hawk-Hill.com is reader-supported.
☕ Hawk-Hill.com is reader-supported. If this article saved you time or money, please consider donating $1 to help me cover the cost of hosting this website OR If you appreciate this information and want to throw a “Thanks!” my way by buying me a coffee – I would Of Course appreciate it! :]
Reader Questions and Recommendations
Readers, do you have any favorite topics / posts? What would you like to read more about in the future? As I hope you can tell from this and other articles on my site, I really enjoy DIY / a good challenge, and I’m not afraid to roll up my sleeves to figure out a great, and hopefully simple 😁 solution. So please feel free to let me know in the comments below (or reach out via social media)!
Ok Really – I’ll try to wrap this up now😂
Finally, if you’d like to continue to learn about interesting DIY options as well as how YOU can tackle creative new projects consider checking out the latest and most popular articles listed on the Hawk-Hill Home Page. I’m always trying to enjoy and write about the creative side of life so please don’t be a stranger – check back often!😍
If you enjoyed this post you may also enjoy reading / perusing / devouring😊 one or all of these articles as well!
- 💡4 Easy Steps to Make Your Own Sea Glass 🌊
- ❤️Bedroom Decorating Ideas for Single Women’s Master Bedrooms 🛏️
- 🏡Ikea Kitchen Cost: What I Spent for a 9×12 Kitchen Remodel 💵
Michael Tohill
Friday 31st of March 2023
just discovered this! brilliant advice / tutorial. i started clay modelling....very amateurish, and I recently made a little quirky baby elephant. I want to stand the little guy in a resin pool, and try to have him using his trunk to splash water over his back. I really think your video and tutorial will get me going in the right direction ....Thank you so so much.
Michael Tohill
Friday 31st of March 2023
@Lindsayanne Brenner, Thanks for getting back to me so quickly. I will definitely send photo when I hopefully finish!
Lindsayanne Brenner
Friday 31st of March 2023
Oh, that sounds like a really cool undertaking. I'd love to see how it turns out (may take a few tries, I know it took me a while to get the look I was going for :)
Evie
Wednesday 25th of January 2023
I wish you would do a video so we could see it in real time. But it looks awesome!
Christa Hoff
Friday 7th of May 2021
Thank you so much for this awesome and really well described tutorial! Ive been wanting my to try my hand at more sculpting pieces, particularly water!
Julie Perks-Bevington
Sunday 14th of February 2021
Thank you so so much very helpful, have you a YouTube site
Ron Bar
Sunday 23rd of September 2018
Thank you so much for the tutorial! I've been looking forever for such a guide... one question... are you please with the resin you work with? is it flexible enough? is it clear and not yellowing in time? is there anything better in the market today?
Lindsayanne
Sunday 23rd of September 2018
It worked for my project! I'd encourage trying out other resins and methods to see if my method can be improved on further!