If you’ve ever wanted to get into bullet journaling but felt too overwhelmed by the task of creating spreads, this post is for you!
I’m going to show you how to make a simple bullet journal stencil that will save you time and help your journaling time stay fun.

The following section may contain affiliate links. As an Amazon Associate, we earn from qualifying purchases.
Supply List:
- An “inspo” layout from your favorite blogger or bullet journaling influencer
- Basic bullet journaling supplies
- A sheet of cardstock or blank plastic stencil sheet.
- An exacto knife or a safer precision cutting pen.
Steps to Make a Bullet Journal Stencil
Follow these steps to make your bullet journal stencil.
1. Find Inspiration
The first step is to find a bullet journal stencil that you like. I recommend searching on Pinterest or Google.
One of the best ways to find inspiration for your bullet journal is to use #bulletjournaljunkie (with over 200,000 posts) or #bulletjournaljunkies, which will serve up a whopping 800,000 ideas for your stencil.
There are so many talented people out there sharing their beautiful journals and it’s so inspiring to see what others are doing. Hashtags are also a great way to connect with other bullet journal enthusiasts. It’s great to be able to share tips, tricks, and ideas with people who are just as passionate about this hobby as you are. If you’re looking for some bullet journal inspiration, I highly recommend checking out some of the amazing journals on Instagram and other social media platforms. Hashtags are a great way to find what you’re looking for.
Draw and Trace
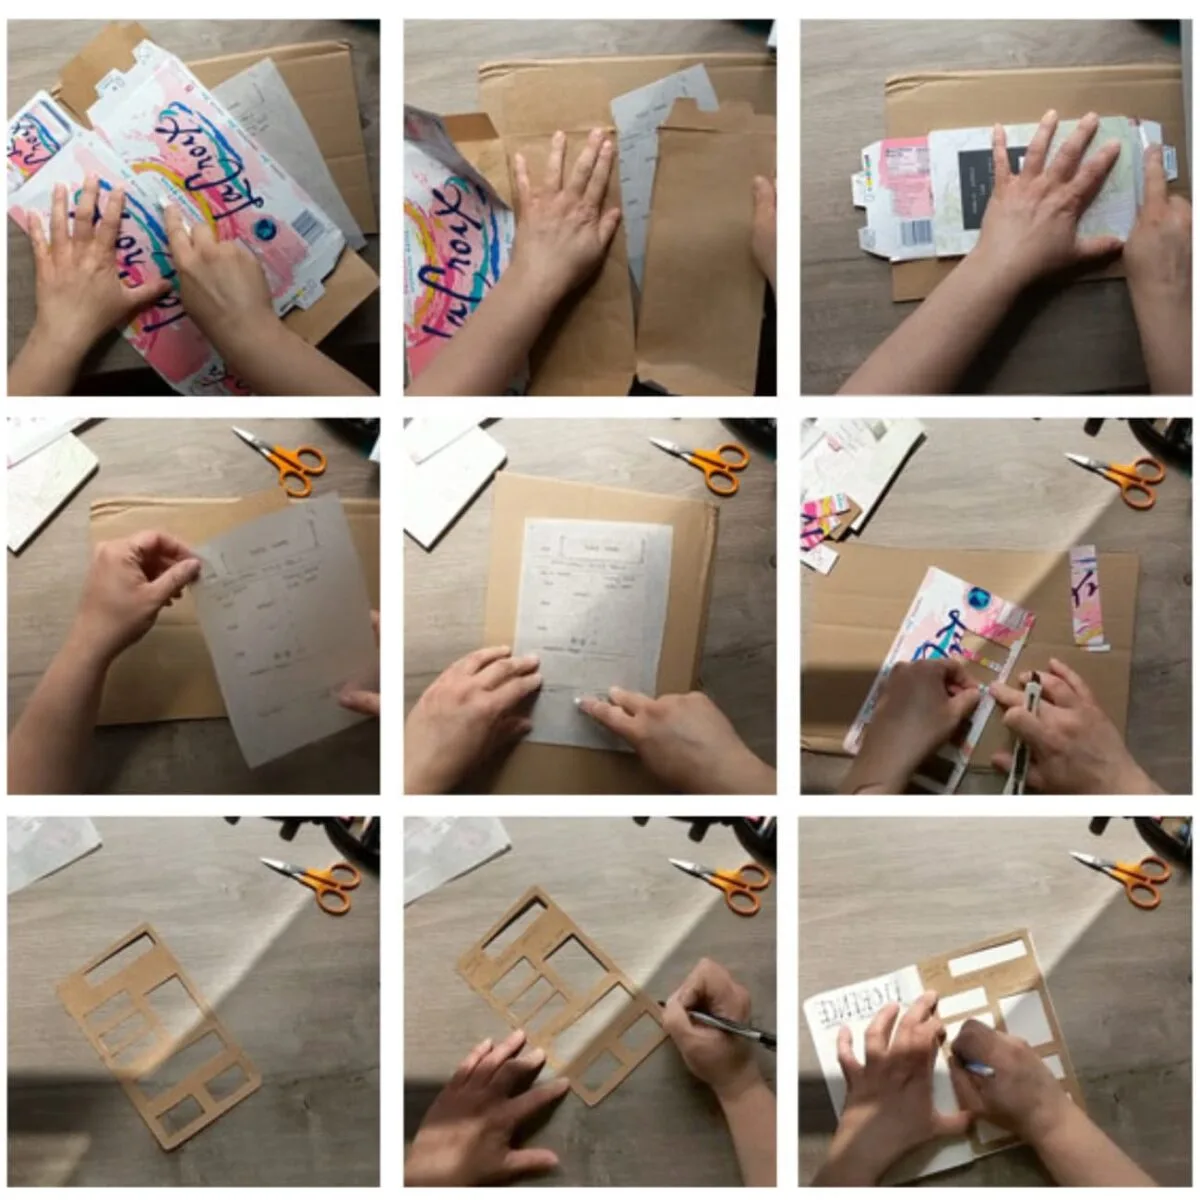
Once you’ve found a few that you like, draw them on a blank page in your journal, trim the page out from the journal, and lay it onto a piece of cardstock.
Cut your Cardstock Stencil
Next, cut out your stencils. I like to use an xacto knife for this step, but you can also use scissors. I like to start by cutting out the big shapes where I would draw a box, and then trimming out the smaller details. To make stenciling easier, I recommend using a ruler or straight edge to help you keep your lines straight. I find it helpful to label my homemade bullet journal templates with a sharpie, so I remember how I’ve used the template in the past.
Use your Stencil to Quickly Make new Pages
Once you’re done cutting your stencil, you can use your stencil to create a variety of different layouts in your bullet journal. With yur stencil, you’ll be able to create them over and over, much faster than drawing them from scratch.
With a stencil, you’ll spend less time plotting pages and more time making your bullet journal work for you.
You make a bullet journal stencil to track anything you want, from your daily to-do list to long-term goals. The key to making the most of a bullet journal stencil is to be creative and use it in a way that works best for you- don’t make a stencil for a layout you make once a year! Instead, create stencils for the lyouts you find yourself repeating over and over.
Ideas for your DIY Bullet Journal Stencil
Here are some ideas for stencils you can make and use over and over:
1. Make a layout for a daily to-do list.
2. Track your progress on long-term projects.
3. Make a layout for recording your thoughts and ideas.
4. Make a layout to plan a week or month ahead.
5. Make a layout to track your goals and progress.
6. Make a layout to keep track of your habits.
7. Make a layout for recording important events or dates.
8. Make a layout to track your finances and spending.
9. Make a layout to plan your grocery list.
10. Make a layout to jot down ideas for blog posts or articles.
In this post, I’ve demonstrated a quick way to make a bullet journal layout stencil. To some, this can be an easy approach to fast recreating pages you love to use in your bullet notebook, but I hope for others, this can help your bullet journal work harder for you.
Preplanning a bullet journal with a stencil is especially beneficial during seasons when you know you’ll be busy. Academic spreads at the start of the school year, for example, or this diary spread. Making pages ahead of time (or even simply a lightly penciled guide on pages) is can save time and keep your journal neat.
Whether you use a heavily artistic bullet journal or a minimalist style, over time you’ll probably find yourself re-creating the same basic layouts over and over. This is a good thing! Repeating patterns that work can help your journal be more effective. In fact, I list this as #1 in my tips for bullet journaling.
More Ideas? Ask below!
Would you believe that this post came about as the result of a visitor question? In response, I created this post about making bullet journal stencils that would be a resource for people just getting started and struggling with the grind of layout out new pages. I hope you found this helpful!
What template have you made? Are you letting your fear of the blank page overwhelm your process of starting a bullet journal? I know that the idea of starting one can be daunting, but I would encourage you to give it a try!
Bullet journaling has helped me to become more organized and productive, and it just might do the same for you.
Let me know in the comments! If you enjoyed this post, please share it!