
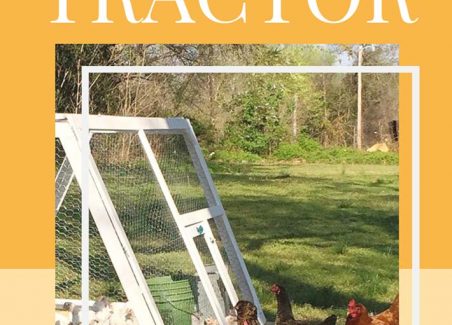

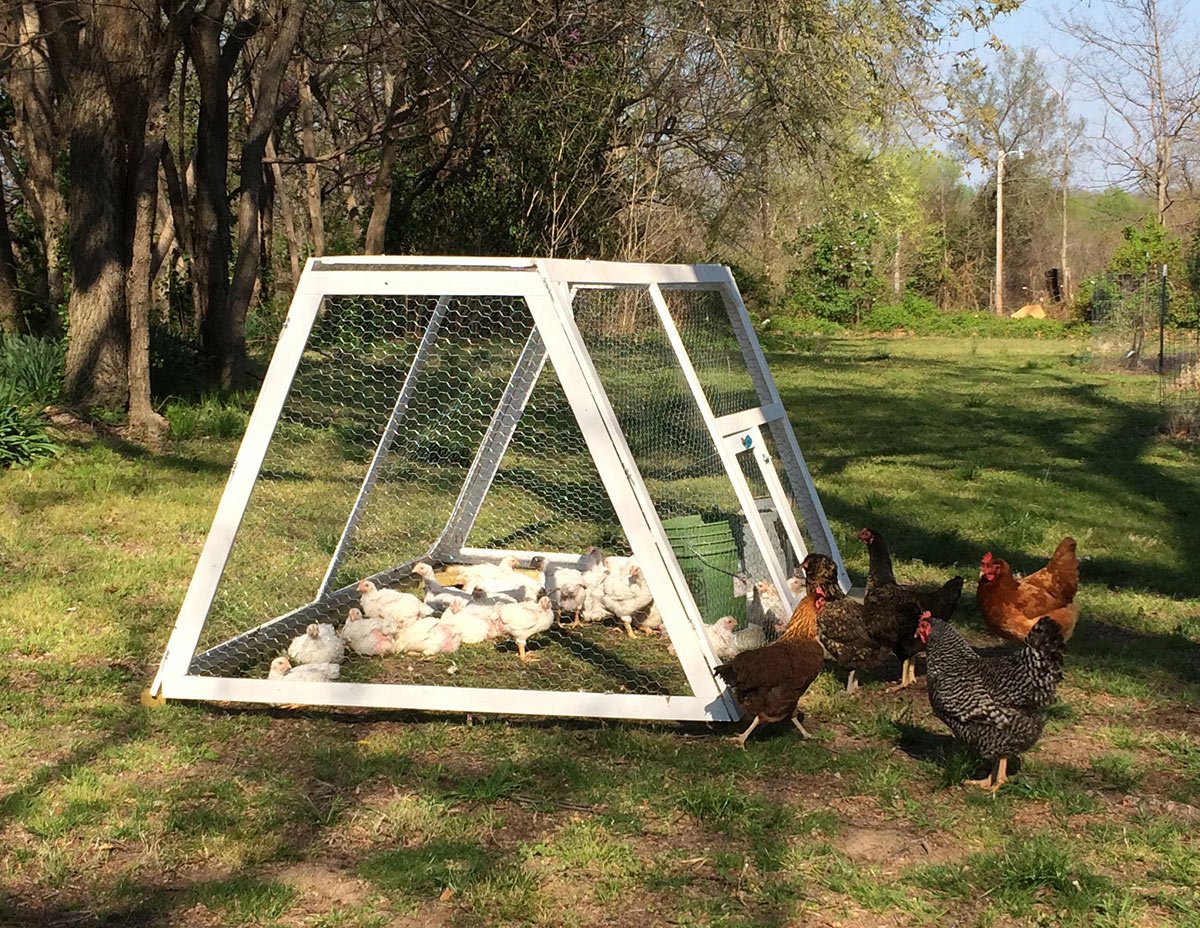
I raised 35 meat birds this spring and in order to keep things civil in the 100 year old coop I renovated for my laying hends, I decided to construct a small, portable chicken tractor. I had just a few basic goals for my coop:
MUSTS:
- Easy to move for 1 person
- Fold or Collapse for Flat Storage
- Tidy Looking
- Predator proof (or as close as possible while still maintaining #1 and #3)
- Multi-use (usable as a chicken hospital or for an occasional larger pet)
- Inexpensive (ish)
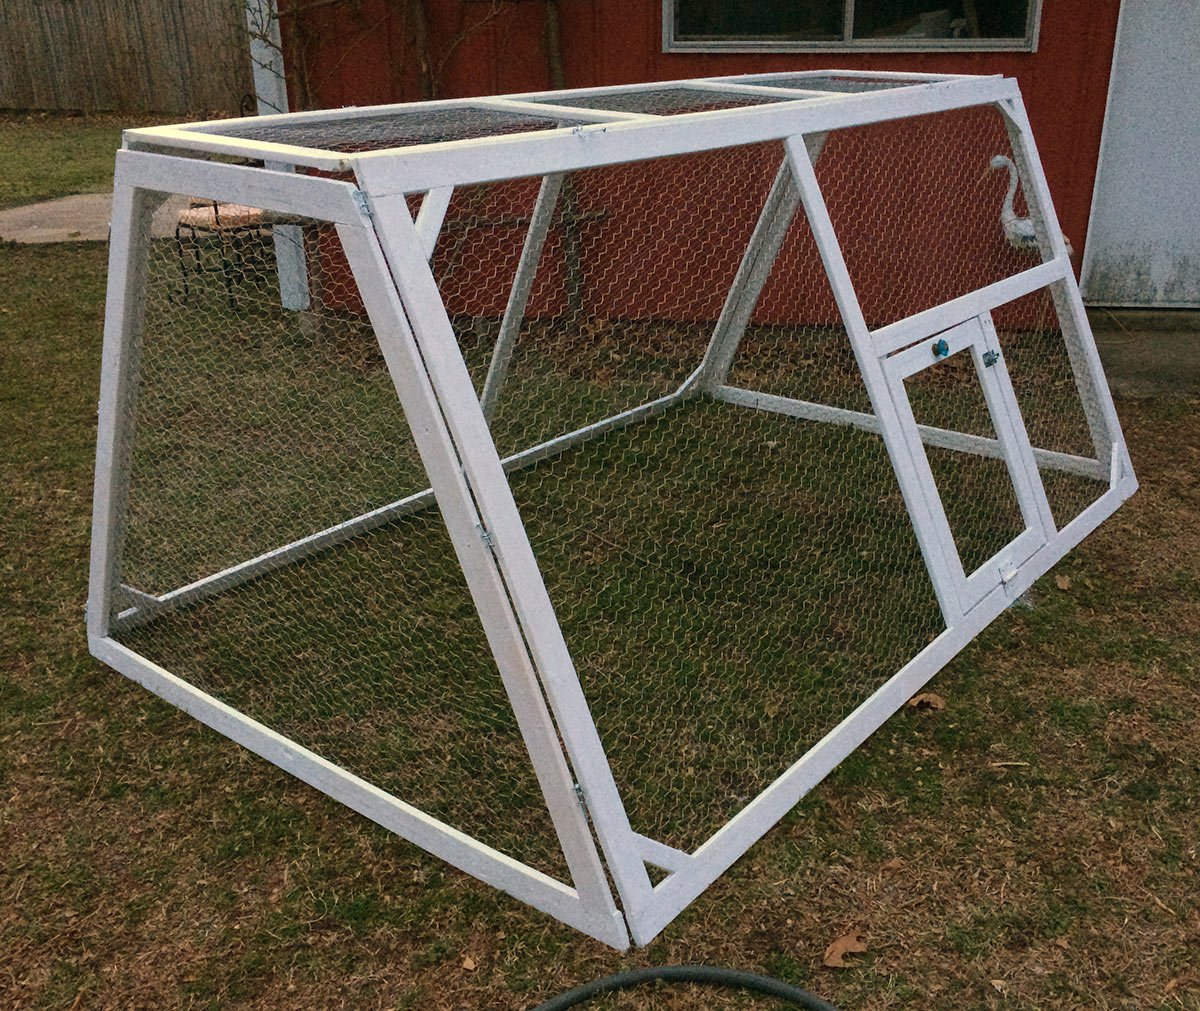
I thought about it for a few weeks, then plotted out a woodworking plan for this tractor. A-frame tractors are pretty common, but this modified design allowed for a significantly larger footprint with less weight than a standard A-frame. This means I could accommodate more chickens comfortably, though the flock pictured in this post was the largest flock I ever raised in this tractor- as it became a little crowded in their final 7-10 days of their (freakishly rapid) growth.
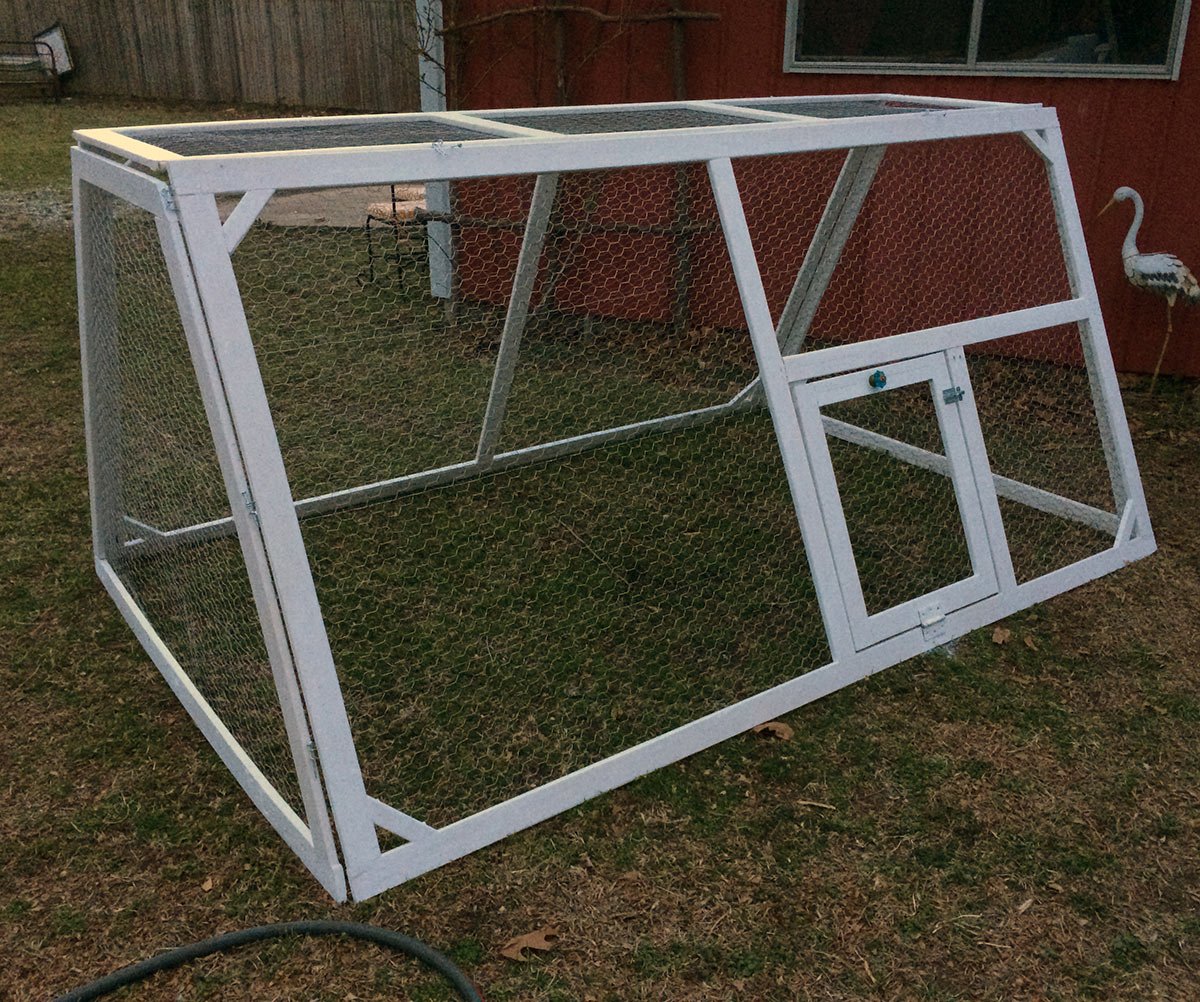
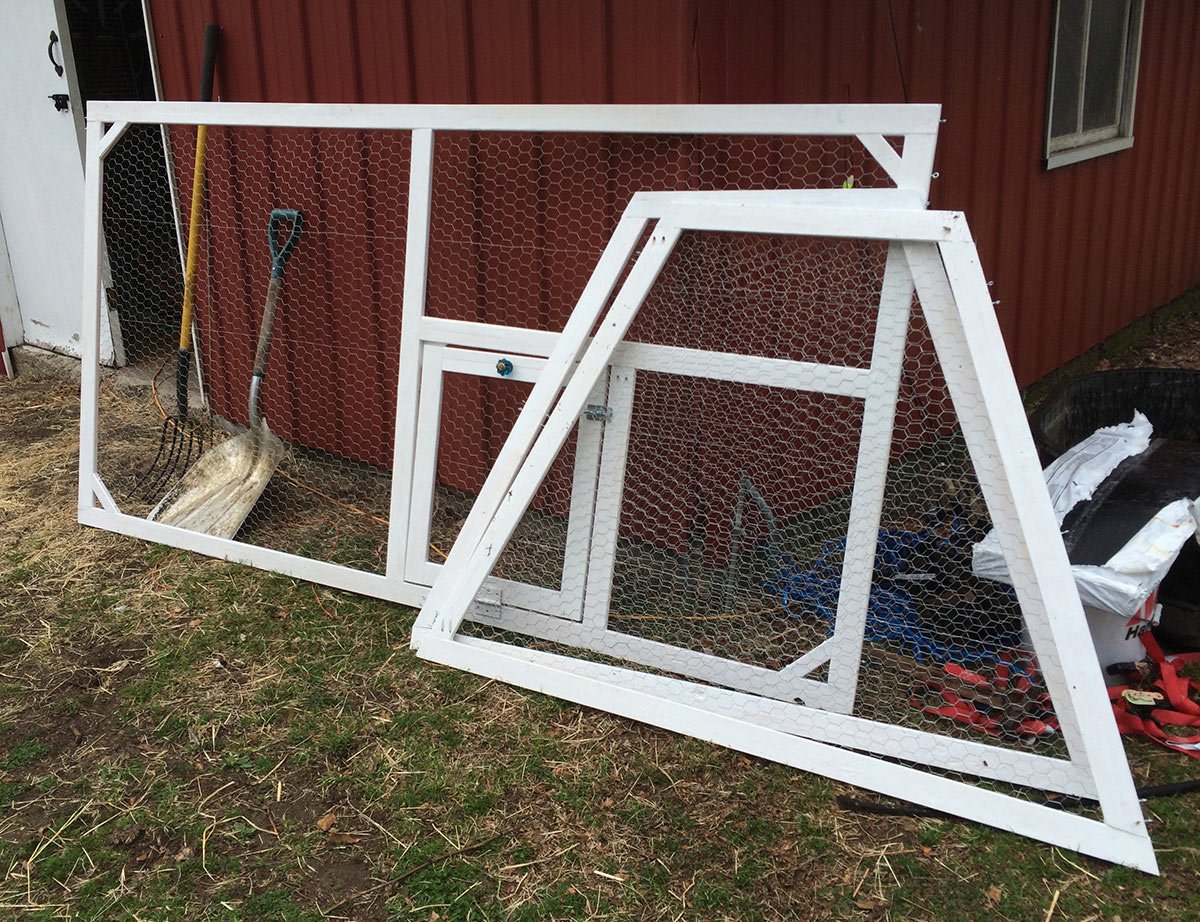
The most unique element of my design is that each side of the chicken tractor is constructed as an independent panel that pins together using a nail or hitch pin and 3 small screw eyes. This keeps the design lightweight and means it can be stored flat.
Download my Free Woodworking Plans for a Modified A-Frame Chicken Tractor
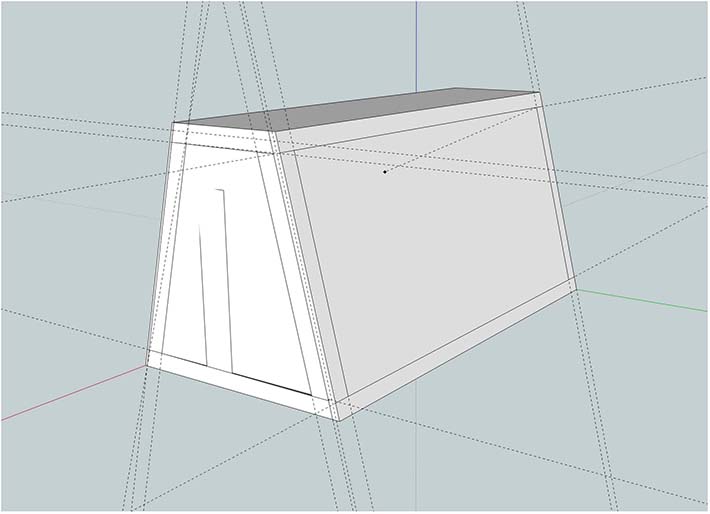
This free chicken tractor woodworking plan is delivered in the form of an SKP file format, which can be opened using the free web-based application SketchUp. With Sketchup, you can zoom, pivot, and explore every side of this 3D model- while viewing measurements, angles, and wood dimensions in depth. Full disclosure: I never fully completed this plan. The download includes a basic 3D model of the chicken tractor, which you can use to check measurements and what angle you’ll need to make cuts, but doesn’t include detailed lumber dimensions, measurements for doors, or support bracket placement.
Chicken Tractor Construction:
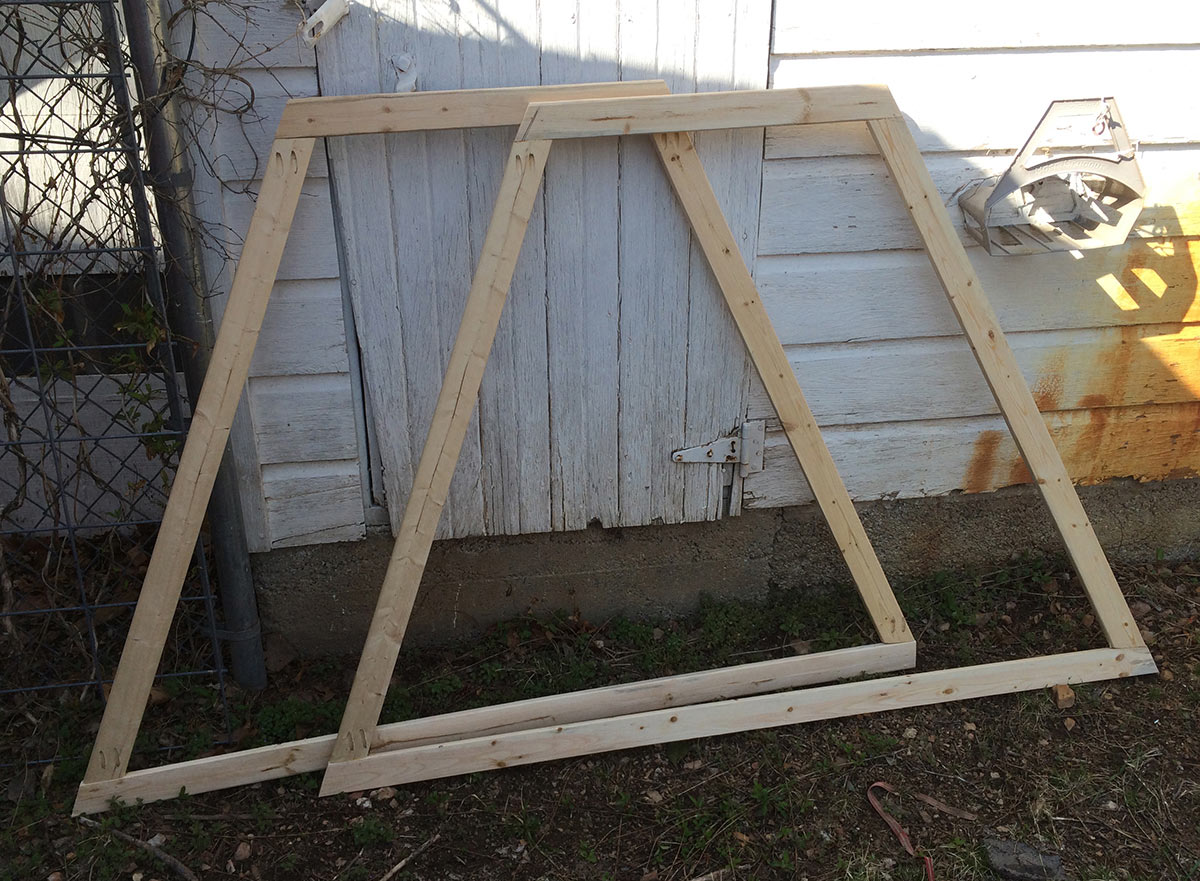
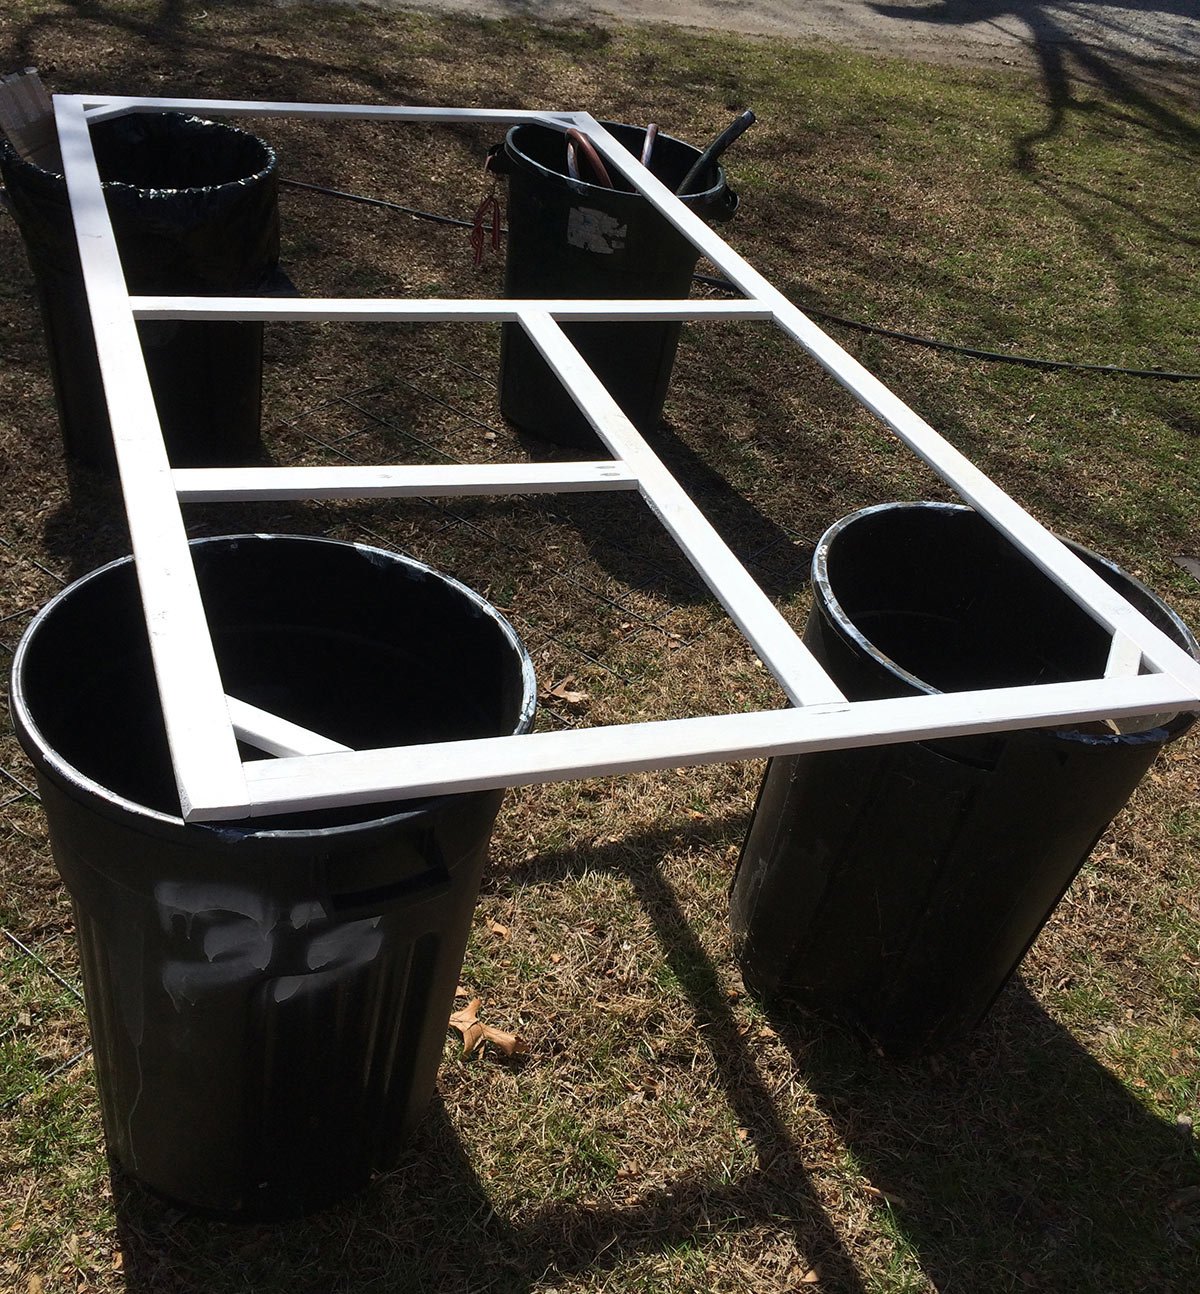
I selected 1×3 furring strips rather than slightly heavier 1×3 dimensional lumber to keep the weight and also construction costs down. With about $40-45 in lumber, I first created two 4’x8′ rectangle frames with braced corners, and then created a top rectangle piece that was 2’x8′, and two trapezoid end pieces that had 4′ sides, 5′ bottoms, and 2′ tops.
Hawk-Hill.com is a participant in the Amazon Services LLC Associates Program, an affiliate advertising program designed to provide a means for website owners to earn advertising fees by advertising and linking to Amazon.com and any other website that may be affiliated with Amazon Service LLC Associates Program
I added a swing-down door on one of the large side panels. Most of my construction was done using my Kreg Jig. (If I was stuck on a deserted island and could pick one tool- it would be my kreg jig!)
Painting my Portable Chicken Tractor:
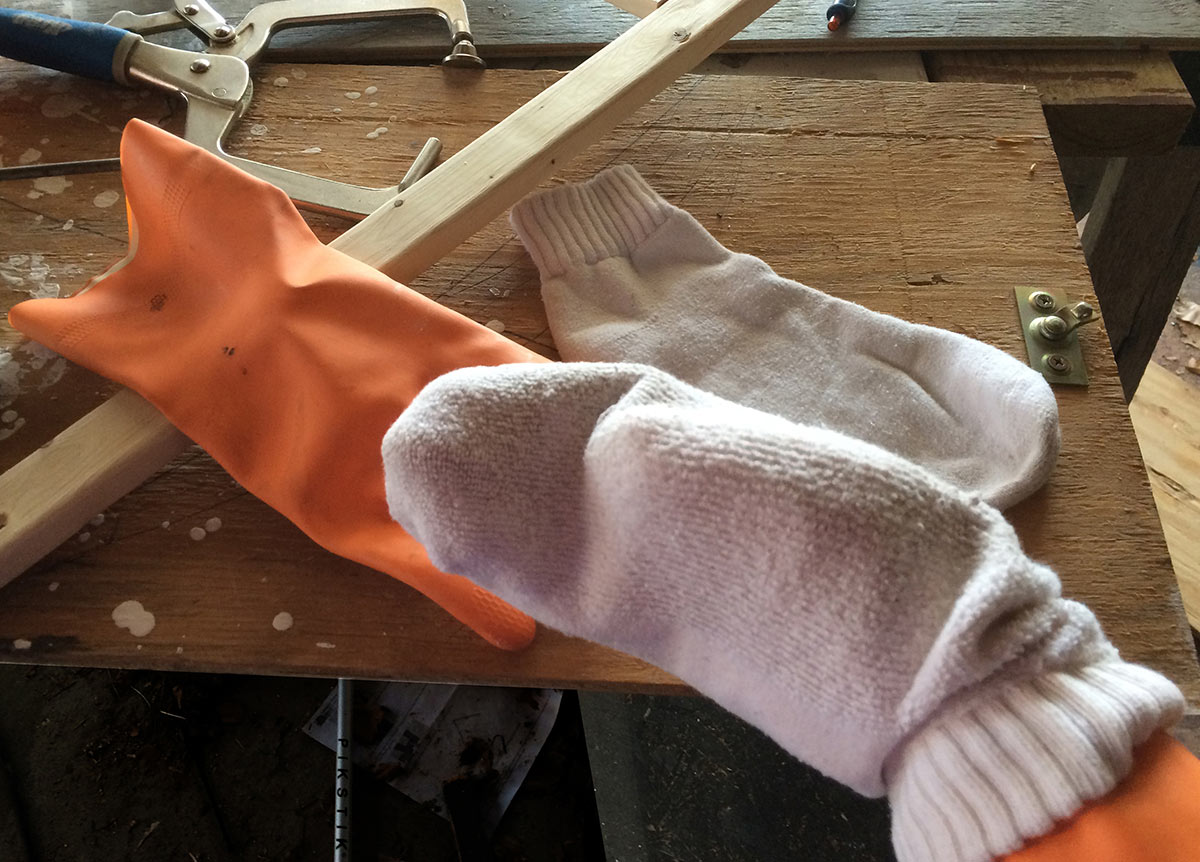
Particularly because I used low grade lumber, I very carefully painted each panel. Pressure-treated lumber would have removed this step, but would have likely doubled the weight of the tractor, so I took the time to paint with a high quality exterior paint that would protect the wood from damage by the elements.
Want to know my secret for painting boards, posts, and poles quickly? Just put on a rubber glove, then cover the glove with an inside-out athletic sock. Dip your sock-glove in paint and paint away- this diy paint glove makes painting corners, edges, and round surfaces very, very quick!
Chicken Tractor Hardware Installation:
Once painted, I installed dozens of small screw eyes along each of the board edges where they would meet other boards when assembled.
Initially, I planned to use hitch pins to hold the tractor panels together, however I found that thick, 3′ galvanized roofing nails actually worked better because their circumference was closer to the circumference of the interior of the screw eyes, resulting in a more stable connection.

The last step was adding chicken wire to each of the panels. A tedious job, at least having an electric staple gun made it easy.
For a bit of class, I finished by adding a colbalt-blue glass anthropologie knob to the door.
Sled Construction
This project came together as I worked, and it soon became clear the chicken tractor would require help to slide easily along the ground.
Using 3 pressure treated 2×4 boards, I constructed a basic frame, with leading corners cut at an angle to make dragging easier. I added a brace to each corner, using my kreg jig, to help support the shape.

Ultimately, the tractor was “pretty easy” to move by myself, but did require some effort. After my chickens were butchered and the tractor was put away for the season, I did add wheels to the front end of the sled. Luckily the Habitat for Humanity ReStore in Joplin always keeps a tub of wheels salvaged from push-lawnmowers so finding big, durable wheels at a great price was a cinch.

I did not closely track expenses on this project, as so many of the supplies I already had on hand. I estimate that I used about $60-$80 worth of lumber (including the sled), $30 worth of chicken wire, and another $10 of miscellaneous hardware, for a total cost of about $100 to build my portable chicken tractor. Hopefully being able to store the panels high and dry in the barn each year will mean this tractor will be usable for many batches of meat chickens in the future. Curious if raising chickens for meat pays off in the long run? Click here to check out my profit/loss comparison of raising my own chickens for meat.
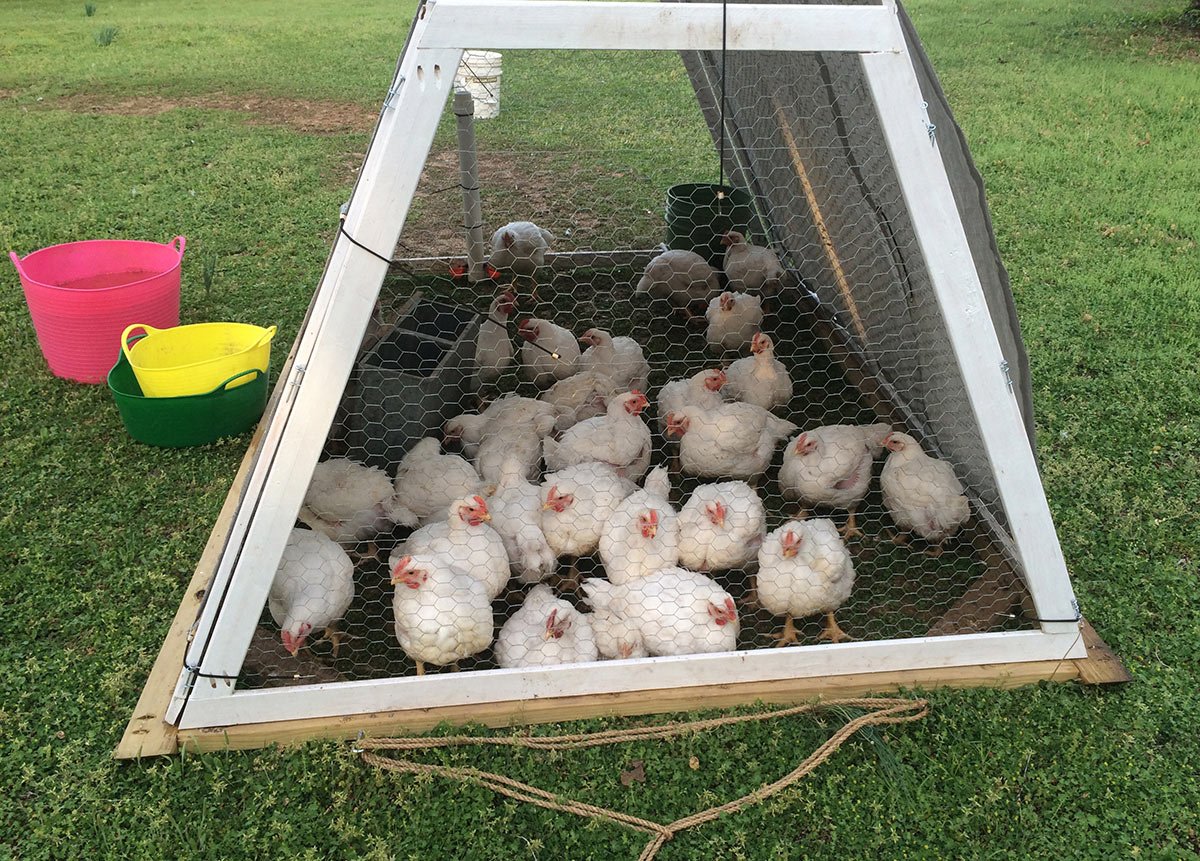
My laying hens found the new addition fascinating:
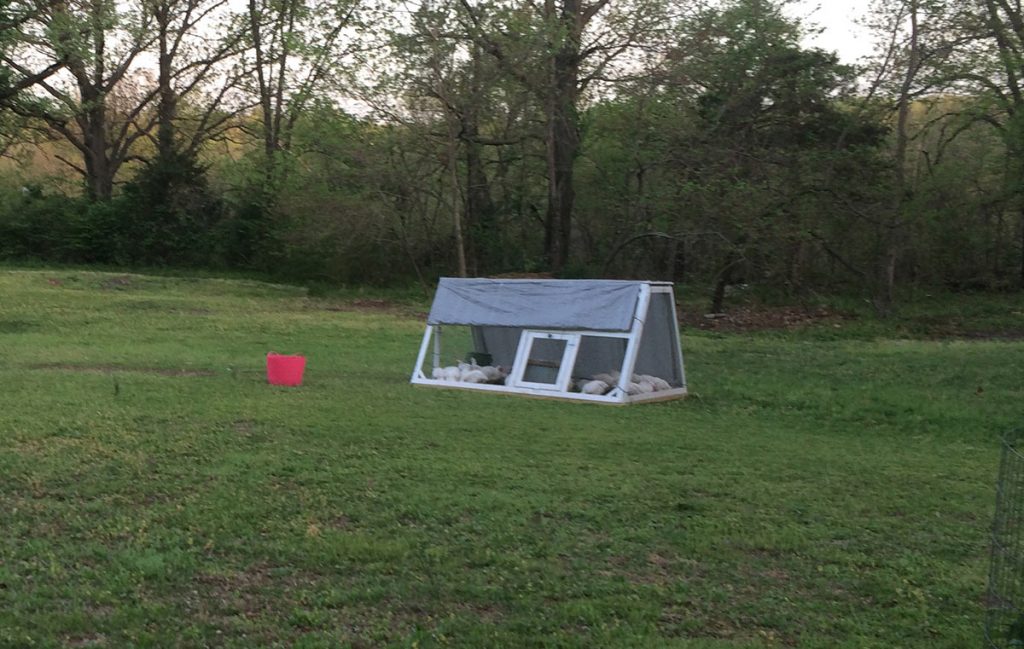
A slightly reflective grey tarp helped keep the chickens cool as the days began to warm up.
My biggest frustration raising birds in this coop was that I had not planned how to move the food and water with the tractor, so each move meant removing and then adding back the feeder and waterer. I’ve since added a partial floor to the front of the tractor, which will provide a platform to place a feeder and waterer.
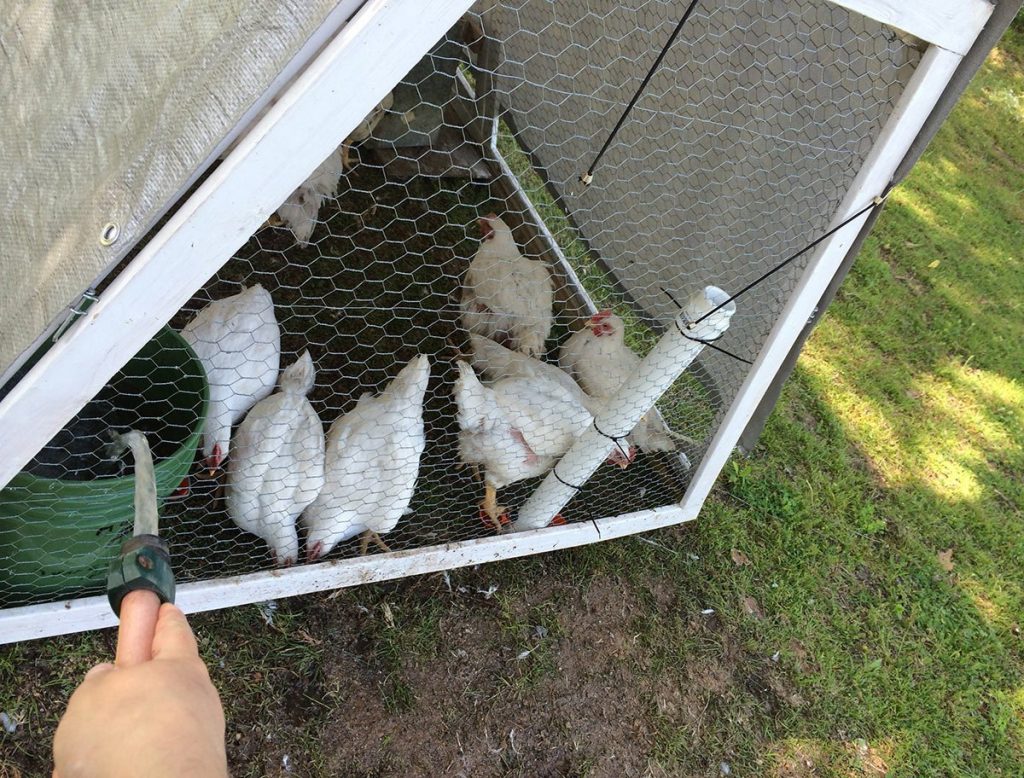
I was concerned about how I’d convince my birds to move with the tractor. It turns out, letting them run out of food overnight, then sprinkling feed in the space where I wanted to move the tractor made the chickens eager to move with the tractor.
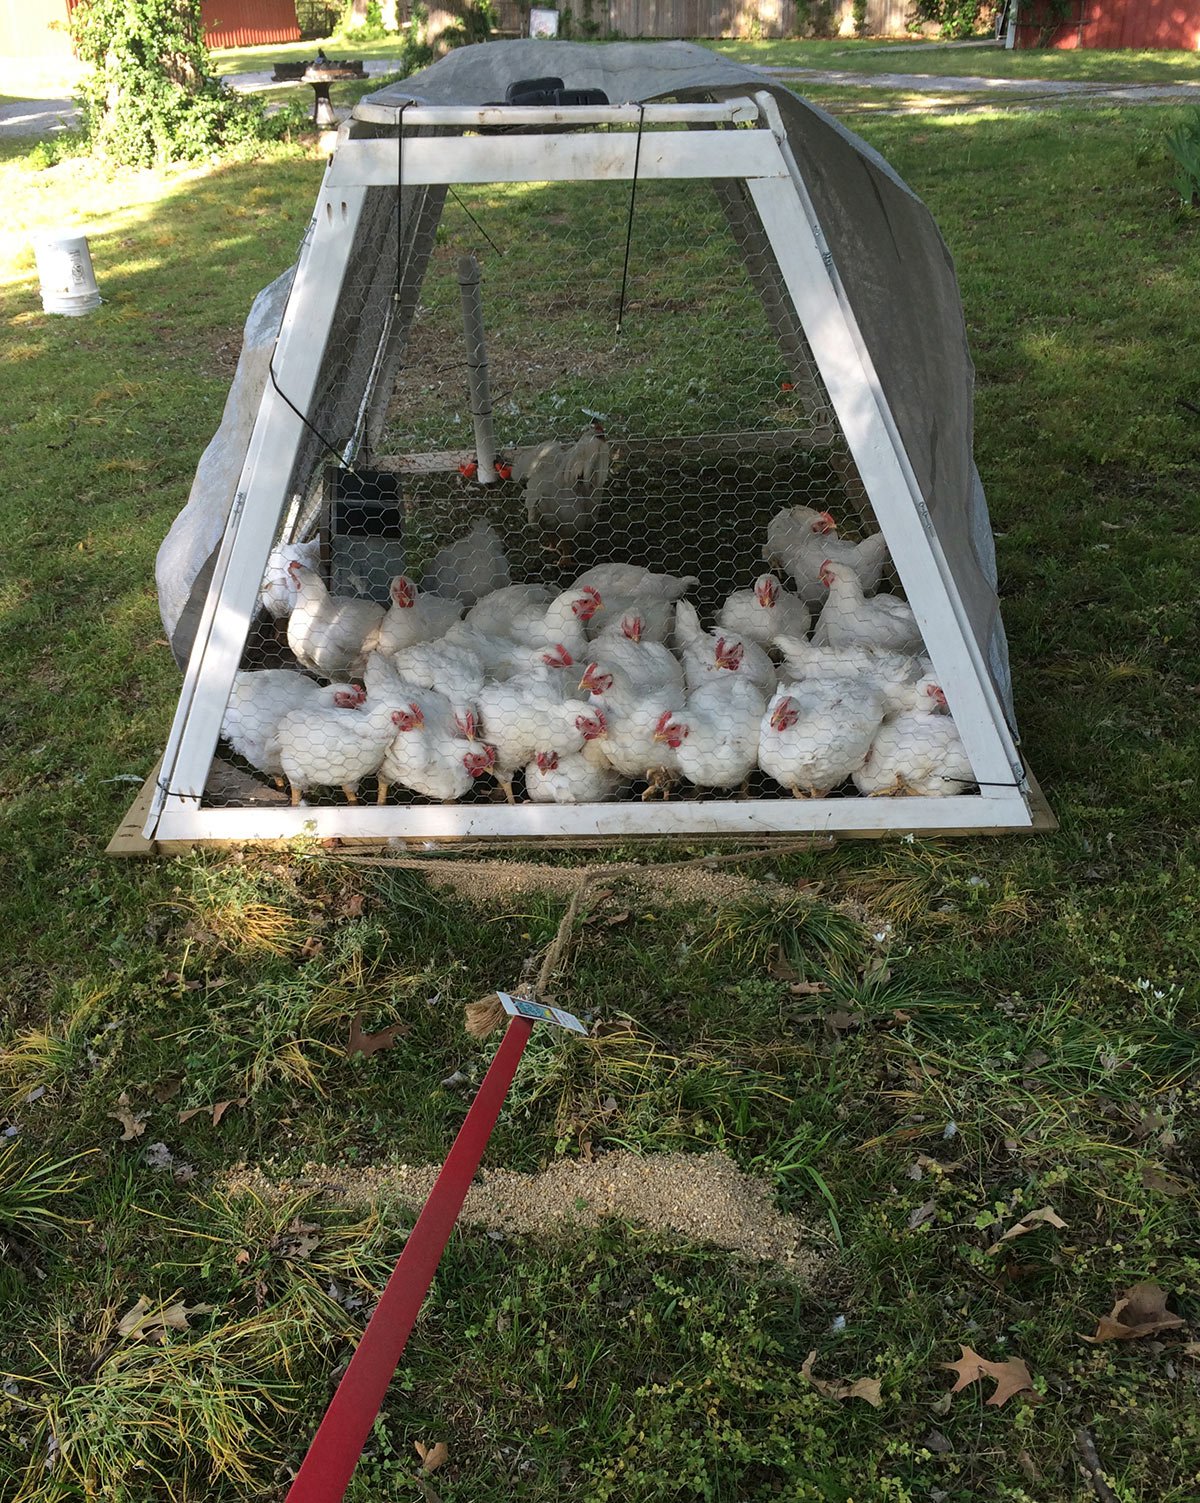
5 am on butchering day: Detaching the chicken tractor panels and using them to compress the chickens into a progressively smaller space made catching the birds easy!
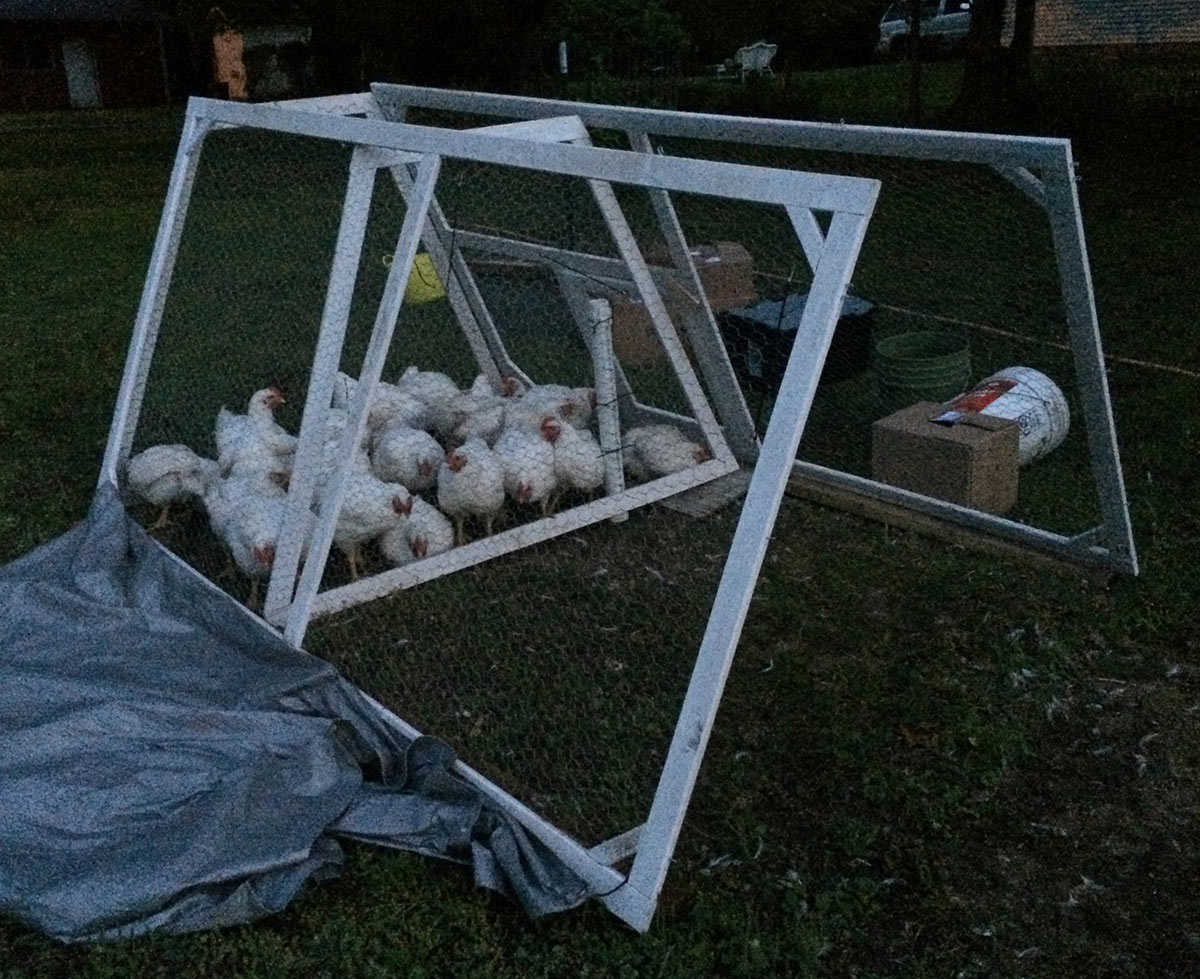
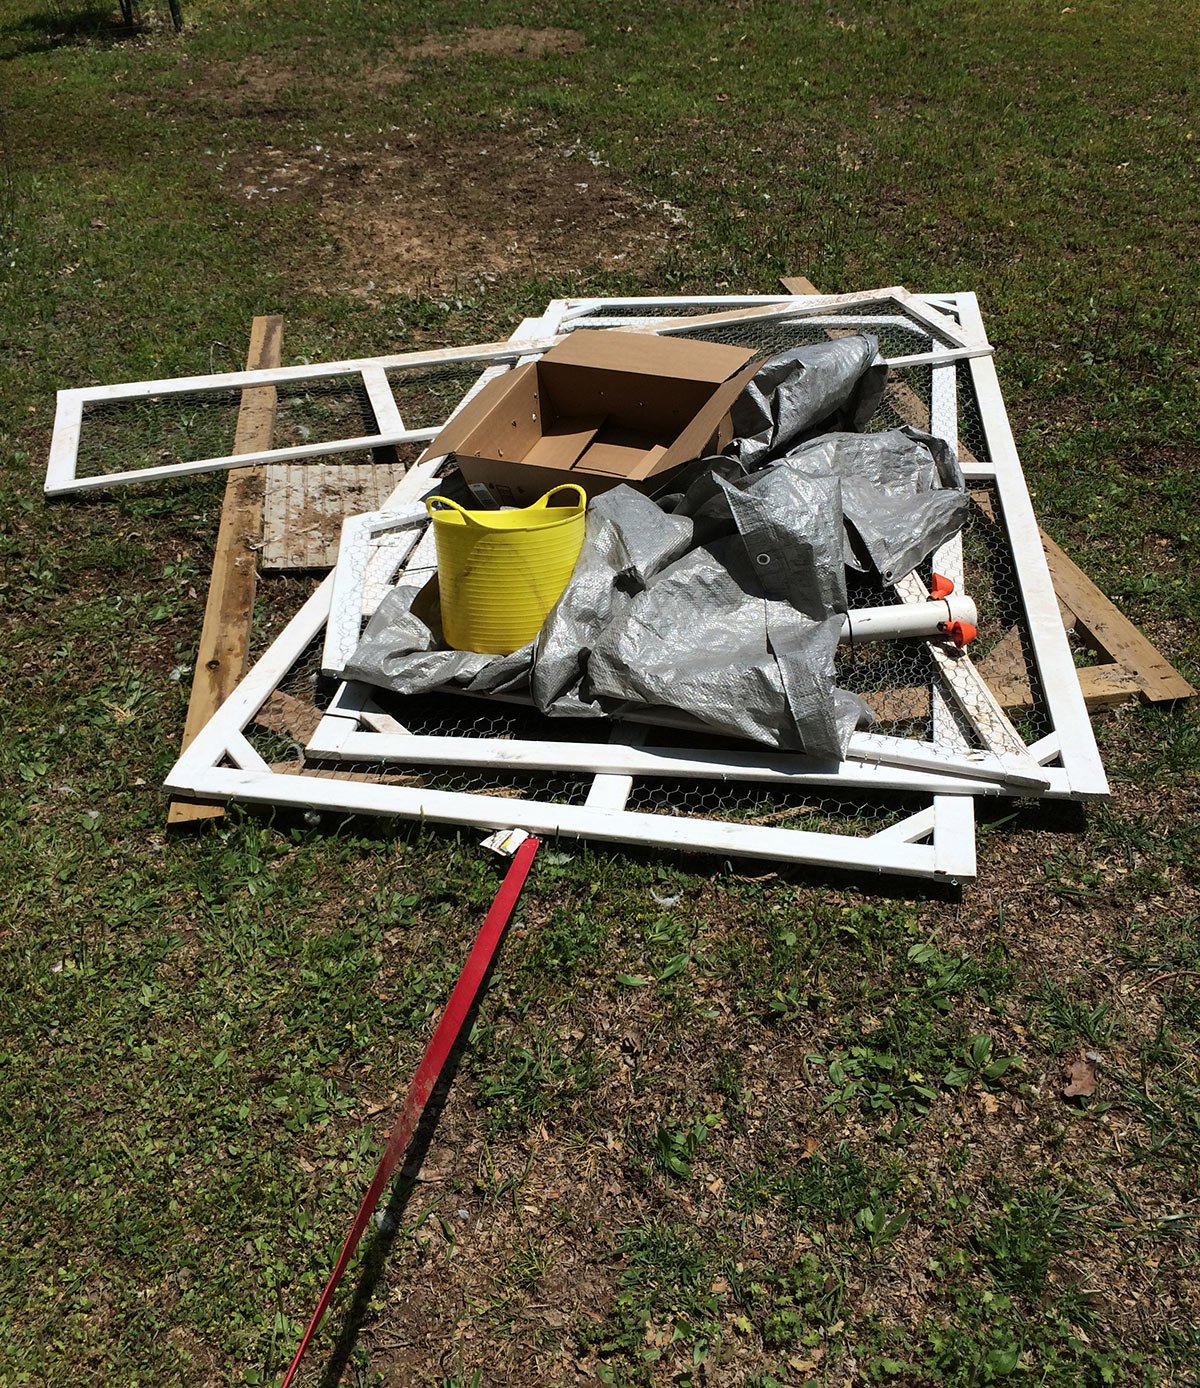
And once the birds were at the butcher, the entire tractor came apart panel by panel and stacked on the sled, ready to drag back to the barn for storage:
Want to learn more about my experiment raising meat chickens? Read more about my chicken-keeping adventures and check out my profit / loss breakdown on raising backyard chickens for meat.
Thanks for Reading!!!
I hope you can tell that I love DIY, researching the best affordable solutions for every-day problems opportunities and documenting / sharing solutions!🙌 Hawk-Hill.com is reader-supported.
☕ Hawk-Hill.com is reader-supported. If this article saved you time or money, please consider donating $1 to help me cover the cost of hosting this website OR If you appreciate this information and want to throw a “Thanks!” my way by buying me a coffee – I would Of Course appreciate it! :]
Reader Questions and Recommendations
Readers, do you have any favorite topics / posts? What would you like to read more about in the future? As I hope you can tell from this and other articles on my site, I really enjoy DIY / a good challenge, and I’m not afraid to roll up my sleeves to figure out a great, and hopefully simple 😁 solution. So please feel free to let me know in the comments below (or reach out via social media)!
Ok Really – I’ll try to wrap this up now😂
Finally, if you’d like to continue to learn about interesting DIY options as well as how YOU can tackle creative new projects consider checking out the latest and most popular articles listed on the Hawk-Hill Home Page. I’m always trying to enjoy and write about the creative side of life so please don’t be a stranger – check back often!😍
Also chech our Pinteres account https://www.pinterest.com/curlylindsay/
If you enjoyed this post you may also enjoy reading / perusing / devouring😊 one or all of these articles as well!
- 💡4 Easy Steps to Make Your Own Sea Glass 🌊
- ❤️Bedroom Decorating Ideas for Single Women’s Master Bedrooms 🛏️
- 🏡Ikea Kitchen Cost: What I Spent for a 9×12 Kitchen Remodel 💵
What are the angles of the end pieces? Love this design.
I will check my angles for you! The nice thing about this tractor is that you can increase the floor space, without increasing the size of the side or top panels, by decreasing the angles and making the height shorter.
I would also like to know what the angles are-thanks
I’d love to see a picture showing the wheels you added. I am old and don’t have the strength to move it on my hilly land by just dragging it.
Thank you.
For those furring strips, do you remember what size Kreg screws you used? Any advice for making it work on wood that thin? I just got my Kreg jig, and I think I’m inclined to agree with you on its utility. Also, what a brilliant trick that gloved sock painting thing is!
Trying to get copy of the plans, but link doesn’t appear to work…
Thanks for letting me know Richard, I just tested it and it seems to be working ok. You do need to enter your email address, then confirm newsletter opt-in, then an SKP file URL will be provided. SKP files can be opened in 3D using free web-based software called SketchUp
Hi, this is exactly what I’m looking for. How many chickens do you think can fit comfortably? Were thinking about doing 10-15 max at a time
10-15 chickens should be comfortable in this chicken tractor, with room to spread out. If I recall correctly, I had 24 chickens in this coop and by the last week of growth they were more crowded than I was comfortable with.
The raccoons in my neighborhood would rip that wire chicken netting off in 2 seconds.
Welded wire can be substituted as a sturdier option for adding additional predator-proofing, but chicken wire worked for the life of our chicken tractor without any predator losses.
Can I ask if there’s a reason you made it as high as you did? It seems like you would still need to bend over to get into the tractor (so not get people height?) but adding height would also add weight, right?
The link to the plans does not work. I looked through the comments to find the size of the angles but no luck. Can you please let me know what the measurements are? Thanks.