
In the article below, you’ll find my original instructions for how to make a horse shaped wreath- plus new resources updated in 2021 to include a video tutorial, free PDF pattern download, and updated instructions.
When I originally made these horse head shaped wreaths, there weren’t how to videos, tutorials, instructions, or patterns for making a horse wreath, but- as I love to do- I worked with it till I figured it out-and I created these instructions below in January of 2014- which have since spread far and wide.
Keep reading for instructions build your horse head shaped wreath, or check out our related articles on making a wreath out an old horse harness collar, decorating a chicken coop for Christmas, making decorations with old horse halters, or decorating your home for an equestrian Christmas.
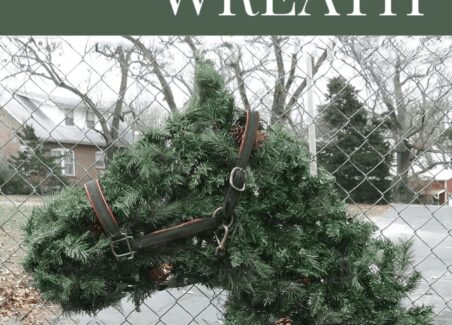
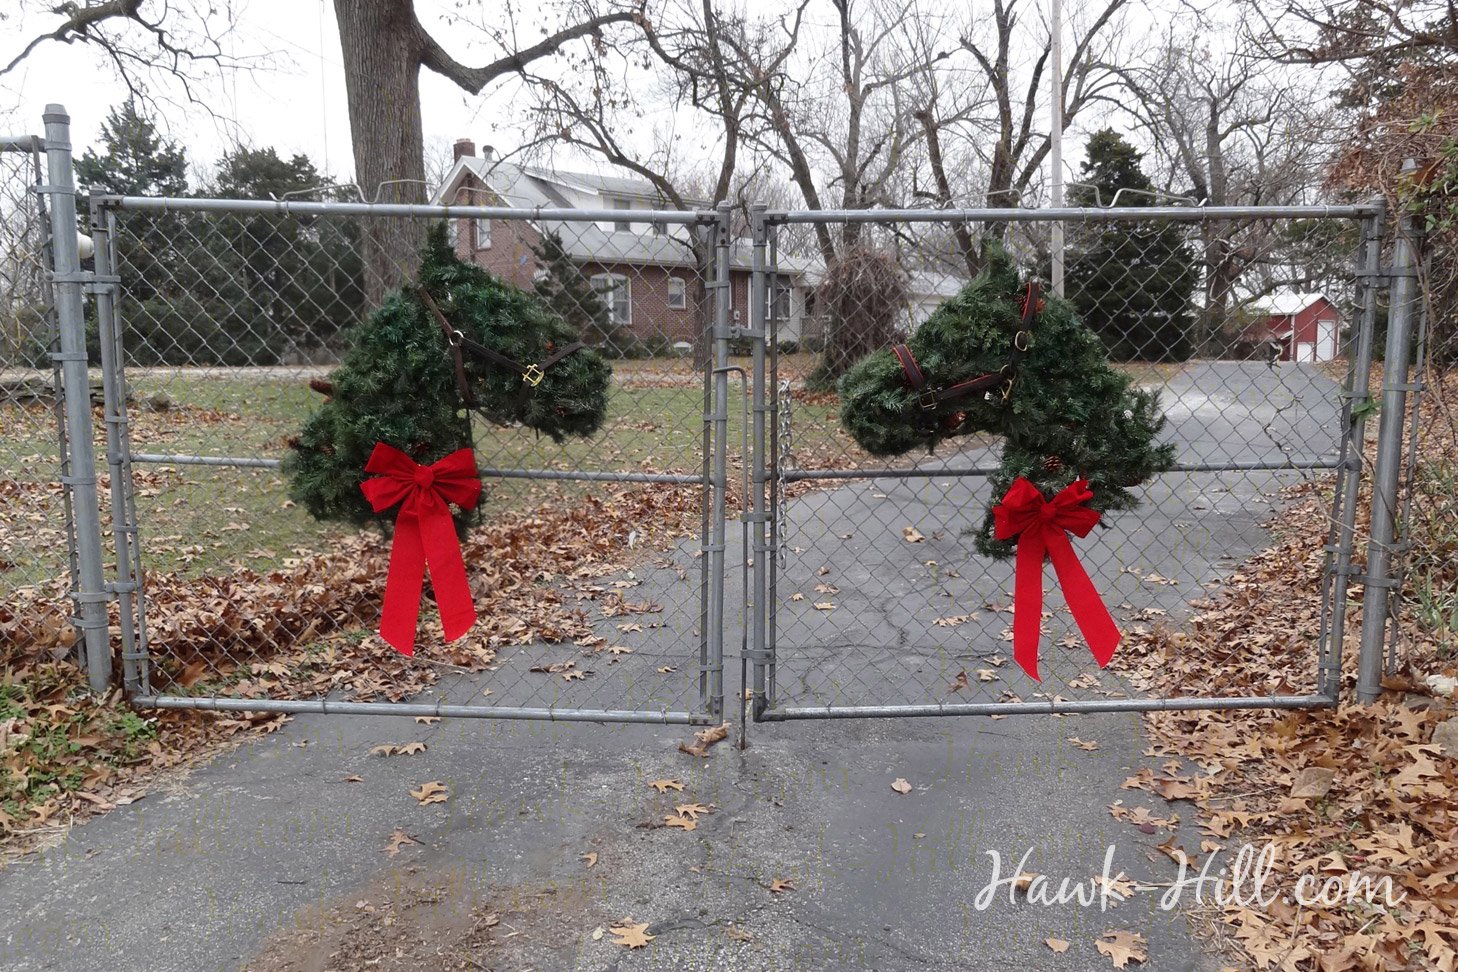
One constant in my outdoor Christmas decorating plan is wreaths on the front gates. Since many of my neighbors know Hawk Hill for the pony that grazes in the front lawn all summer, one year I decided to make wreaths with an equestrian theme.
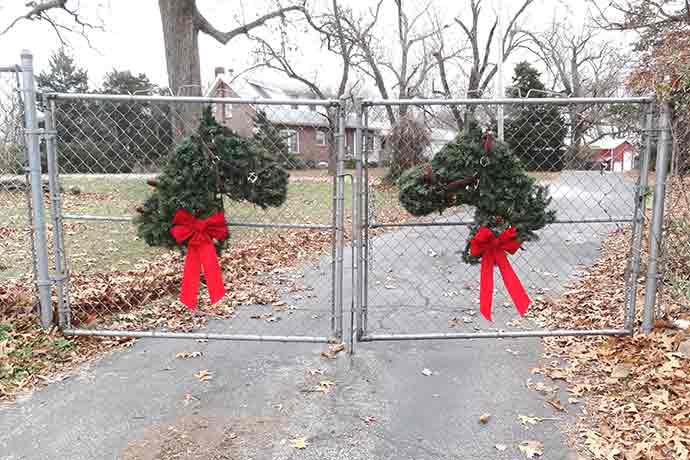
Most people see our gate decor from 45mph, so I knew I needed to go big! I had no luck finding instructions for constructing this kind of wreath, so I decided to post instructions for those who might be curious in the future. These instructions should work for any sort of shape- It would be fun to see the same style wreath done in other interest-specific shapes.
Hawk-Hill.com is a participant in the Amazon Services LLC Associates Program, an affiliate advertising program designed to provide a means for website owners to earn advertising fees by advertising and linking to Amazon.com and any other website that may be affiliated with Amazon Service LLC Associates Program
Update 2021: In response to so many requests to buy my wreaths, a local small business is making these wreaths to sell. Order yours now or use these instructions to create your own!
Materials you’ll need for your Horse Wreath:
EITHER a precut horse head wreath form, OR these
Supplies to make your own wreath form:
1. Chicken wire, hardware cloth, or other flexible wire mesh
2. Wire cutters or Tin Snips
3. Horse Head Pattern to use as a template (see below for a free downloadable template)
Supplies needed for Wreath Construction:
1. Coated Green Twist-Tie Wire – You can make your own with floral wire but twisting tiny uncoated wire is frustratingly fiddly and will leave your fingers mangled after a few dozen, so get the coated wire or pick up a pack of Amazon’s Garland Twist Ties to make this project even easier.
3. Horse halter (optional, front-door sized wreaths will need a foal or pony size halter)
4. Green floral wire (for shaping bushy greenery into defined ears).
2. Evergreen garland – In 2014 & 2015, I made and sold a few hundred of these wreaths(!), and my best results came from using a combination of high-end faux pine greenery with cheap garland as a filler. The cheap garland adds a nice bulk while the nicer stuff gives the finished wreath an expensive look.
VERY IMPORTANT NOTE:
Fluff your greenery before starting, so your wreath will look full and natural. To fluff garland, begin at one end, grasp each wire one by one and bend back out from the central core at a 60-90 degree angle. With fluffed greenery, you’ll be able to use less materials and still create a wreath with a full look. Just trust me, it’s worth the extra step!
Wreath Making Tools Needed:
1. Thick work gloves (making 100’s of these wreaths is when I discovered and fell in love with Simply MUD work gloves, which protect without removing my ability to feel my way around for wires)
2. Pliers
3. Sharp scissors (to cut garland)
Supplies for Final Touches:
1. Red Velvet Ribbon
2. Premade Red Rosette Horse Show Ribbon
Download My Free Horse Wreath Template:
Grab the simple 8.5×11 if you are comfortable enlarging, or purchase the poster-sized template (tiled and in light-grey, to save ink) which you can tape together to create a wreath-sized template.

INSTRUCTIONS TO MAKE YOUR HORSE HEAD WREATH:
INSTRUCTIONS TO MAKE YOUR HORSE HEAD WREATH:
Time required: 45 minutes
Print or Draw a Template
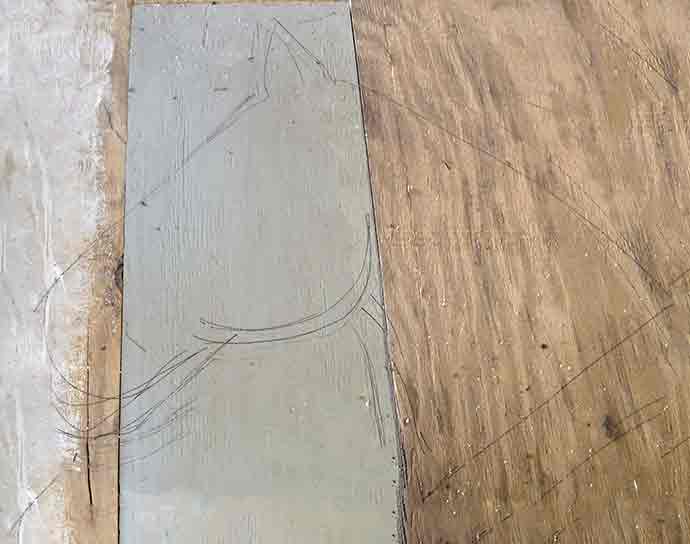
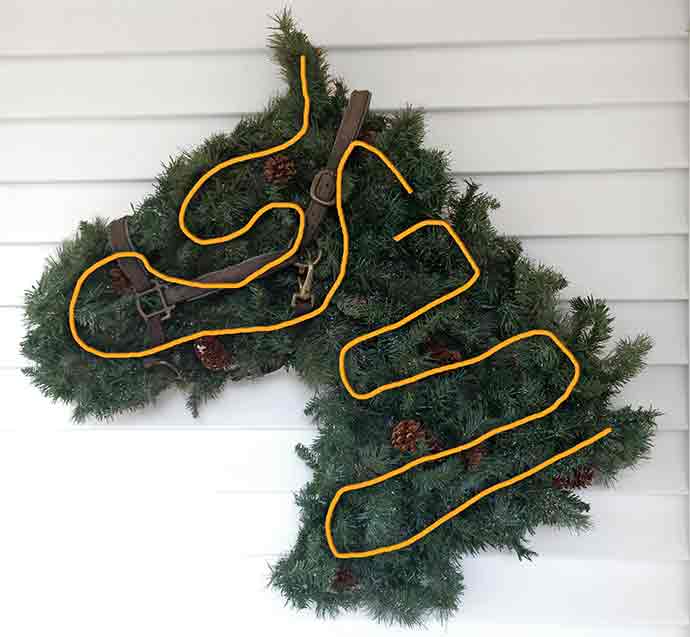
Download my free PDF template above and adjust size as needed. Find or make the outline you’d like to use. I spent most of Junior High practicing my skills at doodling horses, so I just laid out a horse halter to provide proportions and sketched in the shape of the head.
(Note that if you want your horse wreath to be standard front-door sized AND have a real halter on, like mine, you’ll need to base your measurements on a foal or pony-sized halter instead of a horse size). I had so many requests I actually located precut forms for sale, so if you want to skip this step, grab a horse head wreath frame by clicking here.
Fold Wire Mesh into Horse Head Shape
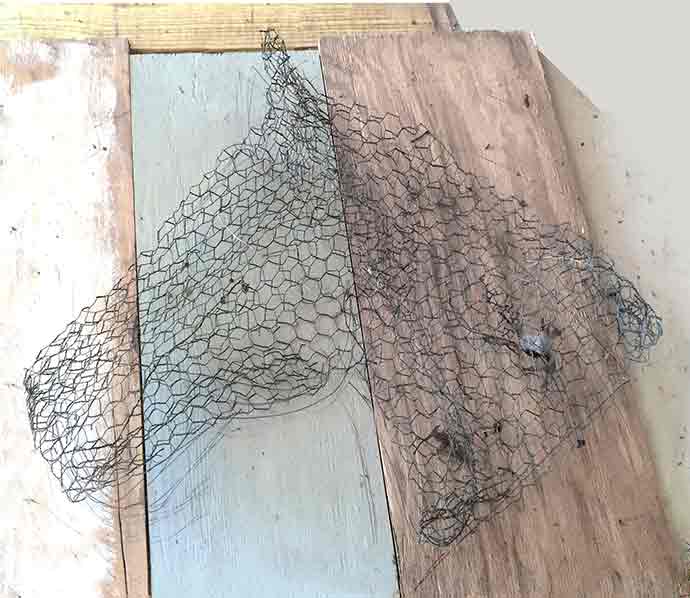
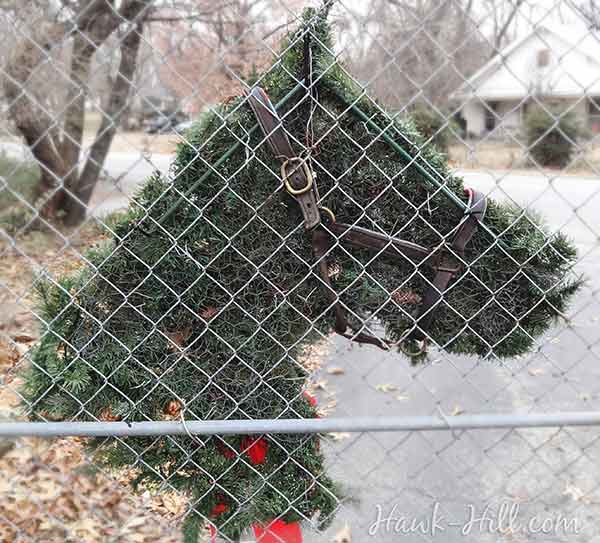
Lay out a panel of wire mesh over your outline. Wearing work gloves to protect your hands, begin folding the edges inward, conforming to the shape of your outline. You’ll have to cut a bit to make the wire fit. To form the sharp corner at the throat, (for non-horsefolks: it’s called the “throatlatch”) make a cut straight up from directly underneath that point and fold each side up to reinforce the chin and neck.
Modeling with chicken wire requires a bit of rough handling, so don’t be gentle with it! You may need to add pieces or layers to get a full, rigid head. When you are happy with your shape, smash it flat.
Aquire Greenery Garland or Fresh Evergreen Boughs
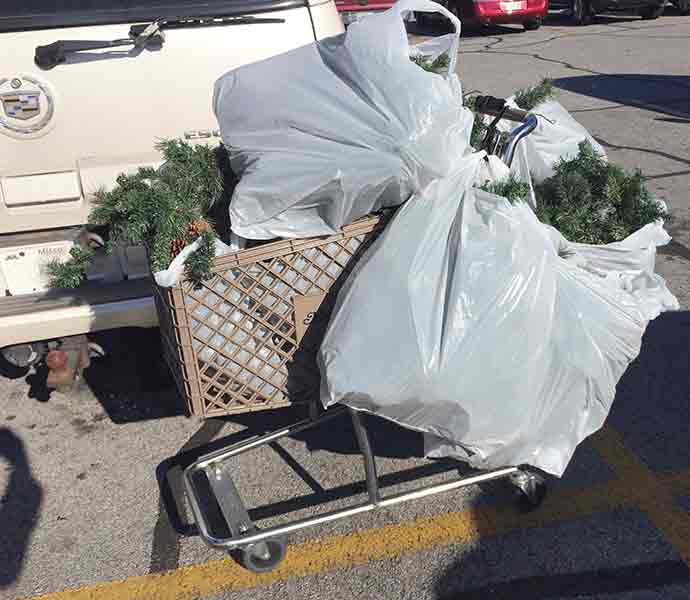
(looking like a bag lady with the spoils of your Black Friday shopping, like me, is optional!)
I mix two kinds of garland for these wreaths: Cheap basic garland purchased in bulk for filler and more authentic faux evergreen garland to make the wreath look at first glance like I used real evergreen boughs.
Add Garland to Create the Horse Wreath
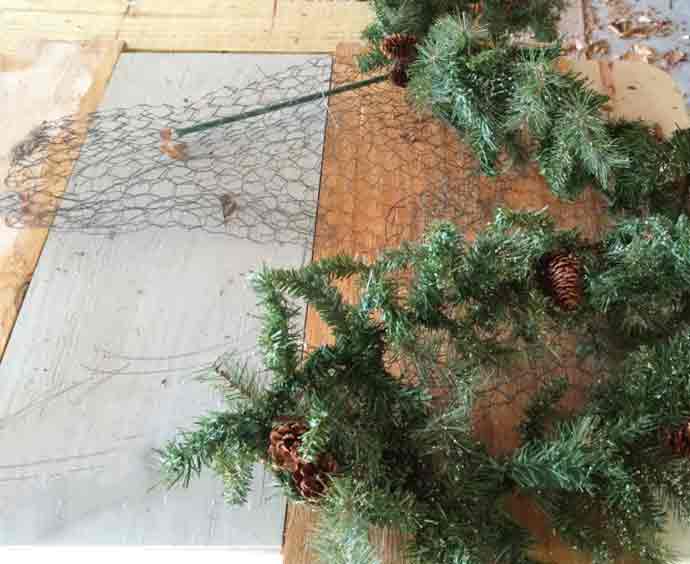
Lay out your garland on the wire frame, and double it back and forth to cover the frame, securing the garland every 6-12 inches. Don’t try to make your garland go farther– a fuller look comes from packing the greenery pretty densely.
Fill Wreath Frame and Fluff Garland
The contours of your design may be different than mine, but this is the actual shape the garland took as my horse head wreath came together:
Secure Garland with Wire or Garland Ties
Use the folded wire pins or garland ties to anchor the greenery to your mesh frame. Start with a few very spaced out wire ties to help get the greenery under control and the end product easier to visualize, then keep adding wire ties until the greenery is completely secure and cannot be shaken loose. Continue until your frame is covered and your wreath’s shape complete.
Cut off any excess garland, then cut those pieces into 4″ to 6″ lengths. Use these short bits to add fullness anywhere the wreath looks sparse.
Wire twisted in this configuration will solidly anchor your greenery.
“Groom” Your Horse Wreath
“Grooming” your horse wreath: you may find that your horse head looks a bit untidy and un-horse-like when done. Don’t worry! With the garland well anchored at many points, you can now fold, bend, and even snip portions of greenery to clean up your horse head shape.
Tip: For the ears and any fine points of your design: green floral wire can help your ears go from bushy to neat: simply grasp the ear in a fist, forcing the sprigs to face one direction, and spiral wrap floral wire down the length. The green floral wire will disappear against the green branches but leave a distinct and neat edge.
When I was finished, my wreath seemed too bushy- smashing under a board flattened and neatened the overall appearance.
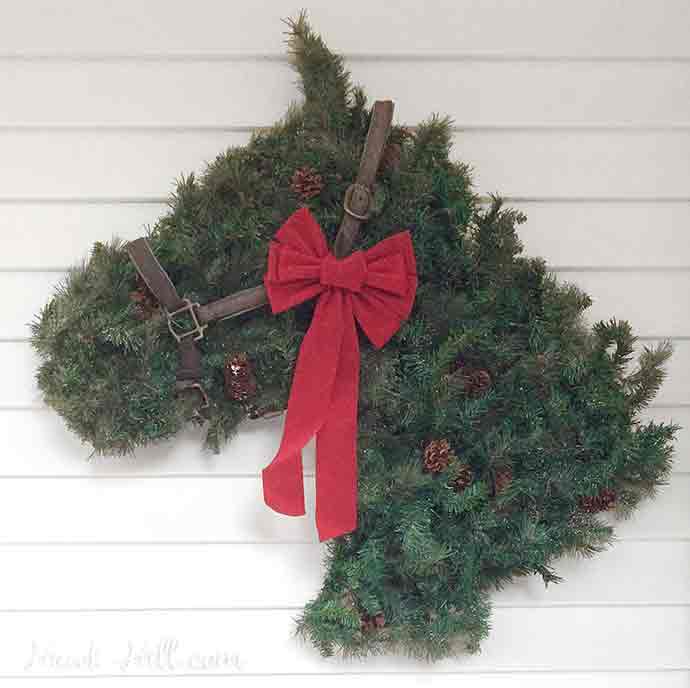
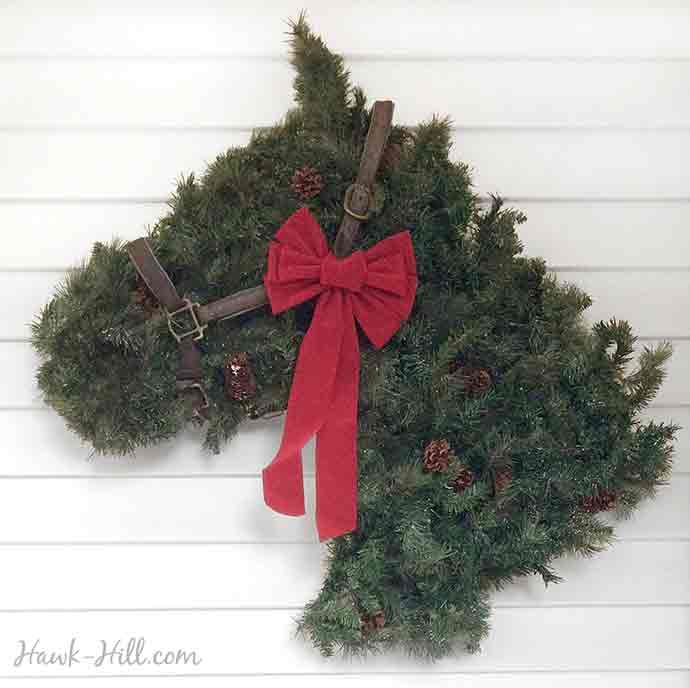
Decorate your Wreath
I really think these wreaths look better with horse halters on them! You can decorate them with old halters like mine, pick up a few cheap red halters, make your own with ribbon, or inexpensively build a “halter” using real halter hardware from LuckyPony.com. Most recently, we’ve started displaying ours with bright red rosette ribbons, for an extra-horsey version of a holiday bow. Pick up the rosettes here.
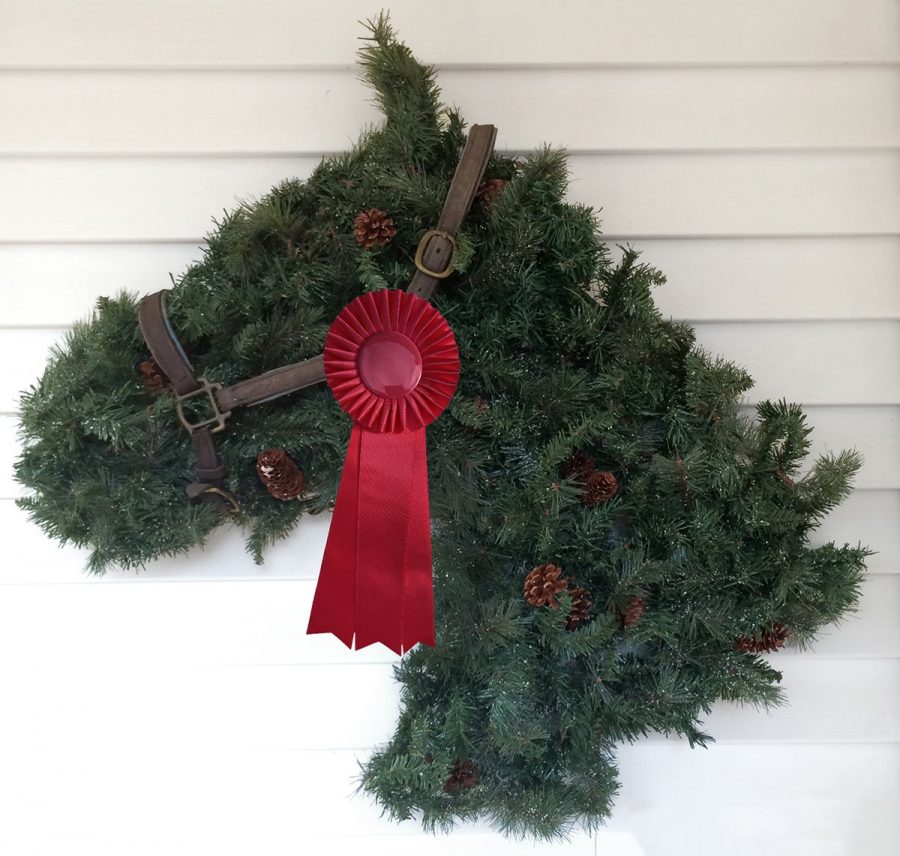
Add a red horse show ribbon for holiday charm and equestrian authenticity. This entire project from sketch to final hanging took me about 45 minutes for my first wreath, and about a half-hour for my second- an outstanding value for very large wreaths that should last several years.
My favorite part about these shaped wreaths is that they are so unique! In a world where most Christmas decorations come from big box stores that sell identical items by the hundreds-of-thousands, it’s fun to have decorations that are totally unique to you!
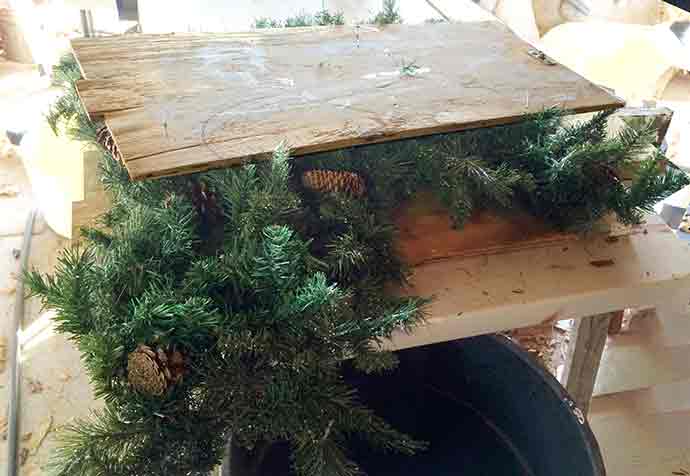
For a reference of how the backside of this wreath should look, here’s a shot of the back of one of mine:
It’s been fun to see this post travel far and wide each Christmas since I originally made and posted these in 2013! So many of you have provided feedback and thank you’s, and I read and appreciate each one! If you take-on this project this year, please share a photo in the comments- I’d love to see your results!
Related Equestrian DIY Projects:
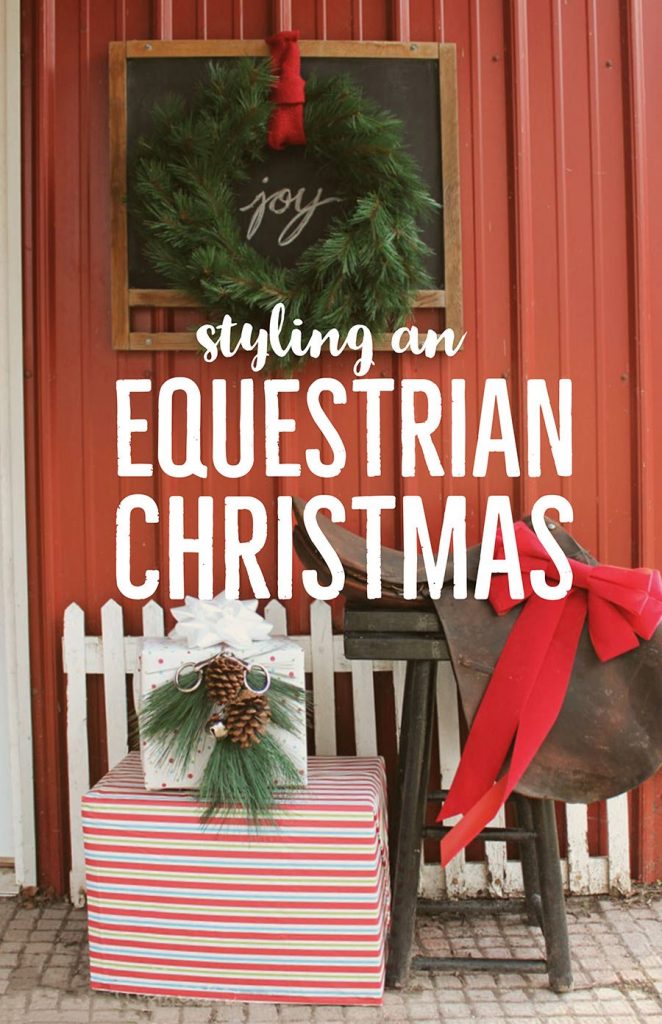
Styling an equestrian Christmas
How to DIY your own Custom Shape Wreath Forms
At first, creating an evergreen wreath from scratch can feel intimidating, and you may be tempted to purchase a wreath frame. Wreath frames can be a time-saving shortcut, but sometimes cost as much as a finished wreath! By making your own wreath frame, you can create a custom wreath in a completely unique size and shape.
Back in the fall of 2013, Hawk Hill had large but modest gates across the driveway at the front of the property. At the time, I kept these gates closed most of the time, while I let our pony, Deb, wander and mow the property to earn her keep. As a century-farm turned suburban relic as the cities on either side of the property grew and merged, suburban neighbors loved my horse, and it wasn’t unusual to see Deb hanging out along the front gates interacting with people walking by.
That fall, I decided to celebrate the property’s most popular feature- our horse- by making two horse wreaths.
Since creating this horse wreath in 2013, I’ve seen versions of evergreen holiday wreaths in sports and dog breed shapes– telling me that people are getting creative and making their own wreath frames. The above instructions outline how I made custom wreath frames for my original front gate horse wreaths back in 2013.
After I posted this tutorial in January 2014, by the next holiday season that tutorial blog post had gone viral- modestly- with hundreds of hits coming in from Pinterest every day. As a tack store owner at the time (FYI: a tack store is basically an “equestrian pet supply store”), I couldn’t skip the opportunity to start making and selling both horse wreaths and horse holiday wreath forms to sell in my shop and on my website.
The next two years (until I sold my tack store in mid-2015), I would start making horse wreaths and horse wreath forms each October, and by mid-November my hands would be raw from garland wire twisting. When I made shaped wreath forms to sell I did so by using heavy gauge hardware cloth (the same mesh wire often used in small animal cages).
To make my wreath forms I followed the following steps:
Design a custom shape (refer to how I created the shape of the horse head above) and draw or transfer it on to your working surface. In my case, I used heavy magic marker to draw the horse head directly on my countertop-height plastic folding table. (If you want to protect your work surface, put down sticky contact paper first, and draw the pattern on it)
Next, I’d unroll my hardware cloth and give it a little bit of a counter bend on the side of the table. This helps prevent it from curling back up into the role that its ships in.
Working swiftly, I placed my hardware cloth over the shape drawn on my table, and use a big chunky magic marker to “draw” the design on my wire. I found that regular sharpies were not robust enough to make a mark easily visible, so I switched to using Chisel Tip magnum sharpies, which left a very clear mark on the silver metal wire mesh.
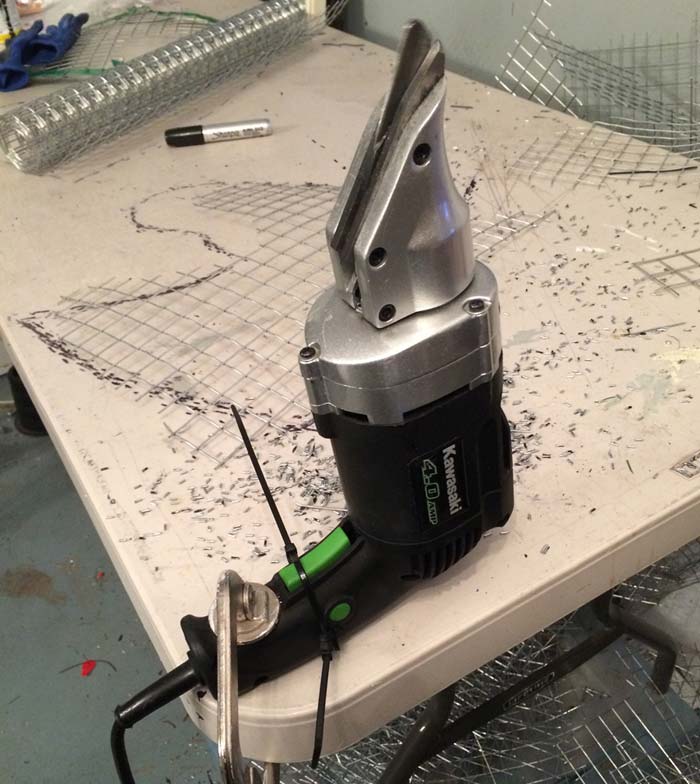
Once I had transferred my pattern to the fencing material, it was time to cut out my wreath form. I cut the first several dozen or so using simple tin snips– which is basically a type of scissors for metal and are the tool I recommend if you only need to cut a few of these wreath forms. However, with orders for more wreath forms pouring in and my hands aching from cutting out horse wreath forms by hand, I had to search out a better option.
That’s when I found out about electric tin snips. I had some expedited to me and they immediately upped my productivity by double. But then, to make things even easier, I tried clamping my electric tin snips to a workbench. That, my friends, was magic! If for any reason you find yourself working on a project where you have to cut massive amounts of fencing material, electric snips affixed to a sturdy surface (so you can manipulate the material rather than the cutting gun) is the way to go!
After my wreath forms were cut out of the fencing material and I had a horse head shape of mesh to ship to someone to build a wreath with, there was just one step left: preventing cuts from the now sharp and exposed wire edges of the metal material, Initially, I tried just folding over the edges to create a blunt outer rim. This worked well but took forever, so back to the drawing board I went.
After some experimentation – and even shipping a few finished wreaths with their frame protected by simple duct tape (which is not a professional look, even if it was hidden from the front!), I found my solution: Plasti-Dip.
Plasti-Dip is a plastic-type liquid that goes on thick and dries soft and cushy- it was developed for making those soft-dipped handles on tools. Poured into a shallow container, Plasti-Dip was the perfect material for coating the exposed ends of my wire horse wreath frames. Once all edges of the frames were dipped in this plastic coating, each had a soft, blunt, cushioned tip, safe for kids and adults to handle during wreath making, hanging up, or storing.
Making a Miniature Horse Halter for your Horse Head Wreath
One of the things that I think really ties together these horse head wreaths is the addition of a decorative horse halter. This iconic piece of traditional saddlery helps make the horse head shape even more defined. Adding a halter is especially helpful if you are using bushy evergreens boughs to make your wreath- as bushier boughs or garland can look a bit less tidy as they follow the shaped frame.
Although my original 2013 wreaths (pictured above) were giant – literally horse head sized – and I used a full-size horse halter to decorate them, when I began making these wreaths to sell (For the Christmas seasons of 2014 and 2015) I had to figure out how to scale down this design for my more typical front -door size wreaths. I began experimenting with various ways to make little halters for these wreaths.
I worked with multiple materials and attachment methods to make halters and bridles sized to scale for the wreaths. If you want to follow along and make a halter for your horse head wreath, here’s how. You just need some red strap material and a few pieces of hardware!
The easiest and most realistic way to halter your wreath is by using a real horse halter in pony, miniature horse, or foal size. Using a real halter looks authentic and has the added benefit of providing an easy way to hang the wreath- but if you aren’t interested in purchasing this specialty product just for a wreath, here’s what you’ll need:
Supplies to Make a Halter for your Wreath:
2 Large Metal O-ring’s (available at any hardware store) You’ll need to place one O ring on the nose and one under where the horse’s eye would be. The first ring holds the noseband in place, and attaches it to the cheek piece, while the second o ring connects the cheek piece to the crown and the throat latch
A piece of hardware called a “halter square” is more authentic to use for the hardware at the nose, and I use one in these images, but as this piece of hardware can be difficult to locate in small sizes, I recommend using an O ring.
1 Long Red Strap (I have experimented with both burlap and faux red leather and I definitely recommend leather or vinyl for ease-of-use. In a pinch, you can use ribbon, although I find it to be too thin and flexible to look like real halter.
Glue vs Rivets: Halter Attachment Methods:
Depending on the material you- and the difference between working with thick and meltable vinyl vs thin and porous burlap or ribbon, the best attachment method will vary. I achieved the best, most realistic results by using fake vinyl leather and rivets. If you don’t have a rivet setter, however, you can use various glues or even hand sew stitches to hold the decorative halter in place.
Step 1: Build a Noseband
To start, you’ll need to string the pieces of strap or ribbon together with the O-rings in a traditional horse halter shape. Begin by making a T shape with the O-ring connecting three straps. Take two of those straps and wrap them around the nose of the horse head wreath. Take the third strap and pull it up towards where the horse’s eye would be. It may be helpful to measure on your wreath and but attach the hardware on a separate, flat, surface.
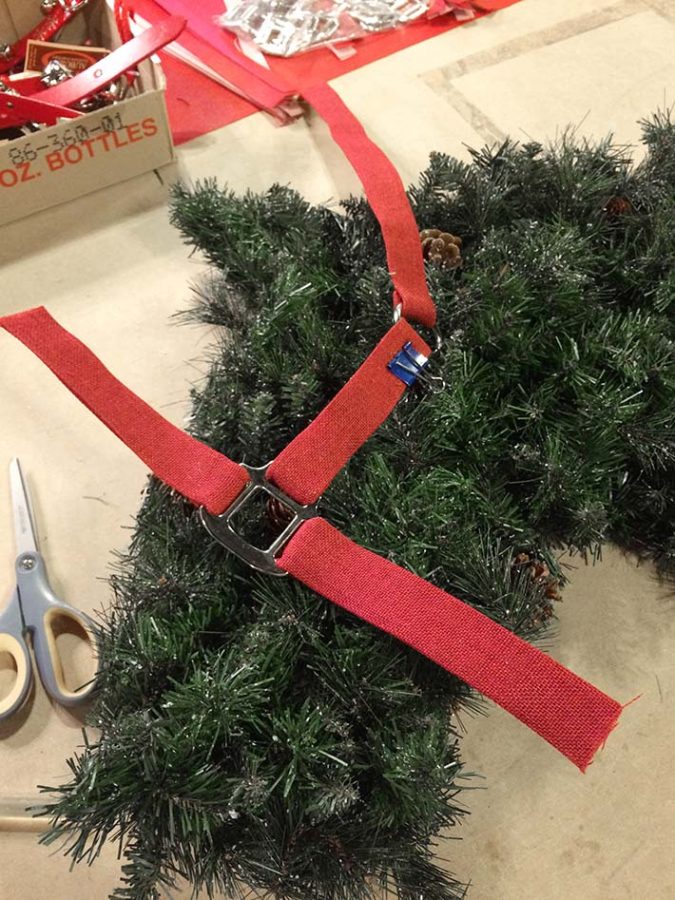
Step 2. Connect Noseband to Halter Crown and Throat
A bit below and to the right of the horse’s (invisible!) eye, attach a second O-ring to the cheek strap.
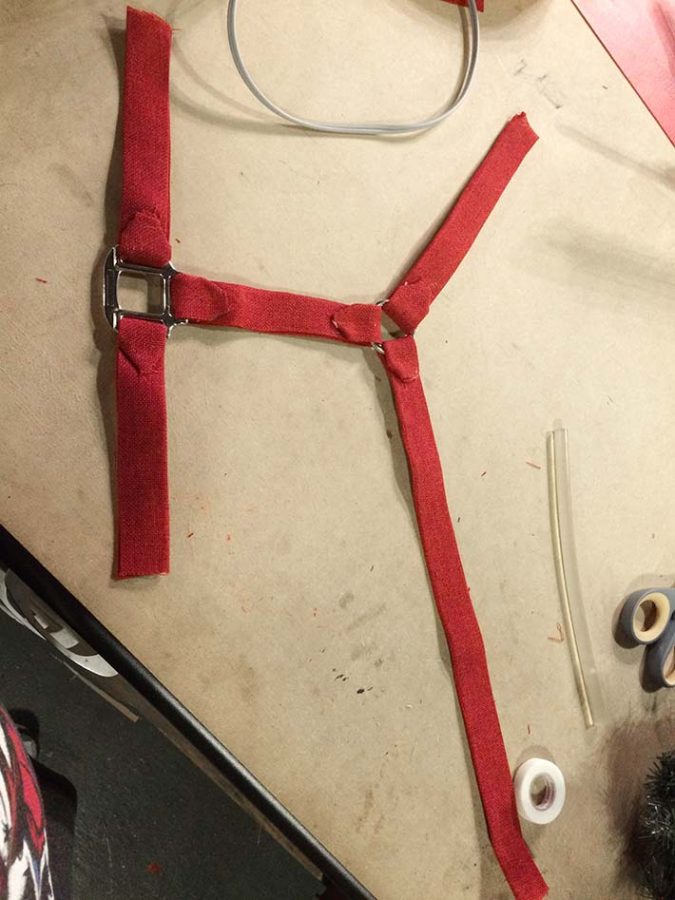
Step 3. Connect Crow and Tuck in Edges
Next, attached two more straps to the O-ring under the eye. Take one of the straps and pass it under the chin of the horse head wreath, where the head meets the neck, and attach it securely to the back of the wreath form. Attach a third strap to that O-ring and pull it up over the wreath horse’s head just behind the ear – where a typical crown of a horse halter would rest.

Thanks for Reading!!!
I hope you can tell that I love DIY, researching the best affordable solutions for every-day problems opportunities and documenting / sharing solutions!🙌 Hawk-Hill.com is reader-supported.
☕ Hawk-Hill.com is reader-supported. If this article saved you time or money, please consider donating $1 to help me cover the cost of hosting this website OR If you appreciate this information and want to throw a “Thanks!” my way by buying me a coffee – I would Of Course appreciate it! :]
Reader Questions and Recommendations
Readers, do you have any favorite topics / posts? What would you like to read more about in the future? As I hope you can tell from this and other articles on my site, I really enjoy DIY / a good challenge, and I’m not afraid to roll up my sleeves to figure out a great, and hopefully simple 😁 solution. So please feel free to let me know in the comments below (or reach out via social media)!
Ok Really – I’ll try to wrap this up now😂
Finally, if you’d like to continue to learn about interesting DIY options as well as how YOU can tackle creative new projects consider checking out the latest and most popular articles listed on the Hawk-Hill Home Page. I’m always trying to enjoy and write about the creative side of life so please don’t be a stranger – check back often!😍
Also chech our Pinteres account https://www.pinterest.com/curlylindsay/
If you enjoyed this post you may also enjoy reading / perusing / devouring😊 one or all of these articles as well!
- 💡4 Easy Steps to Make Your Own Sea Glass 🌊
- ❤️Bedroom Decorating Ideas for Single Women’s Master Bedrooms 🛏️
- 🏡Ikea Kitchen Cost: What I Spent for a 9×12 Kitchen Remodel 💵
Love it!! Thanks for sharing.
this is adorable! Can you tell me the cost of the materials to make it? How much chicken wire does it take to make one horse head?
Hi Kathy! Thanks for your question. I used 2 garlands which I got on sale on Black Friday for $10 each, less than $1 worth of wire, and some scrap chicken wire (gosh, maybe originally a 4 foot by 4 foot section, that I scrunched up)
Lindsay, this is a fantastic idea. I just love it!!!! Thank you so much for sharing it!!! Merry Christmas to you and yours!!!!
saddlebrat
these wreaths are just the greatest!!!! I train racehorse and I would like to make some for Christmas gifts! what exactly is the semi-rigid wire? I hope I can do this for friends!?!?!? I make jewelry so I hope I can pull this off! Lol! and if you have any other tips, please tell me as I am a first timer! you’re the best for sharing how to make the wreaths as some people just cannot afford to purchase them. you are truly a very good person.
Cynthia Milano
p.s. I live in Saratoga springs, new York…..truly horsey town. : )
Hi Cynthia! Thanks for your comments! Actually I think for this project I may have used wire from a roll of electric fence wire. 😉 You can also just go to a hardware store and tell them what you are making and they should be able to set you up with a small roll of wire for under $5.
At the hardware store ask for mechanics wire, strong and flexible plus cheap.
Chicken wire
hi again lindsayanne! im a bit confused. ok…I know what electric fence wire is, as my dad and I had a farm. but what part of this project is it used for? thank you! cynthia milano
It’s used to anchor the greenery to the chicken wire!
Look how fir works for the mane. Beautiful! Going to try this https://www.facebook.com/Hoefslag/photos/a.147107138712819.32601.145345278889005/727594087330785/?type=1
actually I have another question…..am I supposed to weave through every square of the chicken wire? Cynthia milano
No, if you use U shaped piece and twist the ends together, you can anchor small sections at a time until you feel that the greenery is securely in place.
Have you ever done this with balsam boughs? I make wreaths and people want me to make these for them with balsam Could it work thanks
lindsyanne, I apologize for bothering you but I am having trouble getting this horse head wreathe making down pat. question…..when I weave the greenery, what lengths do I cut the greenery into as it doesn’t seem I can weave the whole 9 feet as one long piece. thank you sooooooo much. Cynthia milano
Just wanted to thank you for the instructions, I live in northern Minnesota, so of course I want to try this with fresh pine. Can’t wait, on my way our to get chicken wire right now:)
We raise miniature horses, so this is soooo perfect. If it works out, all my horsey friends will get one!
Thanks for the great instructions!
Thank you so much for the instructions, I can’t wait to make one.
This is totally awesome!!!!!!!!!!!!!!! Thanks so much for the instructions. I too am going to try this. I love horses and my family is into horse racing. I sure hope I can pull this off. Yours looks great!!!
thank you for sharing these step bye step instructions. These are amazing, can’t wait to try!
Do you have any for sale, now and how much?
Yes! I am making a few to sell this year, you can order via the links below:
Large Horse Head Wreath (sized for barn sides, fences, gates, etc)
Medium Horse Head Wreath (sized for front doors)
Thank you for sharing how you did this!
Thank you so much for your step by step instructions!!!! It is such a fresh breath of air to see a talented woman who is willing to share the instructions. Thank you very much!!!
oh my attempting to make one for my daughter thank you so much for sharing your wonderful talent so freely given one happy daughter if I succeed
How do you get
The back to cover up so well?
If you are having trouble with coverage, you either need to use more greenery, or you need to better fluff the greenery you have! Good luck! Let me know how it turns out!
These are absoltutely awesome Lindsayanne~! Thank you so much for sharing the instructions. Can’t wait to have one hanging on our barn- 😀
Hi Lindsayanne, I am in the middle of making a wreath, but I am having 2 problems: 1. When I try to feed the florist wire over the garland and tie it on the back of the chicken wire, I can never see it coming out on the back side. Pathetic, I know. But do you have a secret on how to use the wire or twist ties? 2. I also may be doing it wrong. (I probably am). When looking at your wreath, it is 2 sided. I have been laying the garland on top of the chicken wire and [trying to] tie it down. But this results in a one sided wreath (which is all I need for the barn doors). But, should I be weaving the garland in and out of the chicken wire to make the finished product look thicker?
THANK YOU so much for being so kind and considerate to us newbies. I am not crafty, but I am trying hard. 🙂
Pam Mahony
Southern Pines, NC
Hi Pam! Thanks for your questions! My wreaths are not double sided! The chicken wire actually just blends in really well once it’s all snugged up together. Regarding your question about getting the wires through- I would NOT use floral wire for securing the greenery to the frame- it’s just too thin to hold up well long term AND it tends to bend rather than poke through the greenery- making everything harder. Originally I used plain heavy wire to secure greenery to frame, but having made lots more now here’s what I’d advise- get to the store and find wrapped floral stems (a heavier gauge wire with a grippy wrapping that makes it much easier to tie) and get the package of 20 or 22 gauge wire- cut into 5″ lengths, and use that to tie your greenery onto the frame. Also, be sure you are working in a very, very well lighted area- it makes a big difference!
You might try zip ties to anchor it, I use it to put garland onto metal wreath forms. Would love to try this, thanks for the instructions.
Zipties can help stabilize the garland while you add wire ties, but the plastic in zip ties begins to break down when exposed to UV light (outdoor display) and extreme temperatures (storage in attic/garage/etc). If you’re making this wreath for outdoors I definitely recommend floral wire or garland ties.
Hi Lindsay, I finally figured out a method that worked for me! Since I have needlepointed countless pillows and belts, I treated the wreath like a needlepoint; 4 forward, 1 back. This way I can do wreaths that are full on both sides. It takes about 3+ garlands and about 90 minutes, but I love them! (PS: I am selling them cheap to get lots of orders. No one on this FB group would pay what they are really worth. (And I do not ship.) 😀
Thanks a MILLION for showing us how to do it!
https://www.facebook.com/groups/253718777990721/
Thank you! Trying this out today! You are so sweet to share your creativity with us!
thanks so much for the instructions. Going to make it this week end 🙂
I will try this with real pine tree branches for my own use. I have a very inexpensive source (a tree that is dying on our farm & another that I can trim off some branches) Once the pine dies, I’ll save the form for next year & use it again. Thank you for the step by step directions! I was trying to figure out how to make a form, that might be the biggest challenge for me, as well as drawing a horse head, but with your directions, I’ll give it my best shot!
thanks for sharing the step by step instructions – these are truly brilliant I think I could be busy over the next few weeks making these for the girls at the stables 🙂 Thank you again from England.
Hi Lindsay, do you have any more horse head forms for purchase for the wreaths? I would love to try to make one but I think using your pre-made form would be easier.
Thanks for sharing the instructions. Thanks!
Hi Bonnie! Yes! I wanted to get caught up so I could enjoy Thanksgiving and catch up on some other things, but they’re available again now- at least until I feel bogged down again. 😉 http://www.luckypony.com/productcart/pc/viewPrd.asp?idproduct=30927
What a blessing you are to share instructions. Some of us have to make our own, because of financial circumstances. I hope you are very successful in your sales. This is a delightful design.
Started following you on Pinterest! Which of your boards is this pinned to? Can wait to use one of our old halters and try this!
Like many of the others, I want to send a big thank you out for sharing your method and pattern with all of us. You can bet I will be making one (well ok, at least one! 😉
Thank you so much for the great instructions, I can’t wait to get started. I think I may have purchased the wrong size halter though. I just noticed that you mentiond a cob sized halter….is this what you recommend? I went ahead and ordered a horse size before I read it through and I’m not sure if it will fit properly.
If I ordered more than 2 frames could you lower or disregard the shipping fee?
Thanks so much for your interest! Unfortunately no, we’re having so much trouble keeping up on orders for these that I’m not able to do any discounts. My slightly numb snips-holding hand insists on it. 😉
awesome:)
It might help some to spray the chicken wire with Fix All green spray paint for wood or metal. If making more than 1 horse head wreath, just stack forms together and spray all at once to conserve paint. Using 18 or 22 gauge floral tape wrapped wire cut into about 5 or 6 inch pieces bent into a “U” shape might help, too. Hope this helps.
Thanks for posting the instructions.
I am so happy to find your site! I am a DC for a US Pony Club and I think we may make these as a fund-raiser for our club!!! You are so wonderful to share all of this info!
Thank you!!
Would like to know what size halter to get for the medium horse head wreath – is it COBB or PONY? My frame should be arriving today – can’t wait to get started. Thank you
Is the pre finished head 2or1sided?
would like to buy on from you already made
Received your form and the ends are all enclosed in black tape. I started to take it off and noticed there are sharp edges in places. Am I supposed to remove this prior to adding the greenery? I think I should but am awaiting reply – thanks
What size halter do I need to look right for the medium size one?
Well just ordered pony off of amazon and it was too big. trying cob now
I would love to make one of these but I can’t get the instructions to print. Any suggestions?
I bought a colt/yearling size halter and it was too big. Not wanting to spend any more money on a halter if I didn’t have a horse, I found red velcro and used the fuzzy strips to make a halter. It was fastened with eyelets and split rings and worked great.
How much do you charge for a door size wreath?
I would love to buy one already made
Lindsayanne: Couple of ?s here. I’m a handicapped/disable male in So. IL and also currently fighting stage 4 cancer in the abdomen. I have four families that I would love to make these for. My concern is I cant draw(1) and mine would look horrible; would I be better off to purchase the form pre-made. Is there any discount for ordering more than 1 of the same? Im talking a pony size wreath.2) I want mine to have the long mane as well. I thought I saw it on here but couldn’t find it again. Hard for me to see the computer sometimes too What do I need to make the long mane and how much of it for 4 pony horse heads? 3) What if I wanted to make the ‘inside’ of the ears look more ‘natural’ and what would one use for the noses, eyes, etc? Would putting some kind of greenery or grass in the mouth make it look like it was eating, maybe even hay??? Or would it look to ‘corny” 4) Can you put white lights on it too for some flair? Maybe a set of 50 or so? Let me know what you think. What price could you offer for four of the horsehead (pony). We have a Rural King nearby where I think I could pick up some pony halters for cheap and we have a Hobby lobby close by as well. Pine cones added anywhere? Just FYI …Years ago I dated a lady who’s sis had a flower shop and at busy times during the year we would help make things so that’s where I learned how to do some of this stuff. Do you ever use a glue gun on any of these. Sorry for sooo many ?’s. I’ve added your site to my favorites list so I don’t ‘lose you’
Hi Scott- thanks for reading! I actually don’t sell any of these (wreaths or forms) anymore, just refer out to companies I know that do- they might be able to do custom designs for you. I love all your creative ideas and I would just say give them a shot and see what happens! I’d use dark green floral wire for any special details you want to create- or works great, can be bent and moved after it’s added, and if you don’t like the final result you can pull off the wire and start from square one!
Want to find out about how to purchase horse head wreath. Hi
The best
I LOVE YOUR HORSE WREATH AND WOULD LIKE TO HAVE INSTRUCTIONS.
Thanks Virginia! I’m not sure if you read the whole article but I do include step by step instructions. You can print them out if you need a print copy to refer to while you build your own.
Great idea. Maybe I’ll make a reindeer version. I’ve put this link on the Starcross News page on Facebook. Maybe you could add a Facebook share button to this page?
I love these!!! Are you using artificial garland OR real live garland greenery?
I used artificial- but there’s no reason it wouldn’t work with live greenery!
Hi : I’m making horse head wreaths for my gates. I’ve used cedar for the head and body, but I don’t know what to use for the mane. Is it pine or fir? I want branches that will provide a “flowing” look. Can you help? I live in Western Canada
Hi Sue- it sounds like you are using live greenery? I’m really not sure- as you can see I did not detail mine and didn’t add pinecone eyes or a mane to my horse wreath, I like the simple outline and have not experimented with details, so I couldn’t say.
My frame wants to keep rolling up….Did you use some long Dows in the frame?
I added garden stakes for stability, which could help flatten- but first try rolling the wire loosing in the opposite direction that it wants to roll- you might be able to cancel the bend in the wire that’s making it want to roll.
ok so i have a question im 13 and a bit poor but my gma loves horses she use to own some when she was younger so i want to make her one for Christmas but i can afford garland right now so would real evergreen work i live in the country and plenty of evergreens
Hi Chasity, Yes- live evergreen would TOTALLY work and look lovely. To create the wreath with live evergreen you’d use a similar process, but wiring individual small boughs to the frame. I bet your grandmother would love it!
thanks i hope so to im doing the frame out of chicken wire like you because thats all i had found it in the woods left over from my fish trap but looking for the right pine tree to hack some branches off with my hatchet and use some red ribbon for the halter and thanks for the idea
I took your instructions and made a Yoda head for my son with his son’s help. We made it fit into a box I already had so he’d have a way to store it and I could gift wrap it. (I would post a picture but I don’t know how to do that here.) He loved it.
What a fun idea! Thank you so much for letting me know my instructions worked for you! I’m sure your son appreciated such a thoughtful gift.
Hi. I may be a little late to the party here, lol I just saw this. I was wondering if you had tried it with all natural elements? I have those trees all over our property. I will buy the form. We just moved to a new house and my craft room is a disaster! But I’m thinking if I tried to use greenery probably best to do outside anyway. Any advice you have would be appreciated. Thanks!
Hi!
Thank you for posting instructions for the horses head wreath. I’m a miniature schnauzer lover and saw a picture of a wreath done like the head of a miniature schnauzer and loved it. Could never find instructions and I’m not knacky enough to venture into wreath making without guidance, that’she where your instructions came in. I played all afternoon in the basement putting the wreath together and rereading your post to guide me. So, just wanted to thank you for posting & let you know that you inspire others to create. Happy holidays!
Do you take orders?
I do not. I have provided a link to a small business that does in the text of this post, though!