You don’t need to be a professional to convert a hardwired light fixture to plug-in- it’s a simple DIY anyone can do in minutes! In this article, I show step by step how to add a plug to a hardwired light. Jump directly to the section to learn about:
- A list of 3 tools you’ll need to add a plug to any light
- An illustrated guide to convert a hardwire light fixture to plug-in that can be used be used anywhere an outlet is handy,
- and how to use a light with a plug added to bring light to rooms with no ceiling wiring.
Follow along for a beginner-friendly guide to adding a plug to any light fixture.
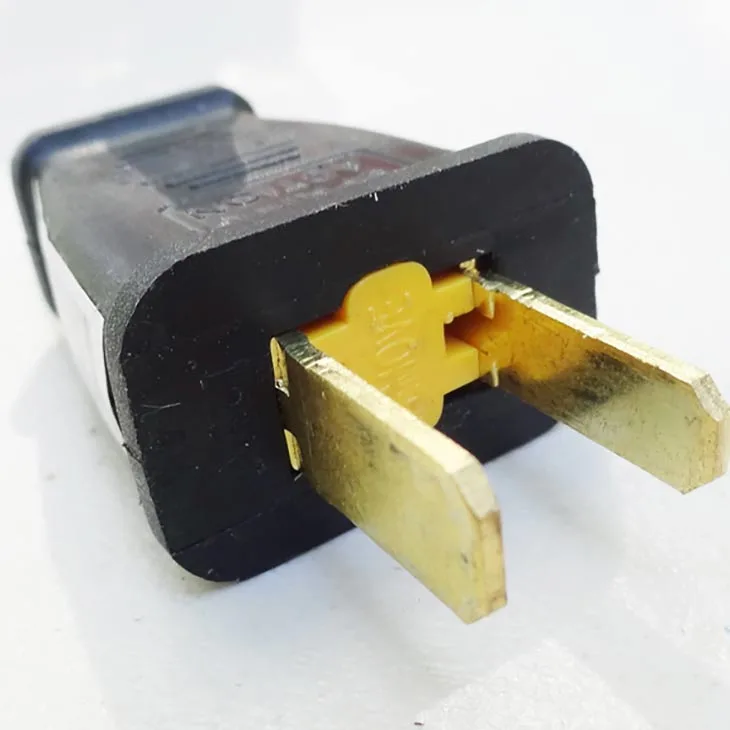
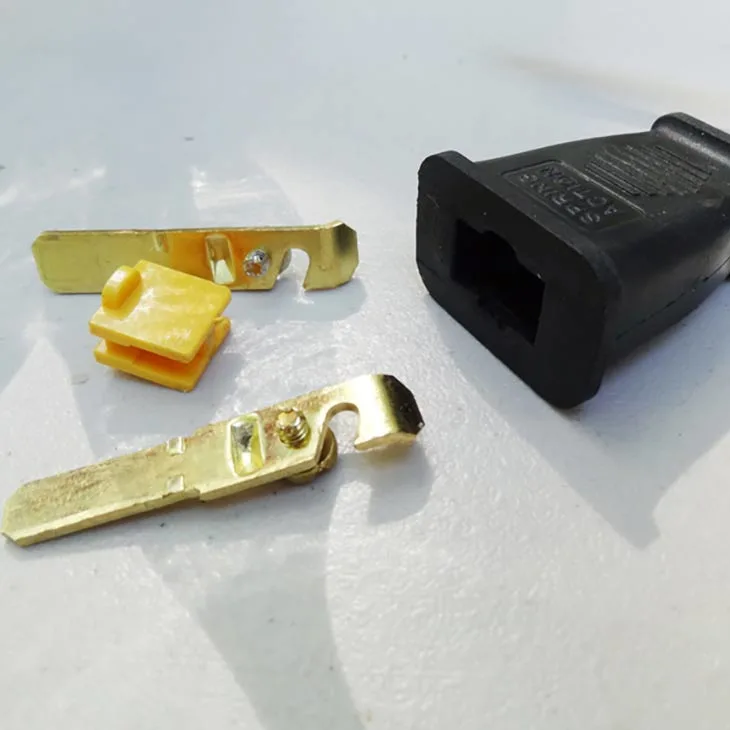
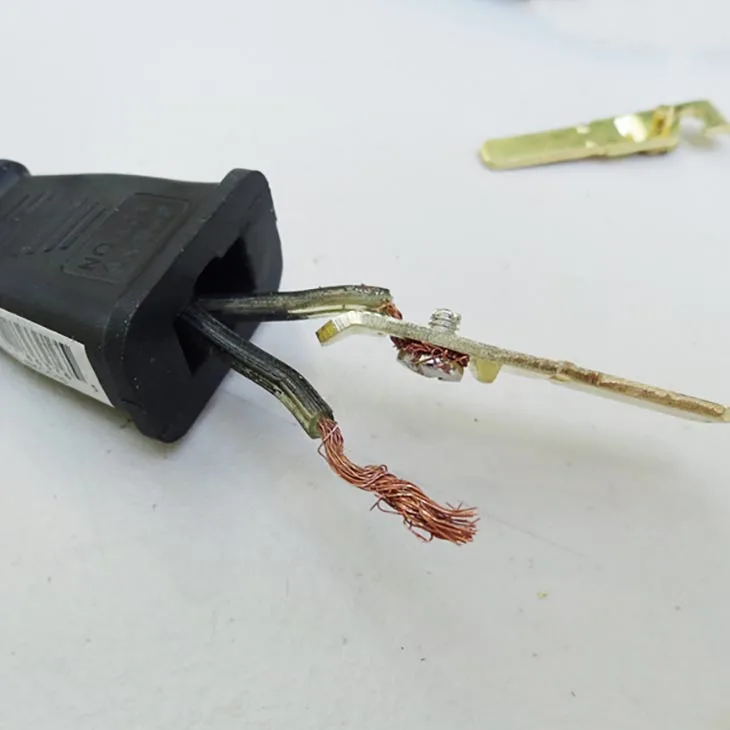
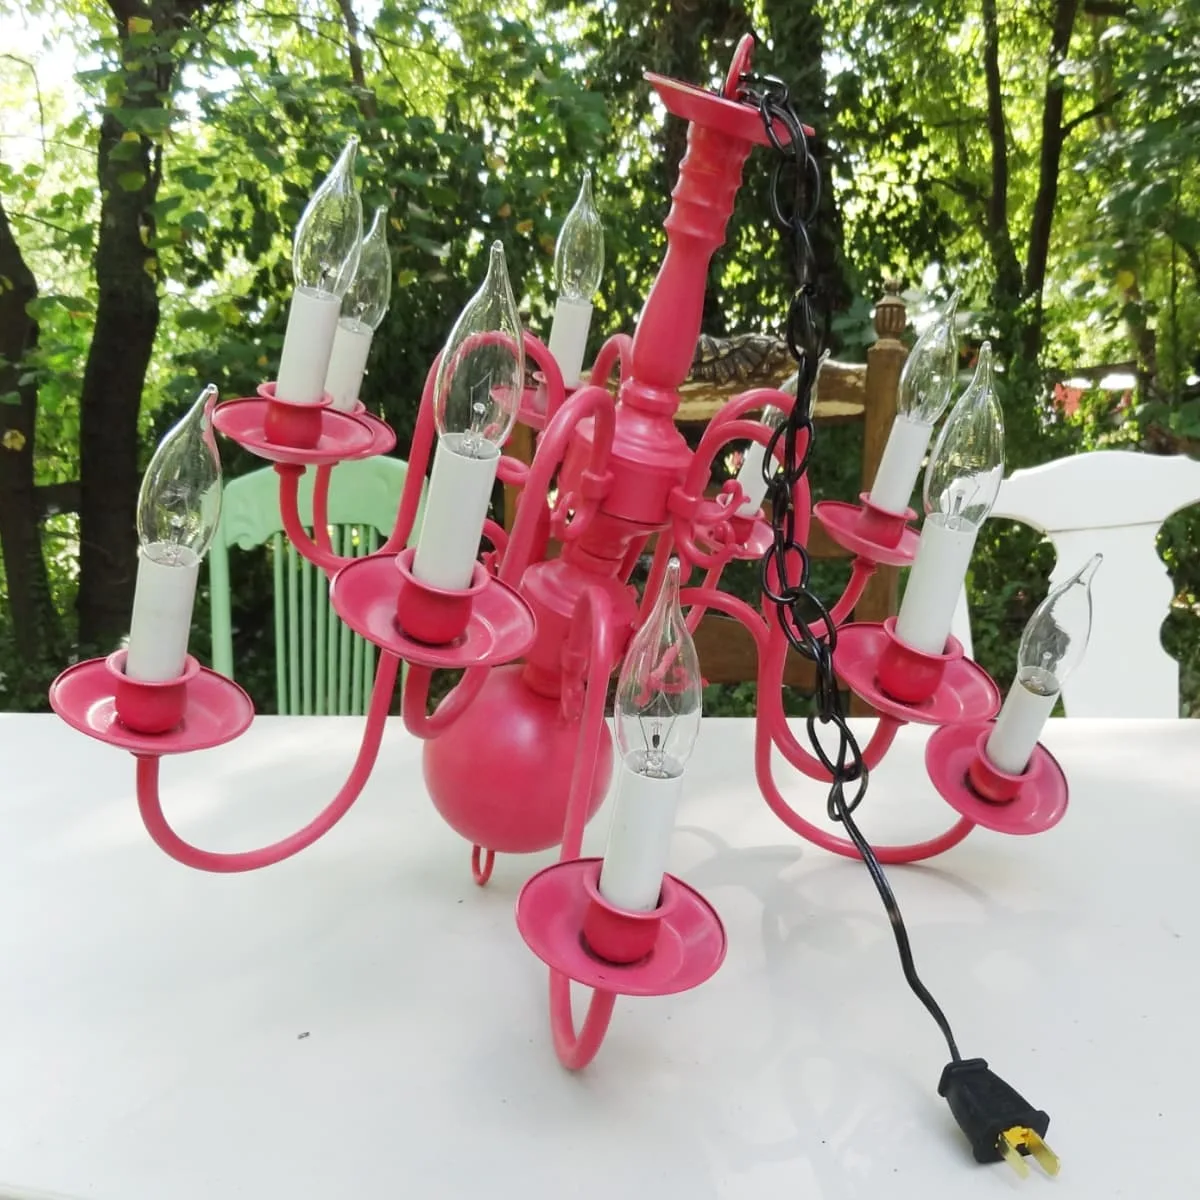
I love chandeliers, but I used to think they were limited to placement within reach of ceiling wiring. When a friend asked for help hosting an evening bridal shower under the sprawling branches of Hawk Hill’s ancient live oak, I started exploring how to make chandeliers a part of the outdoor lighting at my friend’s special event.
Many questions to the knowledgeable staff at my local hardware store and a consult with an electrician helped me learn that it’s actually just a 5-minute DIY to convert a light fixture from needing to be hardwired to an electrical box to simply plugging into any outlet. The best part? It just takes one cheap part to make this switch! Once the plug is added, a chandelier can go anywhere an extension cord can.
Here’s an illustrated tutorial on how to add a plug to a hardwired light fixture.
Supplies Needed for Converting Hardwired Fixture to Plug-In Swag Style:
The following section may contain affiliate links. As an Amazon Associate, we earn from qualifying purchases.
Parts Needed:
- EITHER: 1 x 2-prong Polarized Plug OR
- a Three Prong Grounded Plug.
I’ve not been able to find this item at a big box home improvement store like Lowes or Home Depot, but Ace Hardwares usually have them in stock. Ace’s part number for the 3 prong replacement plug is SA540BKCC10
Tools Required:
- Screwdriver (If you purchased the plug I sourced above, you can use either a flat or phillips screwdriver)
- Wire Strippers (optional! The wires on your light fixture will probably already be stripped, ready for hard wiring. If you don’t have wire strippers, you may be able to strip wires *carefully* with a pair of scissors- here’s a youtube video showing how)
CAUTION: Electricity can be extremely dangerous! If at any point these instructions seem unclear or don’t adequately address the particularities of your light fixture, stop and consult an electrician or licensed electrical contractor.
Optional Supplies:
Instructions for Converting a Hardwired Fixture to Plug-In:
Choose and Prepare your Light Fixture
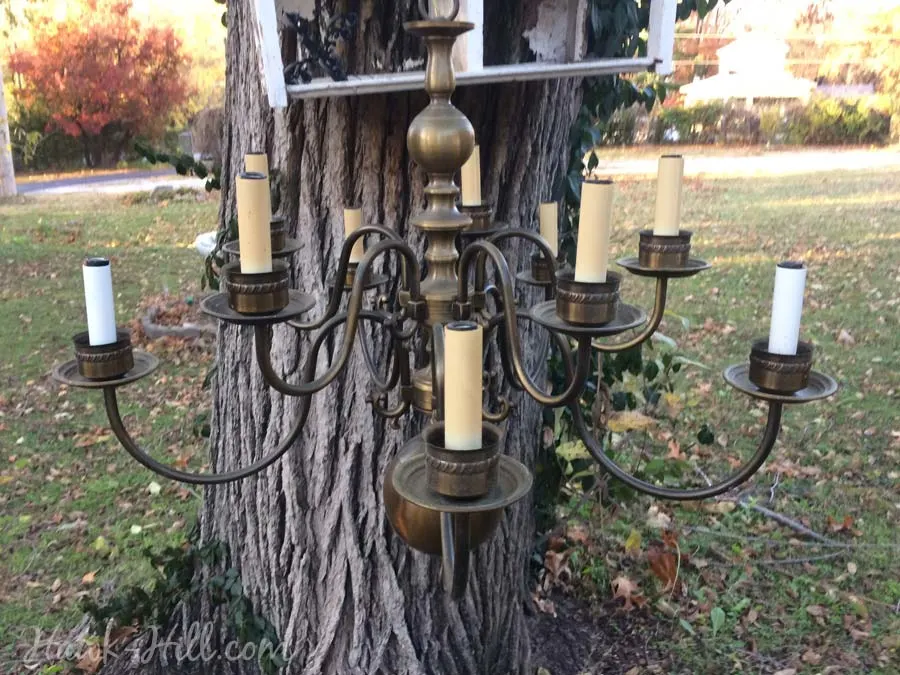
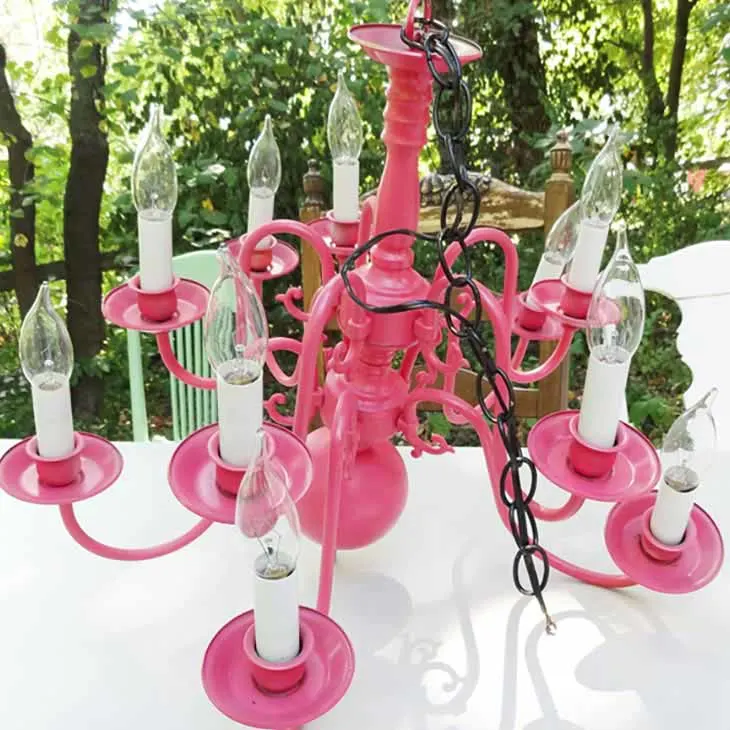
First, choose your light fixture. Thrift store chandeliers paired with a new coat of spray paint are my favorite lights to convert to lamps. They make ideal temporary lighting to use as decoration for parties, photoshoots, girl’s nights, etc.
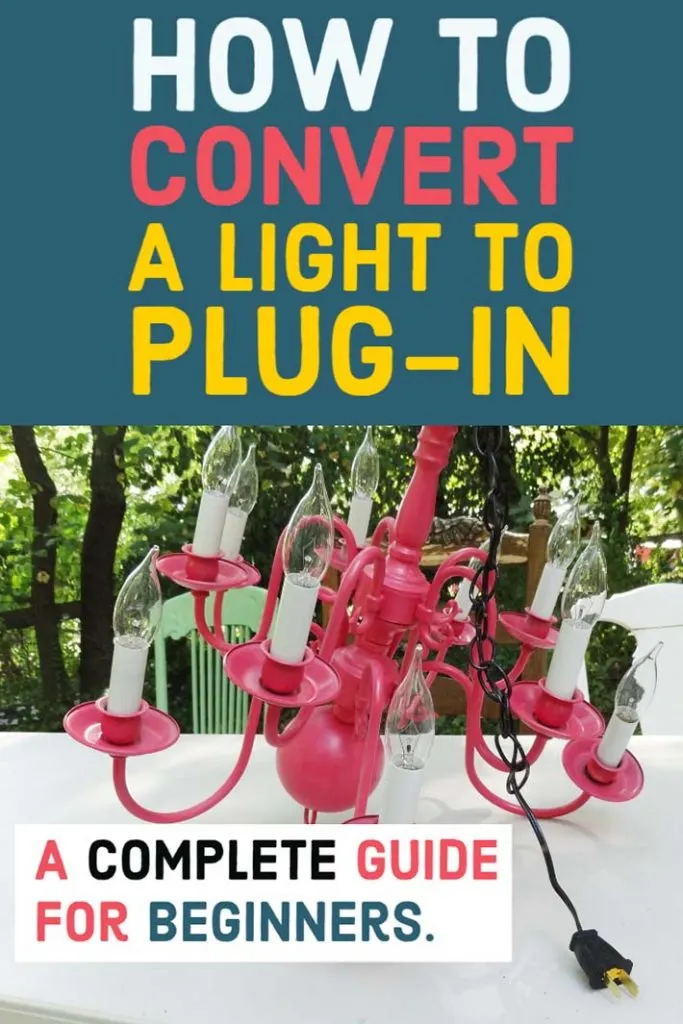
In the photos above, a $15 ugly brass chandelier turned pink party accessory is ready to convert from standard wiring to a plug-in fixture for use as outdoor lighting at an outdoor evening bridal shower party.
Locate, Separate, and Strip Wires
Separate the two wires that come out from the two separate sections of the cord:
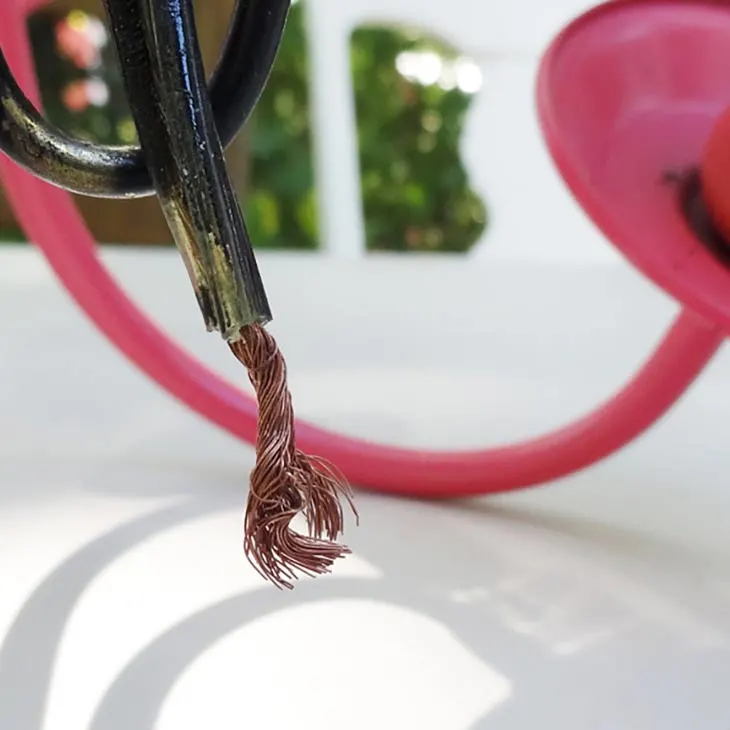
The plastic coating may fuse them together, but to make the next step easier you’ll want to peel those two sections away from each other. A new or used household light fixture should already have these wires exposed, but if they seem too short to work with or frayed, you can cut off the frayed portion and strip coating off fresh wire to reveal unfrayed and easy-to-work-with wire.
Since the wires shown in this image were a bit frayed, I chose to make the next steps easier by cutting and stripping the coating from a new section before continuing.
Acquire New Plug
Now, grab your new 2 prong plug or 3 prong plug. (My images illustrate connecting the two-prong plug, however, the process for the three-prong style grounded plug is almost identical.)
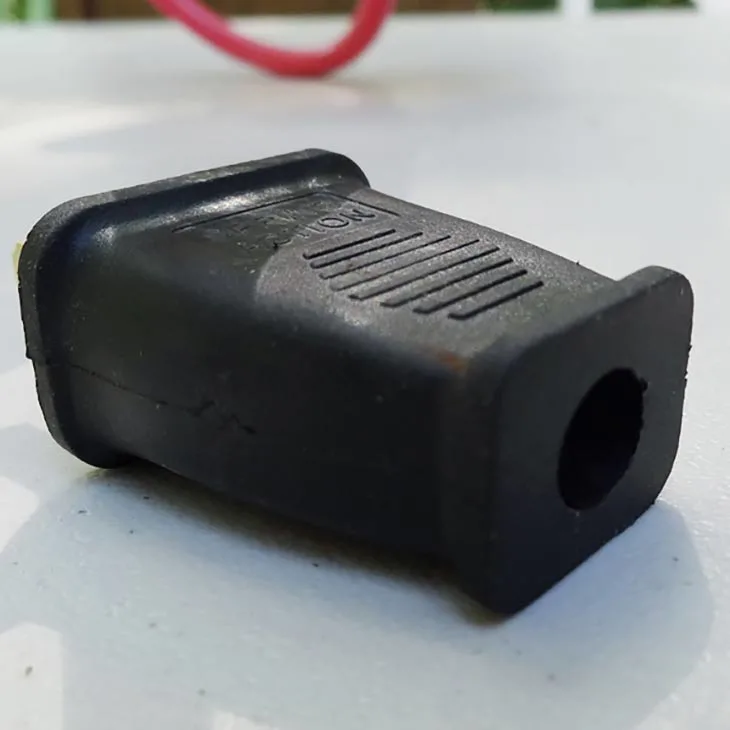
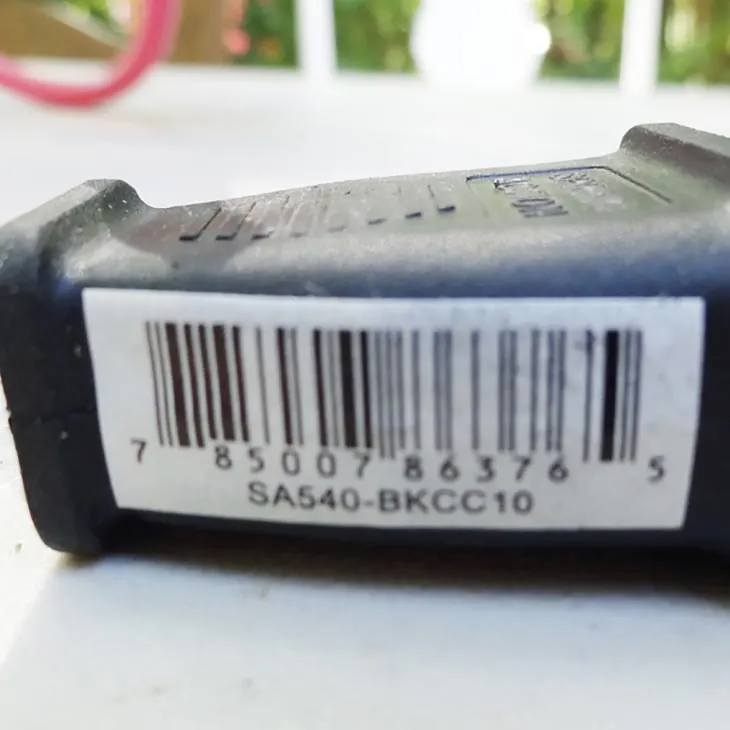
See the yellow portion? We’ll be removing it to make room for wires (note: It might be a different color on yours)
Prepare & Open Replacement Plug
Now firmly insert a screwdriver up through the base of the replacement plug part as shown. The yellow portion (stamped “remove”) will pop out, allowing access to the plug’s prongs.

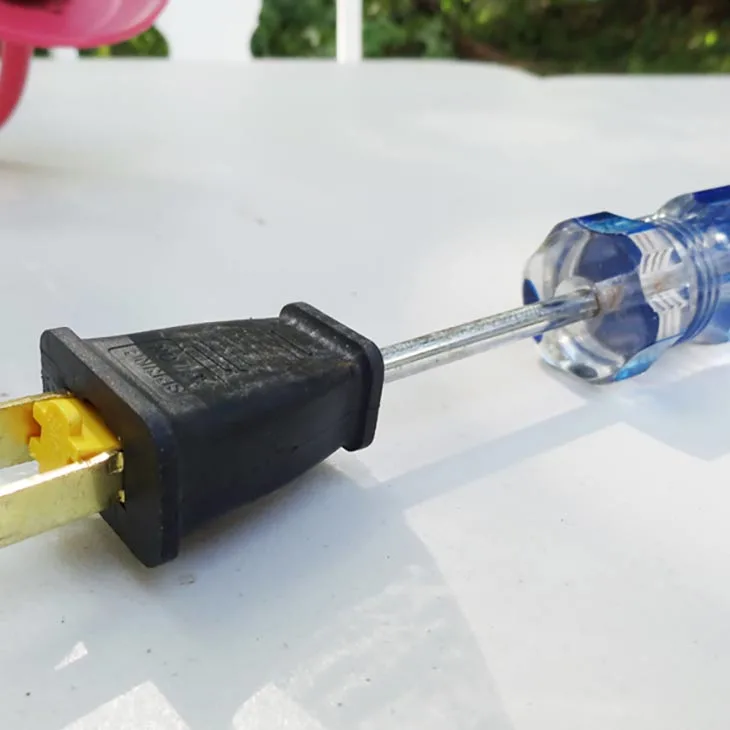
Remove Prongs & Loosen Screws
Once the yellow center portion is removed, the prongs will either pop out or come out with a gentle tug.
You’ll notice each prong has a tiny screw that was hidden by the yellow core. This screw will secure the chandelier’s wires to the prongs in order to conduct the electrical current.
Loosen but do not remove these screws.

Thread the new Plug onto Light Fixture’s Cord
Feed the light fixture’s wires up through the base of the plug and out the front. Then push the body of the plug down the wire and out of the way. Next, attach one wire to one prong’s screw as shown.
Wind the wire in through the notch in the plug and snugly around the screw post. Tighten the screw to securely hold the wire.

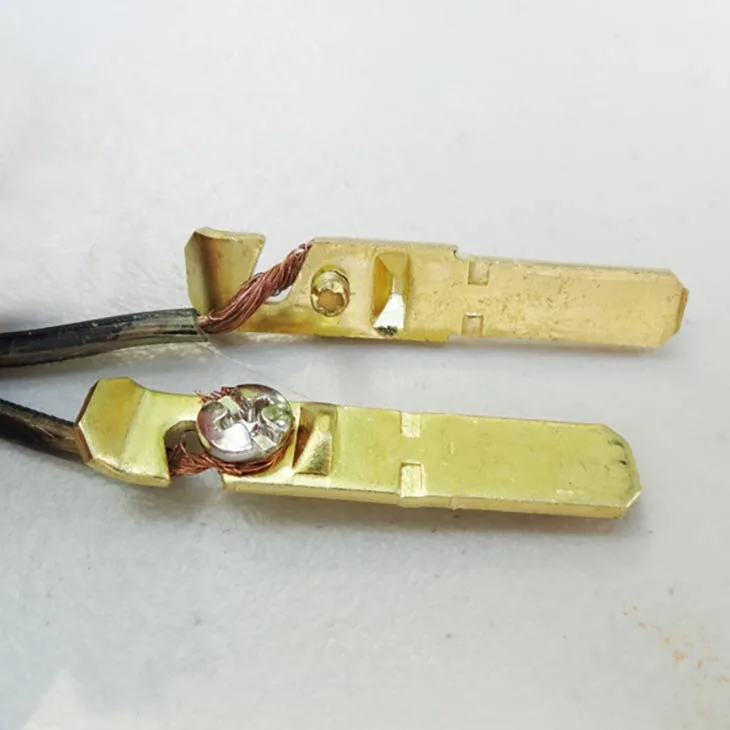
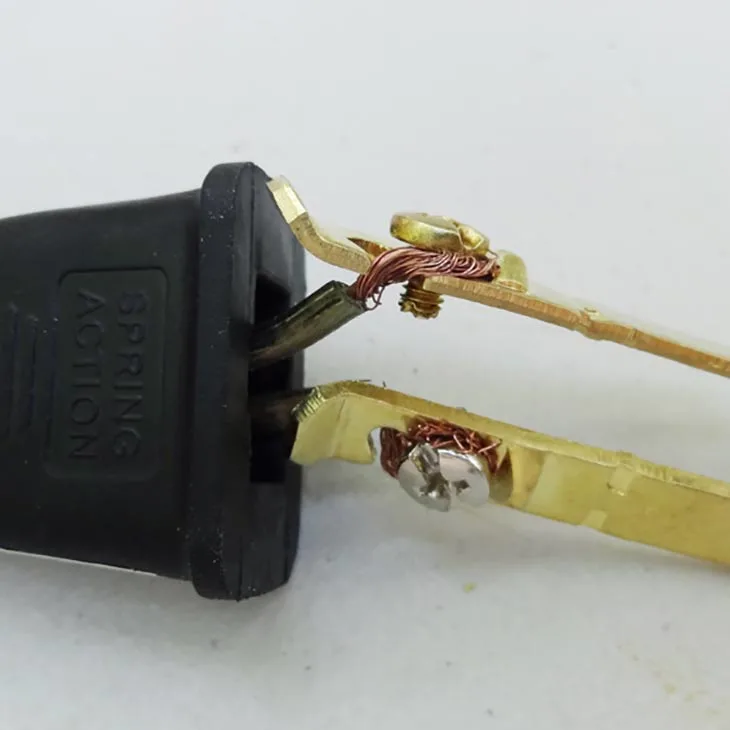
(In my several dozen times repeating this process on thrifted chandeliers that I’ve flipped in my flea market booth, I’ve managed to forget this step more than a few times and had to repeat it, so don’t get overly enthusiastic and jump past threading the plug on, straight to connecting wires)
Attach each wire to 1 Prong
Repeat the previous step with the other prong and the unused wire. Make sure your wire is NOT stripped past the end of the prong (see image).
Reassemble Plug with New Wires
Next (and this part can be just a bit tricky) push the prongs back into the plug housing with the head of the screws facing outward.
Seat the prongs snugly into each side as shown.
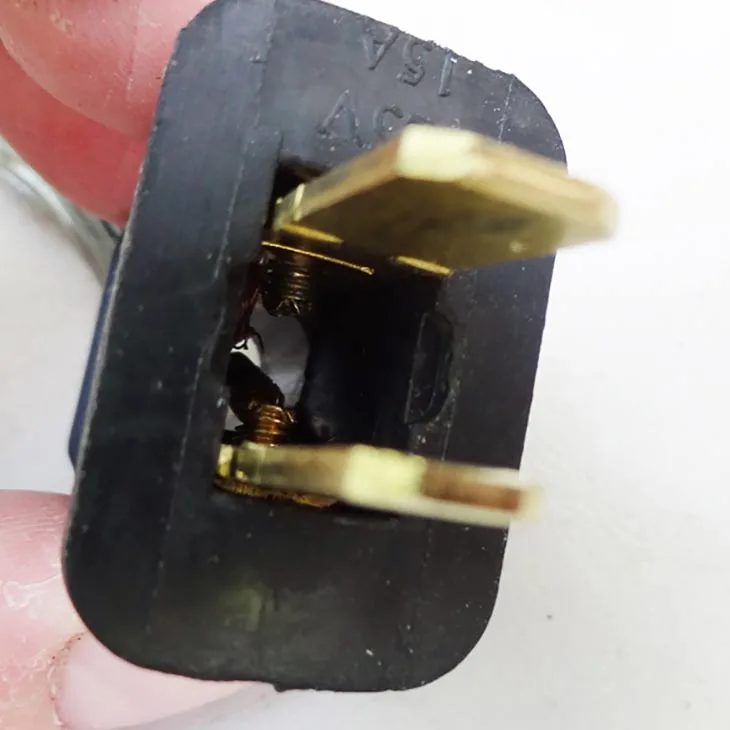
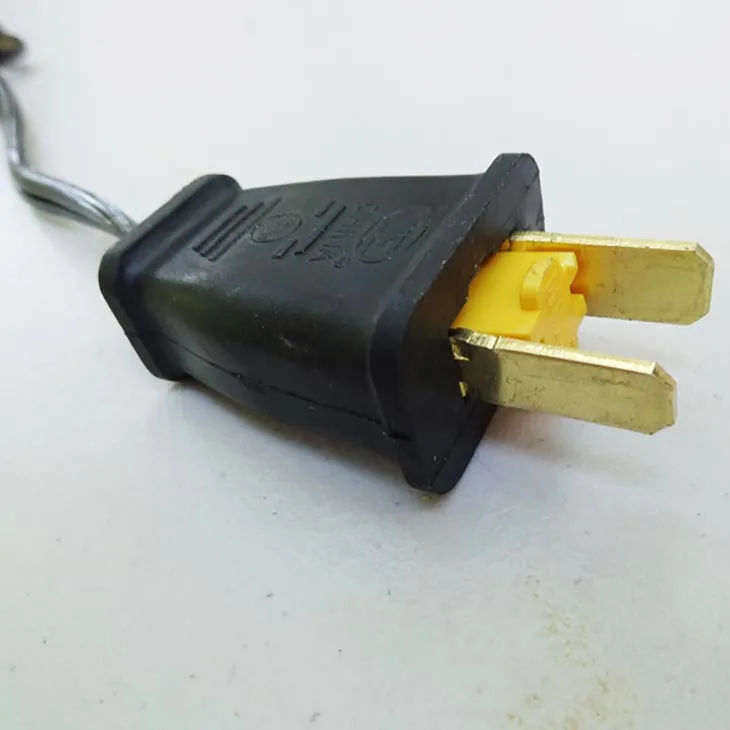
It may help to use a pair of pliers to grip the prong and push it snugly into place.
Replace center portion of plug
Now, replace the center yellow portion (pushing it completely in, until the black and yellow fronts are flush).

If the middle portion won’t insert fully, remove it and recheck that the prongs, screws, and wires are settled fully into the sides.
Plug in, Test, and Enjoy
Once the plug is fully reassembled and fit back together with no bulges, misfit pieces, or exposed wires, you’ve successfully converted a hardwire light to a plug in style light, ready to use as a lamp, swagged pendant fixture, or as a portable light!
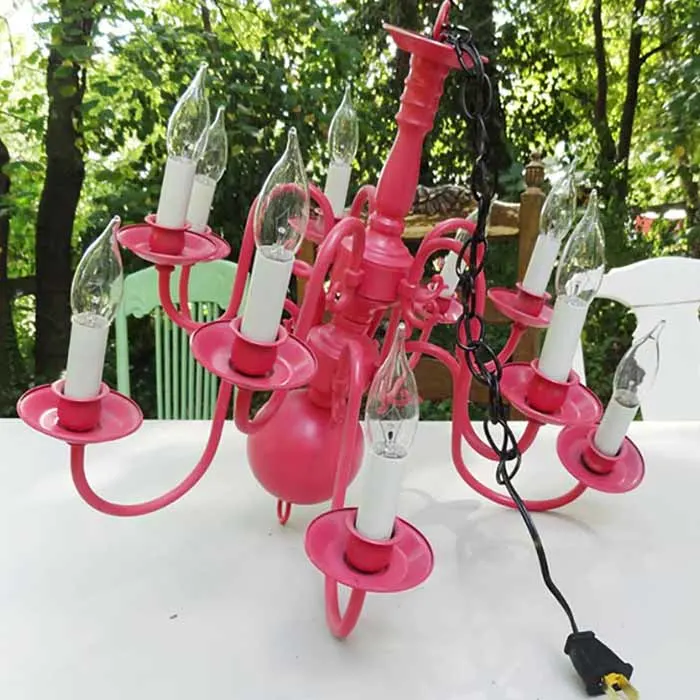
It’s that easy to turn a hardwired light fixture into a lamp that can be used in any (dry and safe) spot that an extension cord can reach! You can even use a Wireless Wall Switch or smart outlet to turn the plugged-in lamp on and off from a doorway or nightstand. (In fact, this is how I light my living room- see my article on how I added a chandelier with a wall switch to my Seattle apartment!)
CAUTION Electricity is very dangerous! If at any point these instructions seem unclear or don’t adequately address the particularities of your light fixture, stop and consult an electrician or licensed contractor.
Hanging a Hardwired Light in a Room with No Ceiling Wiring
If you’ve struggled with lighting in an older home with no wiring for an electrical box in the ceiling of living rooms, be sure and check out my article on how I used this method to hang a chandelier from the ceiling of my living room- creating bright, beautiful overhead lighting even in an older home with no wiring except floor level electrical outlets.
Thanks for Reading!!!
I hope you can tell that I love DIY, researching the best affordable solutions for every-day problems opportunities and documenting / sharing solutions!🙌 Hawk-Hill.com is reader-supported.
☕ Hawk-Hill.com is reader-supported. If this article saved you time or money, please consider donating $1 to help me cover the cost of hosting this website OR If you appreciate this information and want to throw a “Thanks!” my way by buying me a coffee – I would Of Course appreciate it! :]
Reader Questions and Recommendations
Readers, do you have any favorite topics / posts? What would you like to read more about in the future? As I hope you can tell from this and other articles on my site, I really enjoy DIY / a good challenge, and I’m not afraid to roll up my sleeves to figure out a great, and hopefully simple 😁 solution. So please feel free to let me know in the comments below (or reach out via social media)!
Ok Really – I’ll try to wrap this up now😂
Finally, if you’d like to continue to learn about interesting DIY options as well as how YOU can tackle creative new projects consider checking out the latest and most popular articles listed on the Hawk-Hill Home Page. I’m always trying to enjoy and write about the creative side of life so please don’t be a stranger – check back often!😍
If you enjoyed this post you may also enjoy reading / perusing / devouring😊 one or all of these articles as well!
- 💡4 Easy Steps to Make Your Own Sea Glass 🌊
- ❤️Bedroom Decorating Ideas for Single Women’s Master Bedrooms 🛏️
- 🏡Ikea Kitchen Cost: What I Spent for a 9×12 Kitchen Remodel 💵
see also:
How to Convert a Hardwired Fixture to Plug-In:

Cynthia
Saturday 13th of May 2023
How impolite to have ads on the photos to learn how to rewire a chandelier. It's like a child interrupting an adult conversation.
Lindsayanne Brenner
Wednesday 31st of May 2023
Thank YOU for notifying me of this issue! It should be fixed now. I reached out to the 3rd party that manages ads and let them know that under no circumstances do I want any ads covering graphics on my website. I've been working to declutter!! Please let me know if you notice anything else that should be changed from a usability standpoint - (lot of pages to try and keep track of now that I've been doing this DIY website for over a decade (hard to believe!)) I really appreciate it!
Hannah
Sunday 21st of November 2021
How do you handle extension cords? We want to hang a pendant light over the corner of our sectional couch and plan to convert it with your method, but the cord is not going to be long enough to reach the outlet. I’m worried it will look awkward and bulky if the given cord is connected to an extension cord and is running down the wall behind the couch. Am I overthinking it? It’s mostly the look of the plugs connected together that I think will bother me.
Lindsayanne Brenner
Saturday 11th of December 2021
While instructions to do so safely are beyond the scope of this article, it is possible to safely splice the cord from a hardwired light to a length of an extension cord! YouTube has a few great tutorials on this.
Sharon
Thursday 11th of March 2021
I already have a swag kit I just don’t know how to get the wires from the hanging fixture out of the fixture that you screw the bulb into so I can put the other wires in from the swag
Kathleen Morgan
Friday 25th of December 2020
anyone know of changing chandelier with electrical cord that has a switch...not a wall switch?
Lindsayanne
Friday 8th of January 2021
Hi Kathleen, you can install a switch on (almost) any cord using an inline switch installation kit.
Terrance Wyatt
Sunday 15th of November 2020
This helped me so much for project. Thanks a million !