

You don’t need to be a professional to convert a hardwired light fixture to plug-in- it’s a simple DIY anyone can do in minutes! In this article, I show step by step how to add a plug to a hardwired light. Jump directly to the section to learn about:
- A list of 3 tools you’ll need to add a plug to any light
- An illustrated guide to convert a hardwire light fixture to plug-in that can be used be used anywhere an outlet is handy,
- and how to use a light with a plug added to bring light to rooms with no ceiling wiring.
Follow along for a beginner-friendly guide to adding a plug to any light fixture.
I love chandeliers, but I used to think they were limited to placement within reach of ceiling wiring. When a friend asked for help hosting an evening bridal shower under the sprawling branches of Hawk Hill’s ancient live oak, I started exploring how to make chandeliers a part of the outdoor lighting at my friend’s special event.
Many questions to the knowledgeable staff at my local hardware store and a consult with an electrician helped me learn that it’s actually just a 5-minute DIY to convert a light fixture from needing to be hardwired to an electrical box to simply plugging into any outlet. The best part? It just takes one cheap part to make this switch! Once the plug is added, a chandelier can go anywhere an extension cord can.
Here’s an illustrated tutorial on how to add a plug to a hardwired light fixture.
Supplies Needed for Converting Hardwired Fixture to Plug-In Swag Style:
Hawk-Hill.com is a participant in the Amazon Services LLC Associates Program, an affiliate advertising program designed to provide a means for website owners to earn advertising fees by advertising and linking to Amazon.com and any other website that may be affiliated with Amazon Service LLC Associates Program
Parts Needed:
- EITHER: 1 x 2-prong Polarized Plug OR
- a Three Prong Grounded Plug.
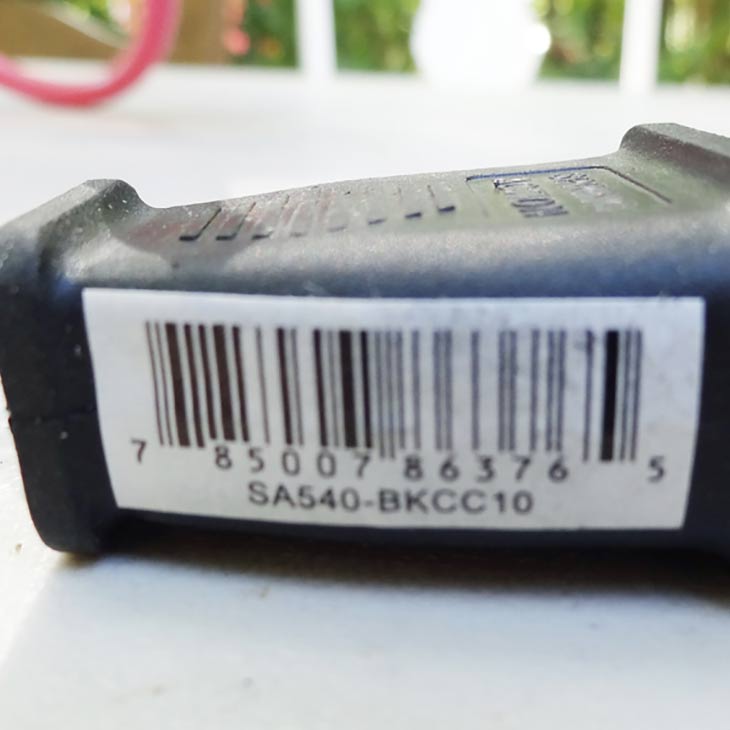
I’ve not been able to find this item at a big box home improvement store like Lowes or Home Depot, but Ace Hardwares usually have them in stock. Ace’s part number for the 3 prong replacement plug is SA540BKCC10
Tools Required:
- Screwdriver (If you purchased the plug I sourced above, you can use either a flat or phillips screwdriver)
- Wire Strippers (optional! The wires on your light fixture will probably already be stripped, ready for hard wiring. If you don’t have wire strippers, you may be able to strip wires *carefully* with a pair of scissors- here’s a youtube video showing how)
CAUTION: Electricity can be extremely dangerous! If at any point these instructions seem unclear or don’t adequately address the particularities of your light fixture, stop and consult an electrician or licensed electrical contractor.
Optional Supplies:
Instructions for Converting a Hardwired Fixture to Plug-In:
Choose and Prepare your Light Fixture
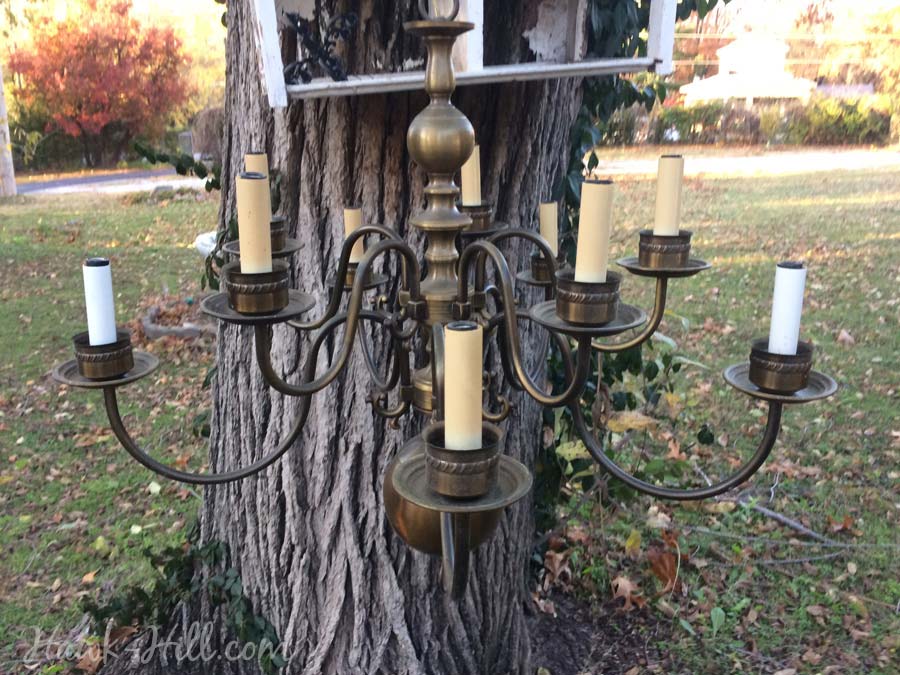
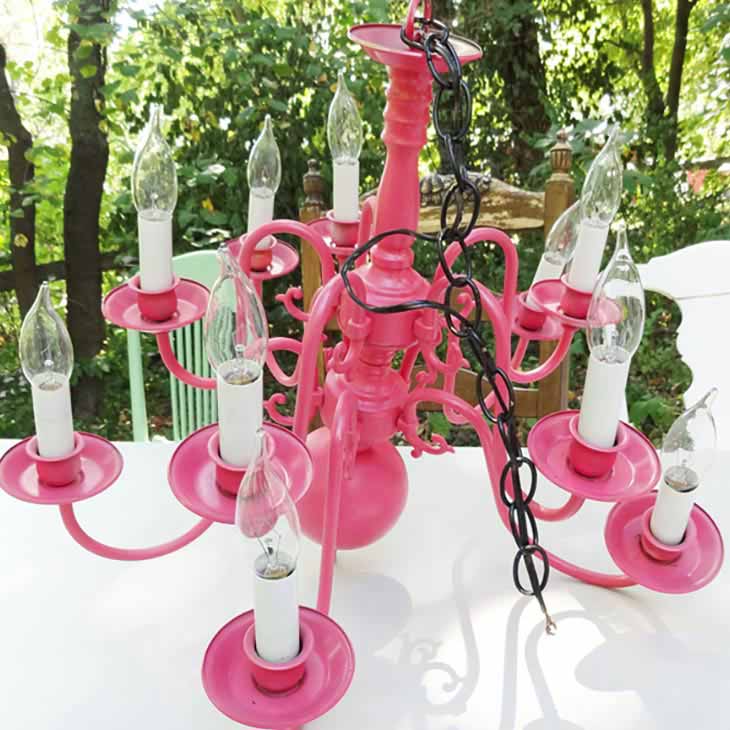
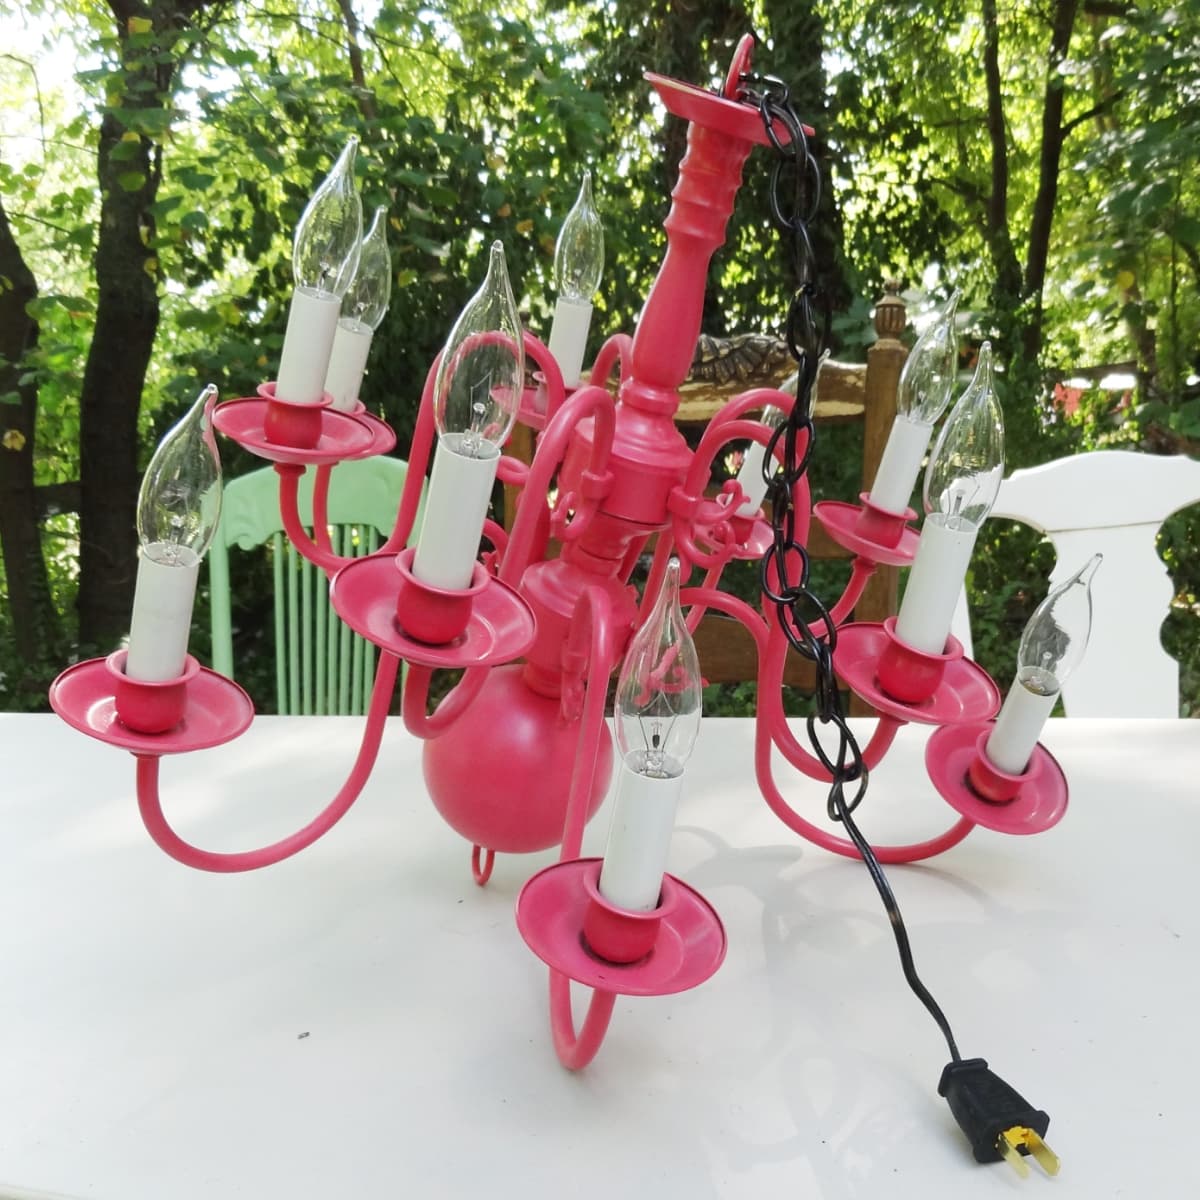
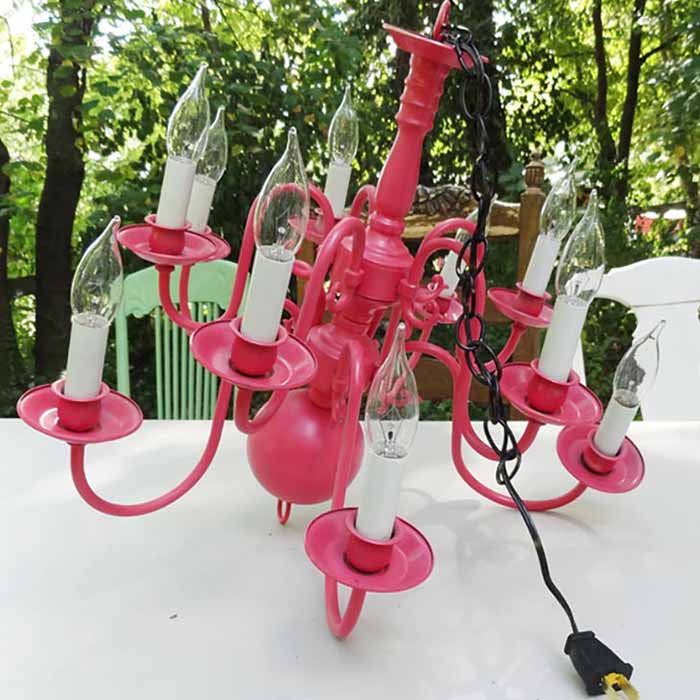
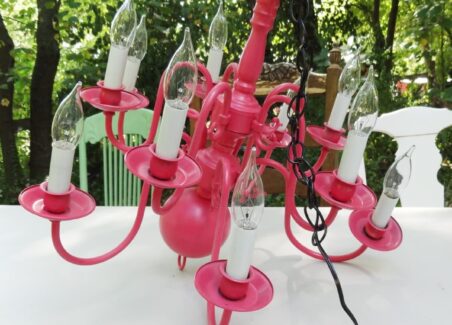
First, choose your light fixture. Thrift store chandeliers paired with a new coat of spray paint are my favorite lights to convert to lamps. They make ideal temporary lighting to use as decoration for parties, photoshoots, girl’s nights, etc.
In the photos above, a $15 ugly brass chandelier turned pink party accessory is ready to convert from standard wiring to a plug-in fixture for use as outdoor lighting at an outdoor evening bridal shower party.
Locate, Separate, and Strip Wires
Separate the two wires that come out from the two separate sections of the cord:
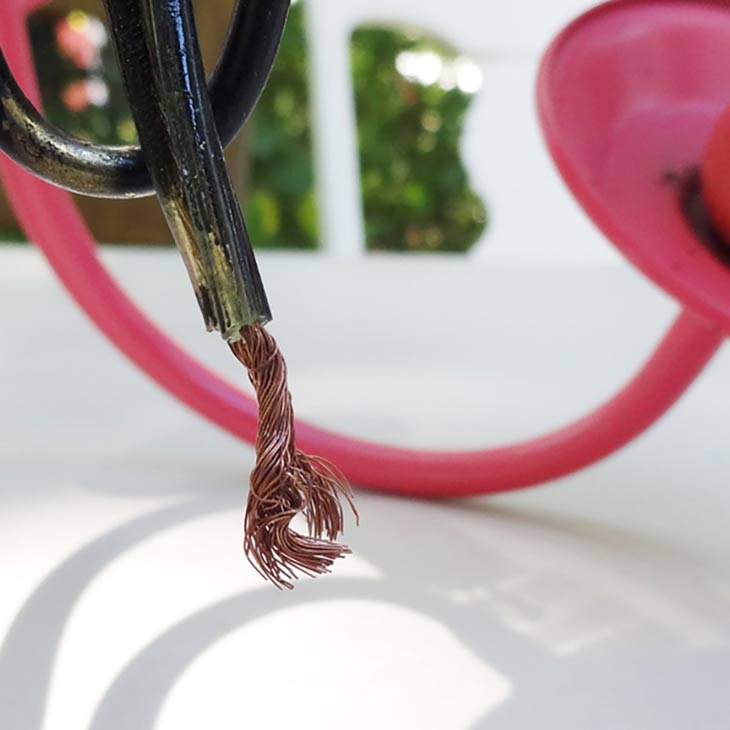
The plastic coating may fuse them together, but to make the next step easier you’ll want to peel those two sections away from each other. A new or used household light fixture should already have these wires exposed, but if they seem too short to work with or frayed, you can cut off the frayed portion and strip coating off fresh wire to reveal unfrayed and easy-to-work-with wire.
Since the wires shown in this image were a bit frayed, I chose to make the next steps easier by cutting and stripping the coating from a new section before continuing.
Acquire New Plug
Now, grab your new 2 prong plug or 3 prong plug. (My images illustrate connecting the two-prong plug, however, the process for the three-prong style grounded plug is almost identical.)
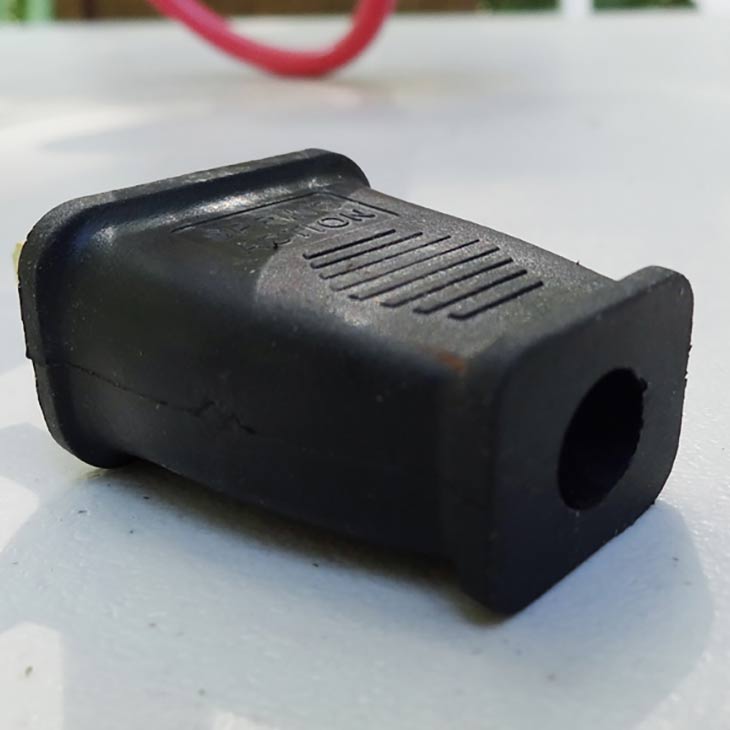
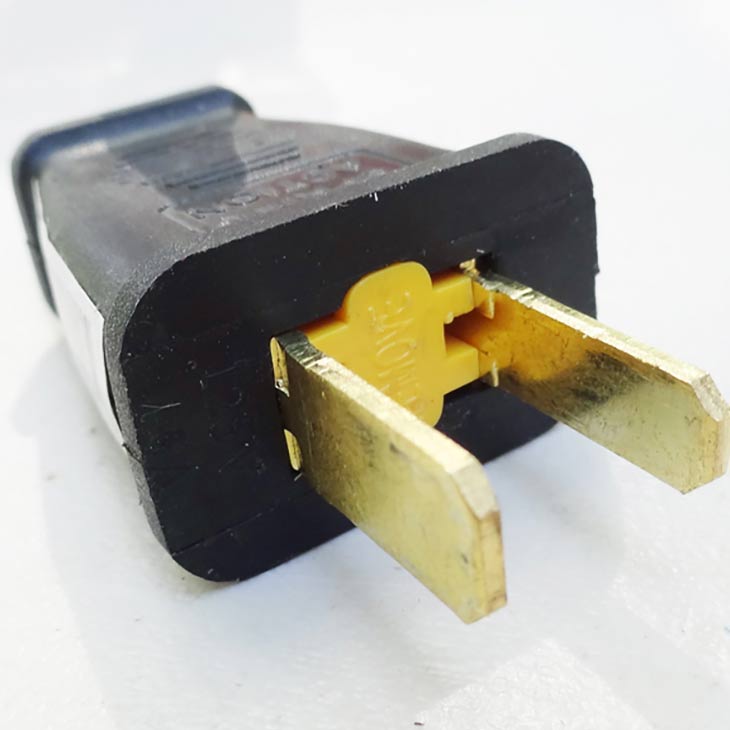
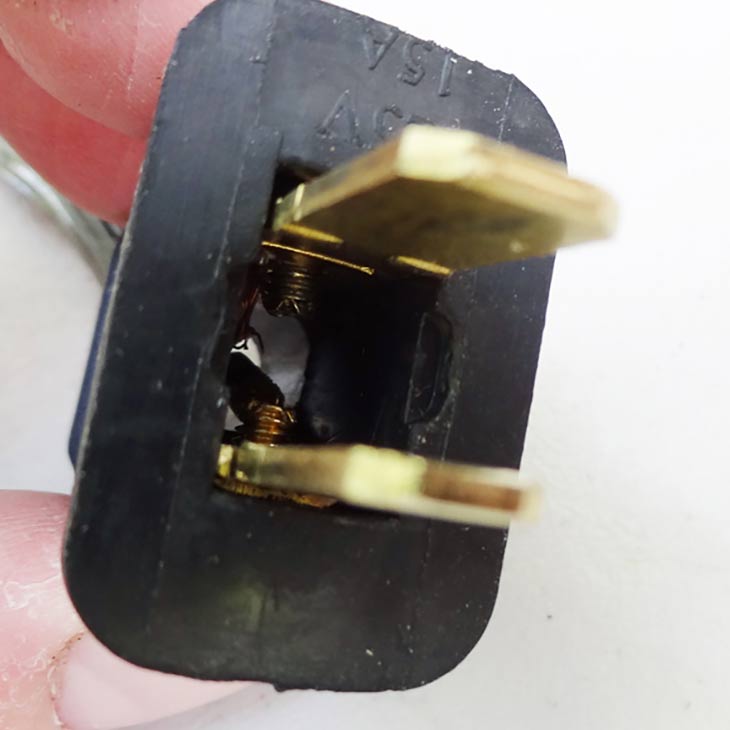
See the yellow portion? We’ll be removing it to make room for wires (note: It might be a different color on yours)
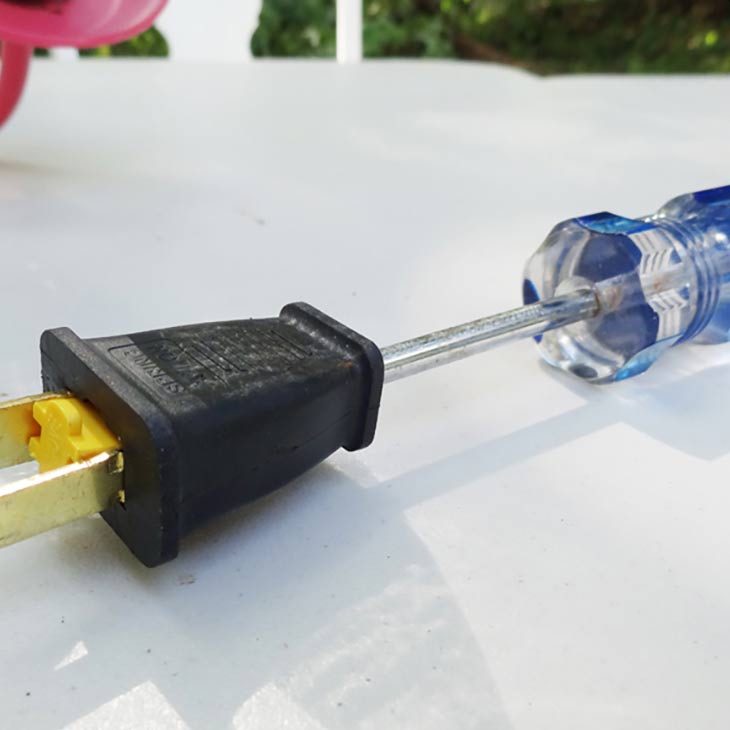
Prepare & Open Replacement Plug
Now firmly insert a screwdriver up through the base of the replacement plug part as shown. The yellow portion (stamped “remove”) will pop out, allowing access to the plug’s prongs.
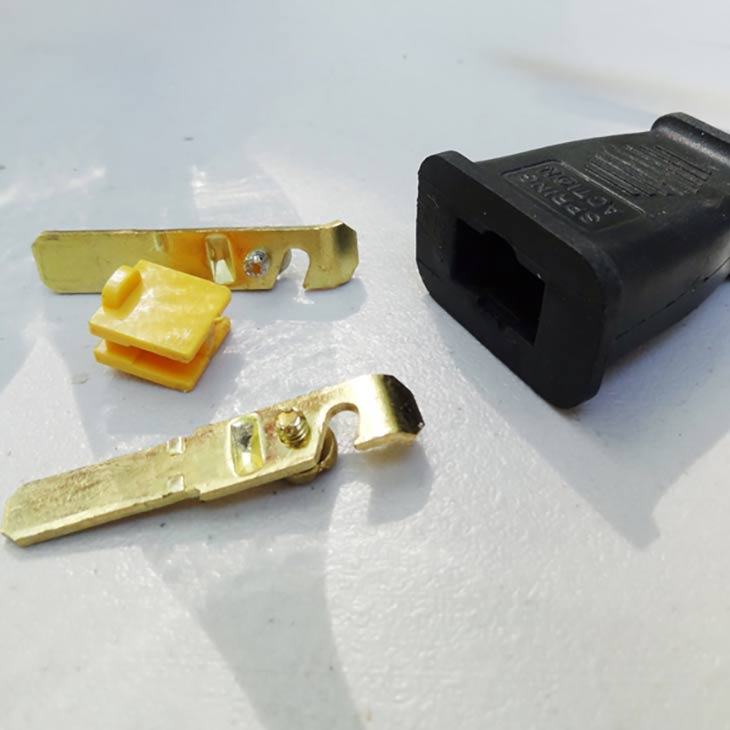
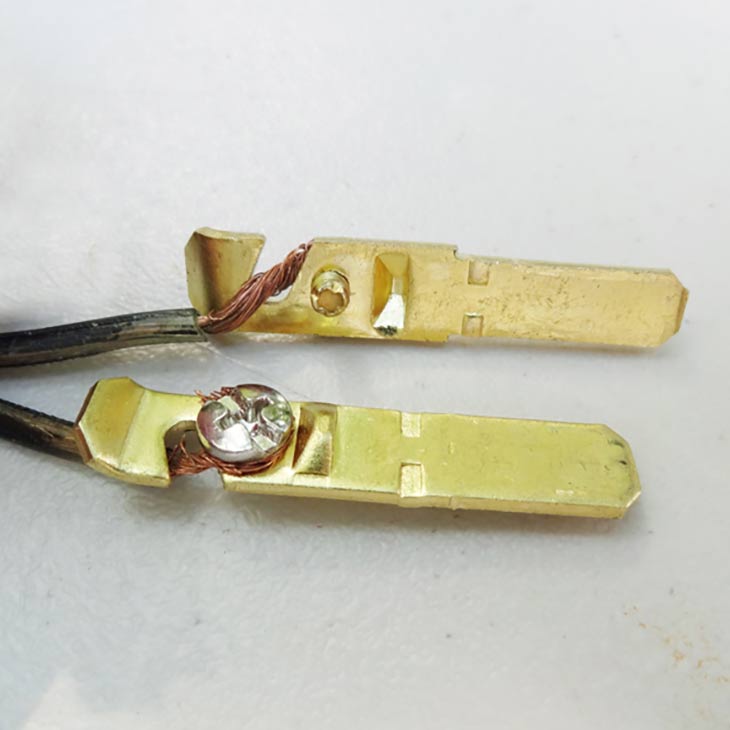
Remove Prongs & Loosen Screws
Once the yellow center portion is removed, the prongs will either pop out or come out with a gentle tug.
You’ll notice each prong has a tiny screw that was hidden by the yellow core. This screw will secure the chandelier’s wires to the prongs in order to conduct the electrical current.
Loosen but do not remove these screws.
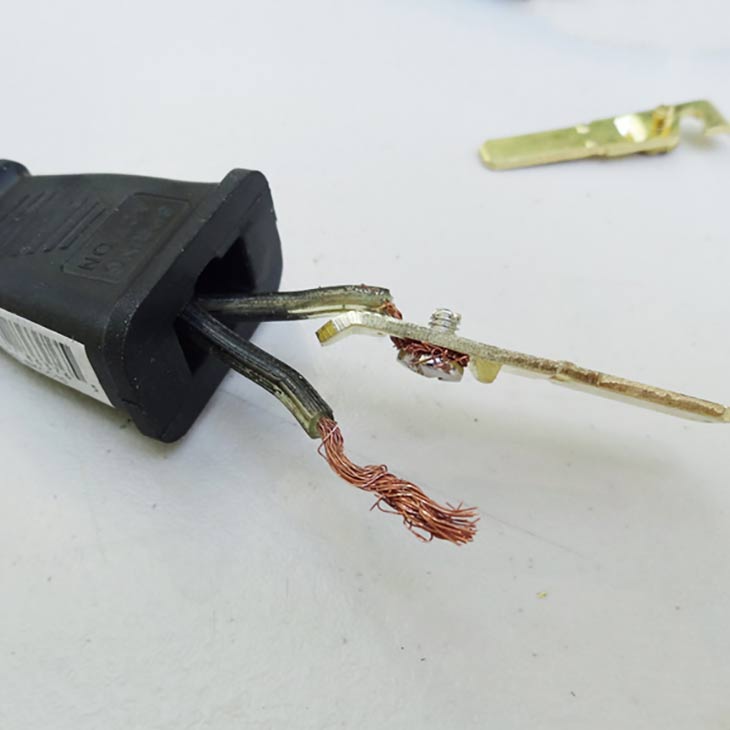
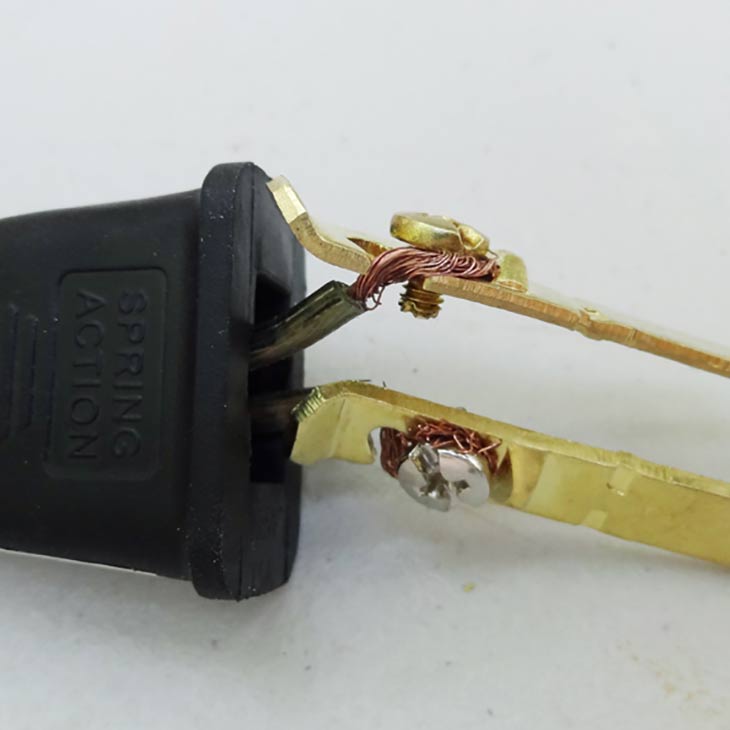
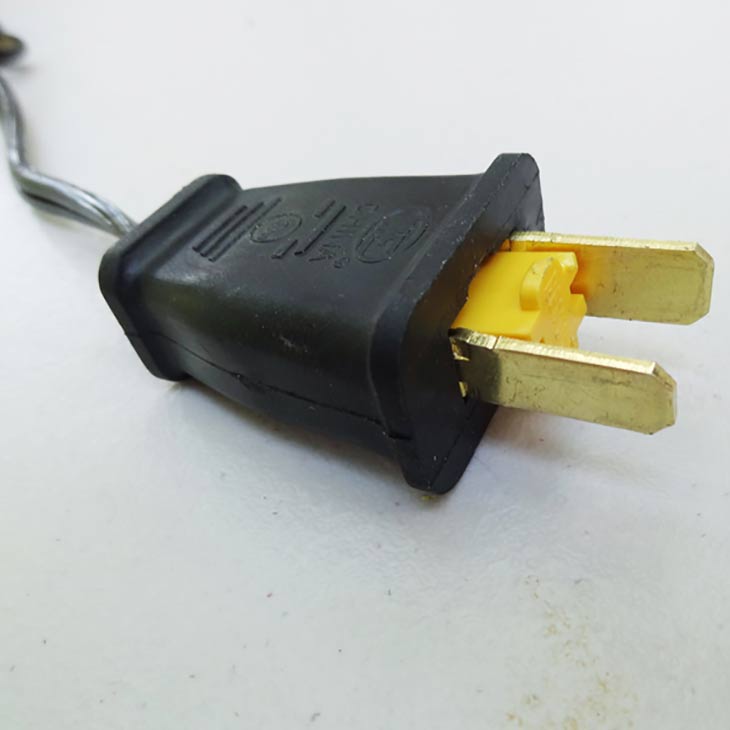
Thread the new Plug onto Light Fixture’s Cord
Feed the light fixture’s wires up through the base of the plug and out the front. Then push the body of the plug down the wire and out of the way. Next, attach one wire to one prong’s screw as shown.
Wind the wire in through the notch in the plug and snugly around the screw post. Tighten the screw to securely hold the wire.
(In my several dozen times repeating this process on thrifted chandeliers that I’ve flipped in my flea market booth, I’ve managed to forget this step more than a few times and had to repeat it, so don’t get overly enthusiastic and jump past threading the plug on, straight to connecting wires)
Attach each wire to 1 Prong
Repeat the previous step with the other prong and the unused wire. Make sure your wire is NOT stripped past the end of the prong (see image).
Reassemble Plug with New Wires
Next (and this part can be just a bit tricky) push the prongs back into the plug housing with the head of the screws facing outward.
Seat the prongs snugly into each side as shown.
It may help to use a pair of pliers to grip the prong and push it snugly into place.
Replace center portion of plug
Now, replace the center yellow portion (pushing it completely in, until the black and yellow fronts are flush).
If the middle portion won’t insert fully, remove it and recheck that the prongs, screws, and wires are settled fully into the sides.
Plug in, Test, and Enjoy
Once the plug is fully reassembled and fit back together with no bulges, misfit pieces, or exposed wires, you’ve successfully converted a hardwire light to a plug in style light, ready to use as a lamp, swagged pendant fixture, or as a portable light!
It’s that easy to turn a hardwired light fixture into a lamp that can be used in any (dry and safe) spot that an extension cord can reach! You can even use a Wireless Wall Switch or smart outlet to turn the plugged-in lamp on and off from a doorway or nightstand. (In fact, this is how I light my living room- see my article on how I added a chandelier with a wall switch to my Seattle apartment!)
CAUTION Electricity is very dangerous! If at any point these instructions seem unclear or don’t adequately address the particularities of your light fixture, stop and consult an electrician or licensed contractor.
Hanging a Hardwired Light in a Room with No Ceiling Wiring
If you’ve struggled with lighting in an older home with no wiring for an electrical box in the ceiling of living rooms, be sure and check out my article on how I used this method to hang a chandelier from the ceiling of my living room- creating bright, beautiful overhead lighting even in an older home with no wiring except floor level electrical outlets.
Thanks for Reading!!!
I hope you can tell that I love DIY, researching the best affordable solutions for every-day problems opportunities and documenting / sharing solutions!🙌 Hawk-Hill.com is reader-supported.
☕ Hawk-Hill.com is reader-supported. If this article saved you time or money, please consider donating $1 to help me cover the cost of hosting this website OR If you appreciate this information and want to throw a “Thanks!” my way by buying me a coffee – I would Of Course appreciate it! :]
Reader Questions and Recommendations
Readers, do you have any favorite topics / posts? What would you like to read more about in the future? As I hope you can tell from this and other articles on my site, I really enjoy DIY / a good challenge, and I’m not afraid to roll up my sleeves to figure out a great, and hopefully simple 😁 solution. So please feel free to let me know in the comments below (or reach out via social media)!
Ok Really – I’ll try to wrap this up now😂
Finally, if you’d like to continue to learn about interesting DIY options as well as how YOU can tackle creative new projects consider checking out the latest and most popular articles listed on the Hawk-Hill Home Page. I’m always trying to enjoy and write about the creative side of life so please don’t be a stranger – check back often!😍
Also chech our Pinteres account https://www.pinterest.com/curlylindsay/
If you enjoyed this post you may also enjoy reading / perusing / devouring😊 one or all of these articles as well!
- 💡4 Easy Steps to Make Your Own Sea Glass 🌊
- ❤️Bedroom Decorating Ideas for Single Women’s Master Bedrooms 🛏️
- 🏡Ikea Kitchen Cost: What I Spent for a 9×12 Kitchen Remodel 💵
see also:

How to Convert a Hardwired Fixture to Plug-In:
You are soooo AWESOME! I just bought 2 pendulum lights from my consignment shop and I want to hang them in my apartment, however I did not have a lighting outlet in the places I wanted them. This tutorial really saved me a headache! thanks Lindsay
This was such great info. I am a female and have done several easy DIY electrical jobs. This tutorial was so great. I tried to order the plugs from Ace hardware and they were all a 2 wwek wait,so I ordered thru Amazon. Same price. Item # at Amazon is Pass and Seymour SA540BKCC10. iT ARRIVED IN 2 DAYS. I NEVER CONVERTED A HARDWIRED ITEM INTO A PLUG IN BEFORE. THANKS FOR THIS WONDERFUL EXPLICIT AND SIMPLE INSTRUCTIONS.
Thank you!
What do you do if there is a grounding wire to the lamp? Thanks!
Thank you , Thank you, Thank you!!!! I knew it was doable but didn’t know how.
Thank You for the information! Do you know how I would do it if I wanted to make the chord a lot longer? Do you have to splice wires together?
Thanks
Hi Kris- I have one in my living room that I needed a longer cord for. There’s two options- 1 would be to proceed with my instructions and then use an extension cord- the other would be to splice. I spliced the cord of mine – Splicing actually is not hard at all- at the hardware store you can buy plastic tubes that shrink when heat is applied that make it much safer to get a secure splice with no shorts – take an extension cord and chop off the female end and join it to the existing wires on your light fixture. I’d suggest googling more about splicing and asking at the hardware store to be extra safe.
i LOVE THIS! I knew this had to be possible, and I’m so excited. THANK YOU FOR SHARING, You ROCK!!!!
Yesterday I bought a chandelier at a thrift shop I want to use outside. I asked the lady who sold it to me if she knew anything about converting it from hard wired to a plug. She looked at me like I had ten heads! I knew it could be done and now I know how! So excited! Thanks so much!
Are you able to leave it outside in all weather conditions or do you have to keep it from getting wet?
Thanks for your question, Nik! It’s DEFINITELY only for use in a dry area. We’ve used them for events outdoors on dry nights, but always bring them in afterwards. The exception might be if you did this to a fixture designed for outdoor use and put the plug in a waterproof extension cord box ( http://www.amazon.com/Farm-Innovators-CC-2-Connect-Water-Tight/dp/B002MHFXS8 ) and plugged the end of the extension cord in a GFCI outlet.
Questions….How did you know which of the two wires ( from the chandelier) was hot and neutral? I didn’t see black for hot or white for neutral in the pics. Does it make a difference which prong gets which wire? would some chandeliers require a more heavy duty plug?? I am buying a beautiful inexpensive oiled rubbed bronze chandelier but need to convert it to plug-in since all the ones I like seemed to be hardwires.It’s a 24 inch across and 15 inch hight w/ 5 lights/ 60 watts. Not BIG but not mini either. Lastly, How would you safely hang this chandelier from the ceiling?Thank you for your help. I don’t want to throw away $85 bucks
Hi Lori! I was told it didn’t make a difference for a lamp, but if you are interested in learning a bit more, a quick google turned up this article: http://www.instructables.com/id/Simple-conversion-of-metal-lamp-to-use-touch-swi/step4/Identify-the-hotneutral-wires/ If you plan to use it often, to light a room for example, I’d go ahead and purchase the 3 prong plug just for peace of mind. Hanging from a ceiling is easy- just use a stud finder to find a ceiling stud and install a ceiling hook rated for a bit more than the weight of your chandelier.
thank you soooooooooooo much!
I have a chandelier from ikea (the kristaller) and it has 3 wires – a black, yellow, and white. is there a difference between these? which two would I attach to the prongs?
Thanks for your question, Nicollette! I LOVE that chandelier! Generally the yellow is the ground wire- so if you are using the grounded (three prong) plug he yellow should go to the grounding plug- it you are using the basic plug you can ignore the yellow wire and leave it unconnected (although, this is not the safest option- and you should definitely check the documentation that came with the light- but I’m almost positive yellow wires are always grounding wires)
wicked cool!!! My hubby & I have been renovating for a few years… A few looooong years, and I need more lighting, so I picked up a gorgeous chandelier and not thinking about how long it would take to get it all done, I’m tired of not being able to see the beautiful sparkle it could give to my home… Now I don’t have to pester my man to wire it in… I can do this myself! Yes! Yes! Doin the happy dance! Thanks for this info 🙂
would you be interested in selling this chandelier? email me at [removed]
Thanks for your question! Actually this one died a violent fate one day while transporting it to an event. The style, though, is easy to find at Habitat for Humanity ReStores and just takes a coat of paint to transform.
Thank you for this tutorial. I picked up this exact same chandelier at goodwill a few months ago and painted it red. Originally it was meant to just replace an old fixture, but then I decided I more needed it in a spot where there is no light. Thanks again, this will prove to be very helpful!
Thks Lindsayanne! I found an old chandelier imported from italy in a box that belonged to my parents. I was searching for a way to see if I could somehow connect the 2 wires to see if it even still worked before trying to hire someone to hang it for me. I think this might be the perfect solution! If it works THEN I’ll hire someone to hang it for me at the top of a staircase, that has 16 foot ceiling, adjacent to a window, which should look gorgeous from outside!
If this works, I’m down the street from a great consignment shop AND a Habitat for Humanity ReStore to purchase some to use outside for some summer entertaining!
And everyone is invited to the Jersey Shore (Mystic Islands) for some fun in the sun, toes in the sand, wading in the waves, then back to my place for an elegant “Joisey” style outdoor evening BBQ, chandeliers & all…♥
Emily
oh! I’m so jealous! Would love to see it!
Ok, so one of the guys at the hard ware store told me a VERY DANGEROUS way to check if a light fixture is functional (I have to say that, because it is! 😉 but it’s so quick!) You just take the light fixture, set it out in the middle of your driveway, for example, then run an extension cord to it that is NOT PLUGGED IN. Then, you take the two wires protruding from the light fixture and push one wire into each of the holes on the female end of the extension cord. Then back way up, and go plug in the male end of the extension cord. – if your light turns on you’re set! If it doesn’t, unplug everything, change light-bulbs, and try again.
DEF worth a try & much easier! Will let you know how that works out (soon as it stops raining!) Thks!
I am soo excited about this…but nervous. the chandlier I have has silver wires and copper wires….which is which? and also there is a third copper wire hanging out of it also…..what in the world do i with all that? haha i did find a 3 prong at lowes….but thinking of getting a 2 prong in stead!
3rd wire is the ground wire- which if you have, you should use, just for safety’s sake!
I couldn’t tell you which wire is which, but it’s a safe bet if you have 2 of 1 color and 1 of the other color, the color with 1 wire is probably the ground wire. If you take it in to a local hardware store, one of their employees in the electrical sections should be able to tell you for sure!
This is so exciting. I’ve become addicted to DIY projects and pinterest, Bought a chandelier at habitat for humanity and didn’t want to hard wire it. I’m putting it on my carport (covered obviously) for a little sitting area I created. Carport was a waste of space for just “cars” haha! Husband of course thinks I’m crazy but it’s okay 🙂 I’ve already caught him sitting out there just enjoying the scenery. Thanks for this amazing info!
Hi so there are two sets of black and white wires, one set for the 3 lights on the left half of the fixture and one set for the 3 on the right, please help.
Oh gosh, I’m not sure! I’m definitely not an electrician so can’t really give advice. Maybe take it in and check with the staff in the electrical section at the hardware store? The same instructions for how you’d hang a light like that would hold true for wiring it to the plug.
Are these safe to use outdoors in the elements?
Definitely NOT! However on my property I have hooks placed on low, reaching branches of an old tree, and a few chandeliers I used for extra light in the garage that I can pop up on those hooks and power with an extension cable with a 10 minute set up/take down time. If the weather is clear with no rain in the forecast they’re fine to place outside temporarily for an outdoor event.
You just made my day Lindsayanne! I wish I would have googled this sooner. I am in a bidding war for a great chandelier at one of our local thrift stores and I think it will be mine. I intent to do just what you say and hang it over my night table. Thank you so much.
What should I look for on the box to know of it’s hard wired or you have to plug it in when I purchase the light?
I just found this thread and want to do this with a chandelier. I must be missing something b/c I understand the plug part but how do you cap the mount and make it a loop for a hook? thanks, bren
Thank you, so much! I have been looking for this information, for what seems approximately forever, because, I knew it could be done, but, all I could find, for the longest time, was instructions on how to turn a plug-in lamp into a hardwired one.
There is a beautiful pendant lamp that I am so in love with, sold by Cost Plus, but, it is only sold to be hard wired and that would involve having to put it somewhere that would mean getting rid of or moving a ceiling fan, and, having it off center from where I want to put a table.
Having it as a plug-in would make all that go away!
Thank you, again and some more.
ditto …on former comments! there is no lighting in the living area of my rental property. Am in the process of decluttering & making my life alittle more simple….wanted to put some light in this room that was not traditional lamps…I am def…going to do it…thanks
I have a question I have a huge cathedral ceiling I am putting up a chandelier in the place of a hanging wicker basket ball light and I do not want to start from the very top of the ceiling I’m very short and I’m going to wire it from the bottom of the chain where I’month taking off the old one. Is this possible because looked it up so many different ways on Google and nobody has anything to stay on can you just change just from the fixture and not from the ceiling. I don’t want to put another chain up. First I could never get up there and I’m not going to hire someone cuz I can’t afford it. Now my brother to build his own home he’s a fireman actually he’s cheated of his Fire Department he says that I should just wire it turn it on if it blows a fuse out of word wrong turn it off again wire it the other way and then turn it on in there be fine but I’ve read that you can think you have it wired right and then when you go to change a bulb you can get shocked if it’s not right and it may not blow fuse also both of the wires that come out of the fixture that came from the chain or both black with copper wires and both of the words that came out of my new old Chandelier has clear plastic with copper wires. Thank you please reply back as soon as possible!
Thank you, Rose
I am so happy to find this Post! I, like others, knew there had to be a way. I have 2 beautiful chandeliers and I’m moving where they won’t change the light fixtures. You made my day – thank you!!
You are welcome! I’m currently redoing this project in my studio apartment in Seattle- it’s so helpful to add brighter light and so much charm!
I absolutely salute your intrepid approach to diy, BUT, please take care, you are in an area where, from what I’ve read in the comments, you need professional advice, if you are unsure of the correct color coded conductors, or have only made off a handful of plugs before (or less), you are at risk of incorrectly wiring multi stranded cable, or extending cables incorrectly/unsafely, and in turn killing someone (dependant on the control measures in your consumer unit), but the current in a lamp can kill, make no mistake, please. I would recommend that you don’t rely on Google/YouTube and so on for your information, but find a friendly qualified electrician and pick her/his brains (the information on the Internet is just wrong, sometimes really really wrong). The issue that most concerns me is that though you may have a working lamp, it may fail in time and cause fire or electrocution, through either: unsafe connections, or incorrectly wired conductors etc. (based solely on your comments here, I’m not presuming on your abilities).
Gas, electricity, structural works, if undertaken without experience and full knowledge , can kill, don’t underestimate this, people have, and they have on occasion died or killed others, this stuff has enough power to notch metal pliers, it is deadly, it’s that simple.
Okay, preachy sparky done, good luck, all the best. Don’t speculate, get the right answers from someone qualified AND experienced.
P.S. No, not me, I’m not selling my services here I’m only a trainee electrician, you need someone local too. So no, no sales pitch. But I can send you a photo of the notched pliers 😉
D
Great reminder! Persons should always exhibit an abundance of caution when working with electricity and seek professional advice if they are at all unclear about instructions or the particularities of the piece they are working with, however changing a lamp’s plug (essentially, what this project is) is a basic DIY project that our friends on more prominent DIY sites also promote as a safe project when appropriate caution is used.
We have a friend who lives in a very old house. She wants to install a ceiling fan/light in a room which only has wall plugs. It is far too difficult for my husband to fish the walls and ceiling to do a hard wire job. Is it possible or even feasible to wire a ceiling fan/light that will just plug into a wall plug.
While I’m confident the wiring could be connected to a plug and ran via extension cord to wall outlet, the challenge would be supporting the weight of the fan. If you are confident you can attach an anchor to a joist overhead, and are then able to securely mount the ceiling fan to the anchor, I’d guess this project could be successful.
I have a ceiling light which I would like to convert to a pendant. How would I do that?
Not sure, but that sounds cool! Can you post a photo? That might be above my skill level, but it depends on the light, I guess. If it has a wire or chain for hanging and you can extend that wire/chain, it *might* be just an issue of running the wires through a pipe and then buying fittings for the pipe on either end.
I really appreciate how you made it step by step and easy to follow for an amateur. Mine turned out great thanks for your help on this project, I knew it was possible.
Awesome! Thank you for letting me know it was helpful for you!
Thank you SO MUCH for your very clear instructions and illustrations. I was just replacing the plug on the coffeemaker, but had no instructions for the plug. So glad I found you!
This helped me so much for project. Thanks a million !
anyone know of changing chandelier with electrical cord that has a switch…not a wall switch?
Hi Kathleen, you can install a switch on (almost) any cord using an inline switch installation kit.
I already have a swag kit I just don’t know how to get the wires from the hanging fixture out of the fixture that you screw the bulb into so I can put the other wires in from the swag
How do you handle extension cords? We want to hang a pendant light over the corner of our sectional couch and plan to convert it with your method, but the cord is not going to be long enough to reach the outlet. I’m worried it will look awkward and bulky if the given cord is connected to an extension cord and is running down the wall behind the couch. Am I overthinking it? It’s mostly the look of the plugs connected together that I think will bother me.
While instructions to do so safely are beyond the scope of this article, it is possible to safely splice the cord from a hardwired light to a length of an extension cord! YouTube has a few great tutorials on this.
How impolite to have ads on the photos to learn how to rewire a chandelier.
It’s like a child interrupting an adult conversation.
Thank YOU for notifying me of this issue! It should be fixed now. I reached out to the 3rd party that manages ads and let them know that under no circumstances do I want any ads covering graphics on my website. I’ve been working to declutter!! Please let me know if you notice anything else that should be changed from a usability standpoint – (lot of pages to try and keep track of now that I’ve been doing this DIY website for over a decade (hard to believe!)) I really appreciate it!
What do I do with the little wire that is out side the cord I think it’s the ground wire
In converting the chandelier from a hard wire to a plug in, how would you lengthen the cord? I’m trying to make it a swag light and need a much longer cord.
Hi Norma, I believe it would be as simple as making the cord you plan to splice with longer (ie. buy a longer cord ((typically 18 gauge)). But maybe I’m not understanding your question.