

Behold: The humble Slide- but what is it and how can craftspeople and leathersmiths get the most out of this versatile piece of hardware?

Tri-glide slides are a piece of incredibly versatile hardware that is used in many craft applications and especially in strap goods like belts, dog collars, and some horse tack (although for horse tack a modified version of the tri-glide is popular. It is called a Conway buckle, and is a uniquely designed slide that is: 1. curved to accommodate thicker material and 2. has a post that secures the strap via a punched hole). Most hardware sources carry an assortment of slides and Conway buckles for use as both buckles and strap length adjusters.
Tri-glide Slides are most often used as a way to make quick size adjustments to strap goods like dog collars and belts. They also can be used as a buckle for low-intensity products such as making your own yoga straps.
Tri-glide Slides, used as buckles, work by using friction to secure the material in place. While the strap is held in tension, friction prevents the materials from sliding through. However, once tension is removed, the materials can be manually fed up and through the slide allowing for adjustment or unfastening. For a video on this method of adjusting a strap through a slide, check out this video on youtube.

So is it a Buckle or a Slider?
It’s a fair question! In most applications – particularly those that have high risk associated with failure of the product, like dog collars or climbing harnesses, this type of hardware is never used as a buckle.
Under the right conditions, such as a lubricant spilled that reduces friction or construction using a webbing that is too smooth, the potential for the slide moving during use is too high to be relied upon as a buckle alone. In these cases, this type of hardware is always paired with a buckle, and strap-ends are secured (usually by a factory worker doubling and stitching the strap at the end) so that they cannot slip free from the slide and cause failure of the strap.

For yoga straps, lightweight tie-downs (such as compression straps used on camping equipment stored within another bag), belts, or the kinds of straps used in physiotherapy or fitness training, the end of the strap is often left unstitched and the tri-glide slide is used, effectively, as a buckle. For these types of light applications, especially when paired with a webbing that is slightly rough and well-fit to the slide’s openings, the tri-glide slide works well as a buckle.
This method of creating a lightweight cinch is perfect for pairing with my tutorial for making your own burlap planters.
How to Use a Tri-Glide Slide as a No-Sew Buckle
The images below show how we converted a standard dog collar to an invisible fence receiver collar. Because this was not a dog’s primary collar (it was never used with a leash but instead just used at home to help remind the dog of property boundaries) we modified a standard dog collar and used a tri-slide as a closure for the collar. Follow along to see how easy it is to use a slide as a buckle when you’re working on light-duty straps and want to avoid using a sewing machine.

1. Here, I’ve already started my project: I’ve cut open an adjustable dog collar, fed my invisible fence receiver onto the webbing, and rather than trying to sew through the thick material I’m just going to feed a tri-glide slide, onto the webbing and finish the project.
The first step is to just feed the webbing up into the slide, over the center bar, and out the opposite opening: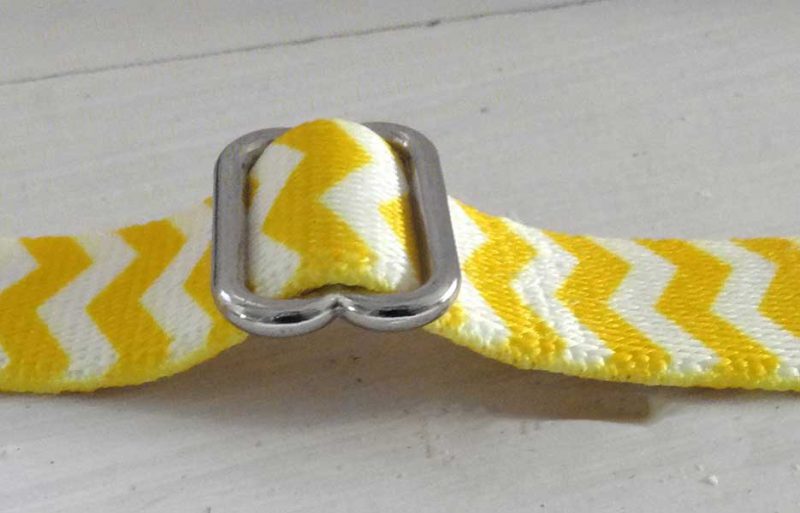
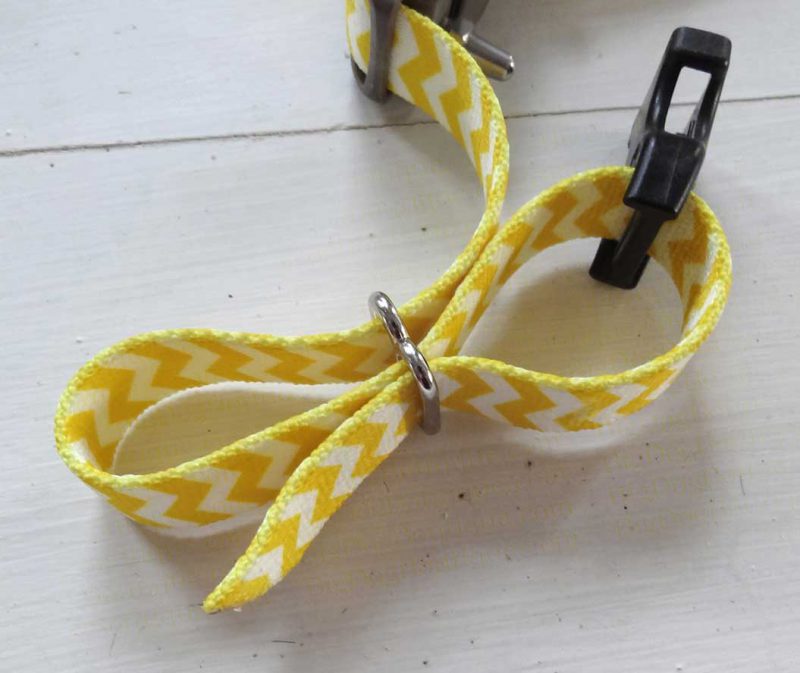
2. Once the slide is threaded onto the material I take the end of the webbing and feed it through the slot on my buckle as shown

It can feel a little complicated at this point, but it’s a simple process to figure out when the strap is in-hand. I’m simply feeding the webbing back from the buckle into the same space of the slide that the webbing exited in step 1.
3. After feeding the material back into the slide, again got up and over the center bar and out the opposite side. The image below shows the final positioning of the webbing needed, in a loosened form to show detail.
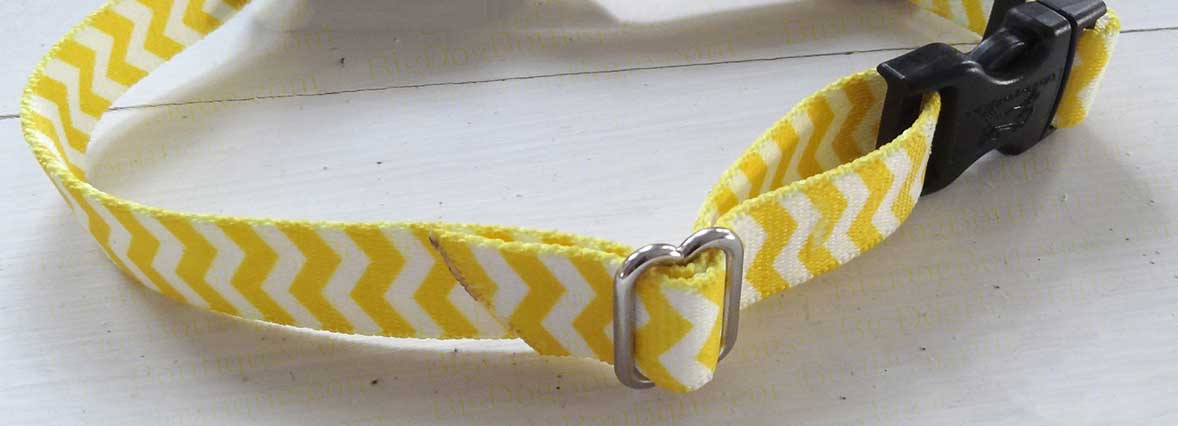
4. Once threaded up through the buckle slot, and back through the slide, the final step is to simply to tighten all the webbing so that the slide can exert the friction needed to hold the webbing in place.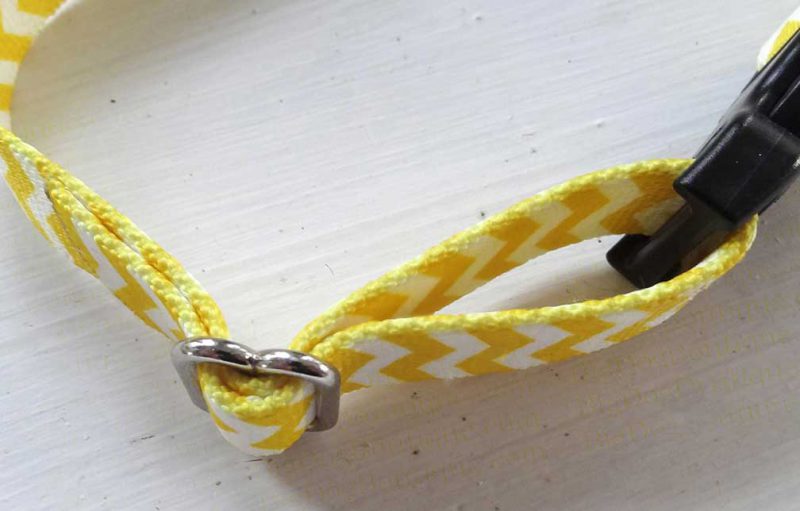
Thanks for Reading!!!
I hope you can tell that I love DIY, researching the best affordable solutions for every-day problems opportunities and documenting / sharing solutions!🙌 Hawk-Hill.com is reader-supported.
☕ Hawk-Hill.com is reader-supported. If this article saved you time or money, please consider donating $1 to help me cover the cost of hosting this website OR If you appreciate this information and want to throw a “Thanks!” my way by buying me a coffee – I would Of Course appreciate it! :]
Reader Questions and Recommendations
Readers, do you have any favorite topics / posts? What would you like to read more about in the future? As I hope you can tell from this and other articles on my site, I really enjoy DIY / a good challenge, and I’m not afraid to roll up my sleeves to figure out a great, and hopefully simple 😁 solution. So please feel free to let me know in the comments below (or reach out via social media)!
Ok Really – I’ll try to wrap this up now😂
Finally, if you’d like to continue to learn about interesting DIY options as well as how YOU can tackle creative new projects consider checking out the latest and most popular articles listed on the Hawk-Hill Home Page. I’m always trying to enjoy and write about the creative side of life so please don’t be a stranger – check back often!😍
Also chech our Pinteres account https://www.pinterest.com/curlylindsay/
If you enjoyed this post you may also enjoy reading / perusing / devouring😊 one or all of these articles as well!
- 💡4 Easy Steps to Make Your Own Sea Glass 🌊
- ❤️Bedroom Decorating Ideas for Single Women’s Master Bedrooms 🛏️
- 🏡Ikea Kitchen Cost: What I Spent for a 9×12 Kitchen Remodel 💵
Do you think it’ll work with leather?
Using tri-glide slides with leather depends on the thickness of the leather strap. For example, tri-glide slides are sometimes seen on purse straps made from thin or laminated leather, but never on dog collars which are made from thicker leather.