
IKEA furniture can be, well, plain. Every time I see IKEA furniture in a IKEA catalog I think to myself how classy it looks, but inevitably, after I go to the store, pull the pieces from their warehouse, check out, get it all home, bring it all inside, and assemble it, my furniture doesn’t look classy at all. Instead, it looks like furniture assembled I myself from a budget furniture company. Sounds accurate for the price right? But I am rarely satisfied with the way things look out-of-the-box, so I almost always customize my IKEA furniture.
In the past, I’ve had IKEA Billy bookshelves that I modified to look like built-in bookshelves in my living room, and made many changes to smaller IKEA furniture units. One of the changes I almost always make to my IKEA furniture as soon as I get at home is to add texture and dimension by using textured beadboard wallpaper. By adding the texture of beadboard to the back of a plain white laminate piece of furniture, the furniture is suddenly elevated. No longer does it look like a piece of furniture extruded from a factory machine, but now looks like something a little more higher-end.
The two simple tips in this article are quick, easy, and inexpensive ways to transform IKEA furniture into looking like a bit higher and pieces. By adding beadboard and caulking to an IKEA Pax wardrobe or Billy bookcase, the bookcase instantly looks as if it is from West Elm or Pottery Barn instead of a Swedish budget furniture warehouse.
In this post, I’m illustrating using the set of wardrobes I installed during my spare bedroom to walk-in closet conversion.

How to upgrade IKEA furniture with textured beadboard wallpaper
1. Assemble the basic unit
Textured beadboard wallpaper can be added to IKEA furniture just before the board on the back of the unit is added or after the backing board is added. For Billy bookshelves, which back a backing board that needs to slide into place on a guide, thickening the board before assembly is not advisable. Adding wallpaper may cause the board not to slide into place. For PAX wardrobe units, however, the backing board simply nails on, making it possible to add the wallpaper to the backing board before attaching it to the Pax frame.
Hawk-Hill.com is a participant in the Amazon Services LLC Associates Program, an affiliate advertising program designed to provide a means for website owners to earn advertising fees by advertising and linking to Amazon.com and any other website that may be affiliated with Amazon Service LLC Associates Program
2. Follow the instructions to attach textured beadboard wallpaper
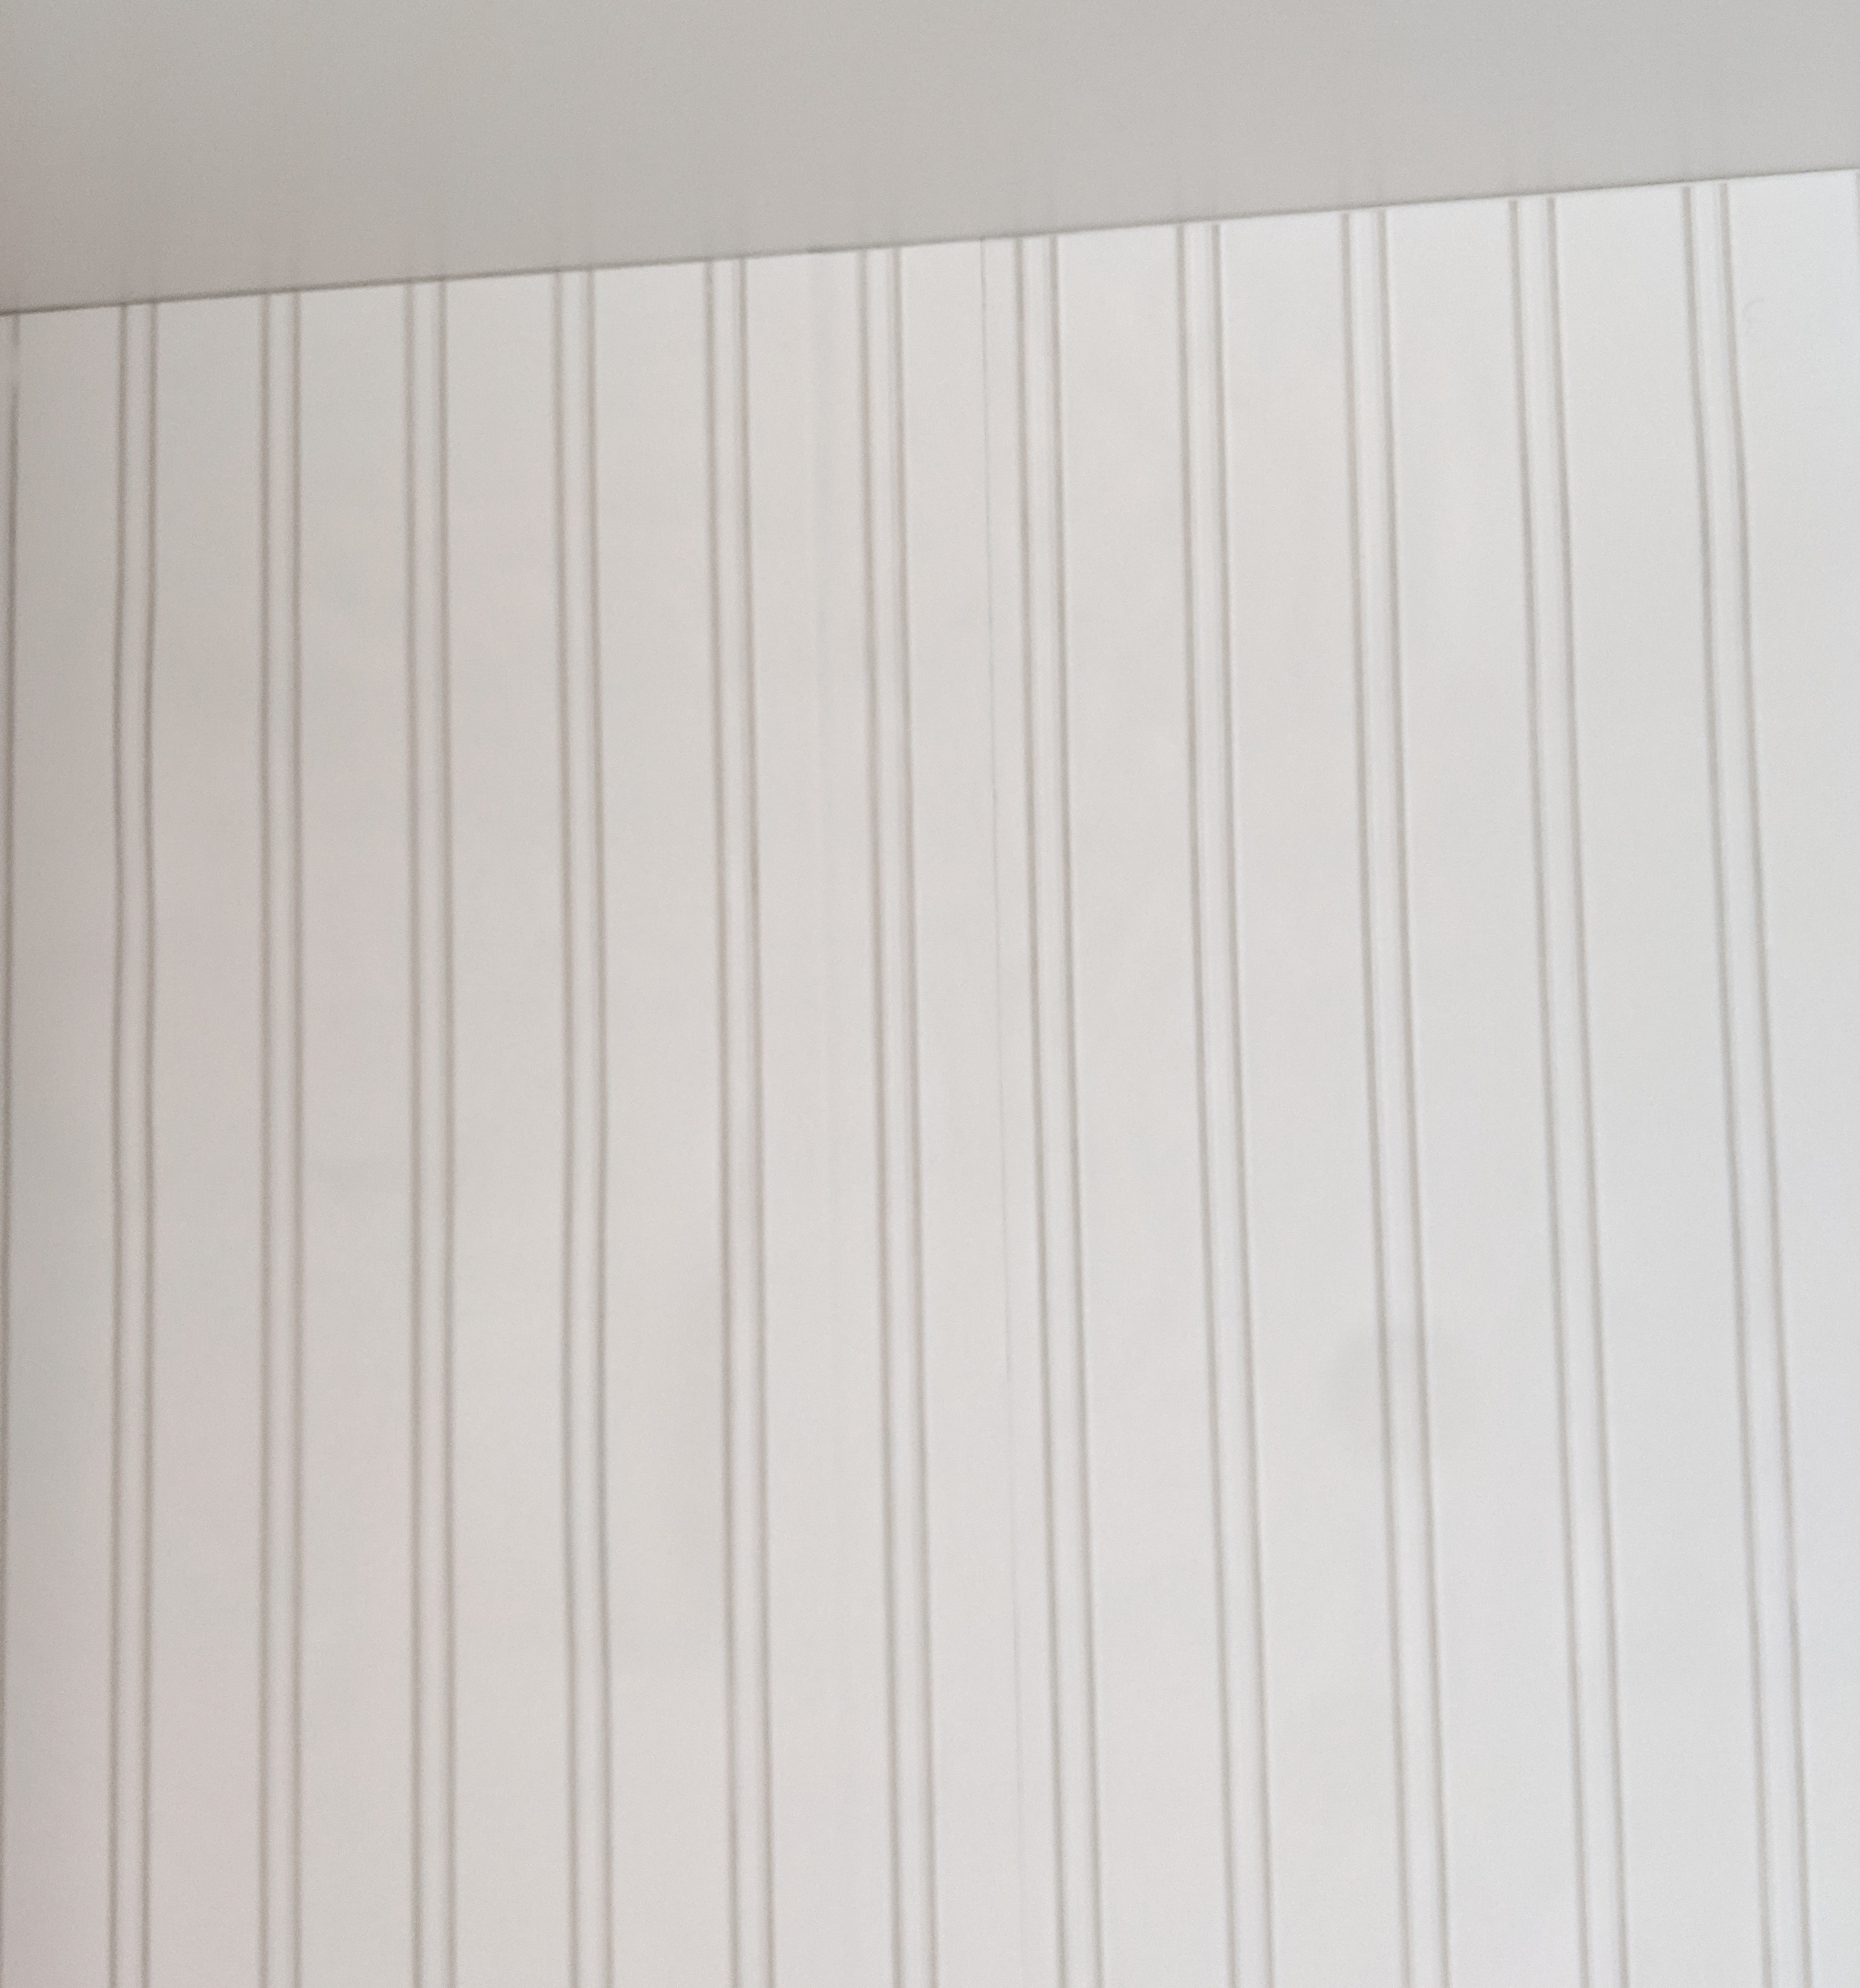
The wallpaper I use for easily upgrading my Billy bookcases and Pax wardrobe is Graham & Brown Paintable Prepasted Beadboard Textured Wallpaper. Activated with water (a lot of water) it becomes self stick and can easily be hung on the back of an assembled vertical IKEA wardrobe, cabinet, or bookshelf. I love this wallpaper because it’s thick and easy to handle. It’s also easy to slide once it’s in place, helping keep it level and straight.

Textured wallpaper does an outstanding job of hiding the creases on the backing board of wider IKEA furniture. That piece of cardboard you had to unfold during assembly keeps that crease even after the piece of furniture is in use- sometimes making the furniture look cheap. By adding textured wallpaper, the crease is completely hidden. Although the wallpaper may have joints between sections, as you can see below this textured wallpaper is incredibly effective at hiding those joints. Ultimately they are far less obvious than the creases left by IKEA’s flatpack packaging.
3. Trim beadboard wallpaper to fit the IKEA furniture
Trim any excess once the wallpaper has been attached to your IKEA wardrobe or bookshelf. If there’s any overlap, you’ll need to trim this away using a straight edge or X-Acto knife before the wallpaper begins to dry. Remove the scraps and use a slightly damp washcloth to wash your IKEA furniture anywhere that the wallpaper may have inadvertently touched. Removing excess paste from the laminate helps contribute to a finished, clean look.
Note: Some people have asked me about the need to pretreat IKEA furniture so that wallpaper will securely attach and not peel away. The plastic surface of IKEA’s laminate can sometimes cause treatments like paint to peel off. I can’t speak for all wallpapers, but this Graham & Brown Paintable Beadboard Wallpaper that I use on my IKEA furniture to upgrade to a beadboard look has never peeled away- glue holds it securely to the surface even without priming or sanding the laminate to create texture.
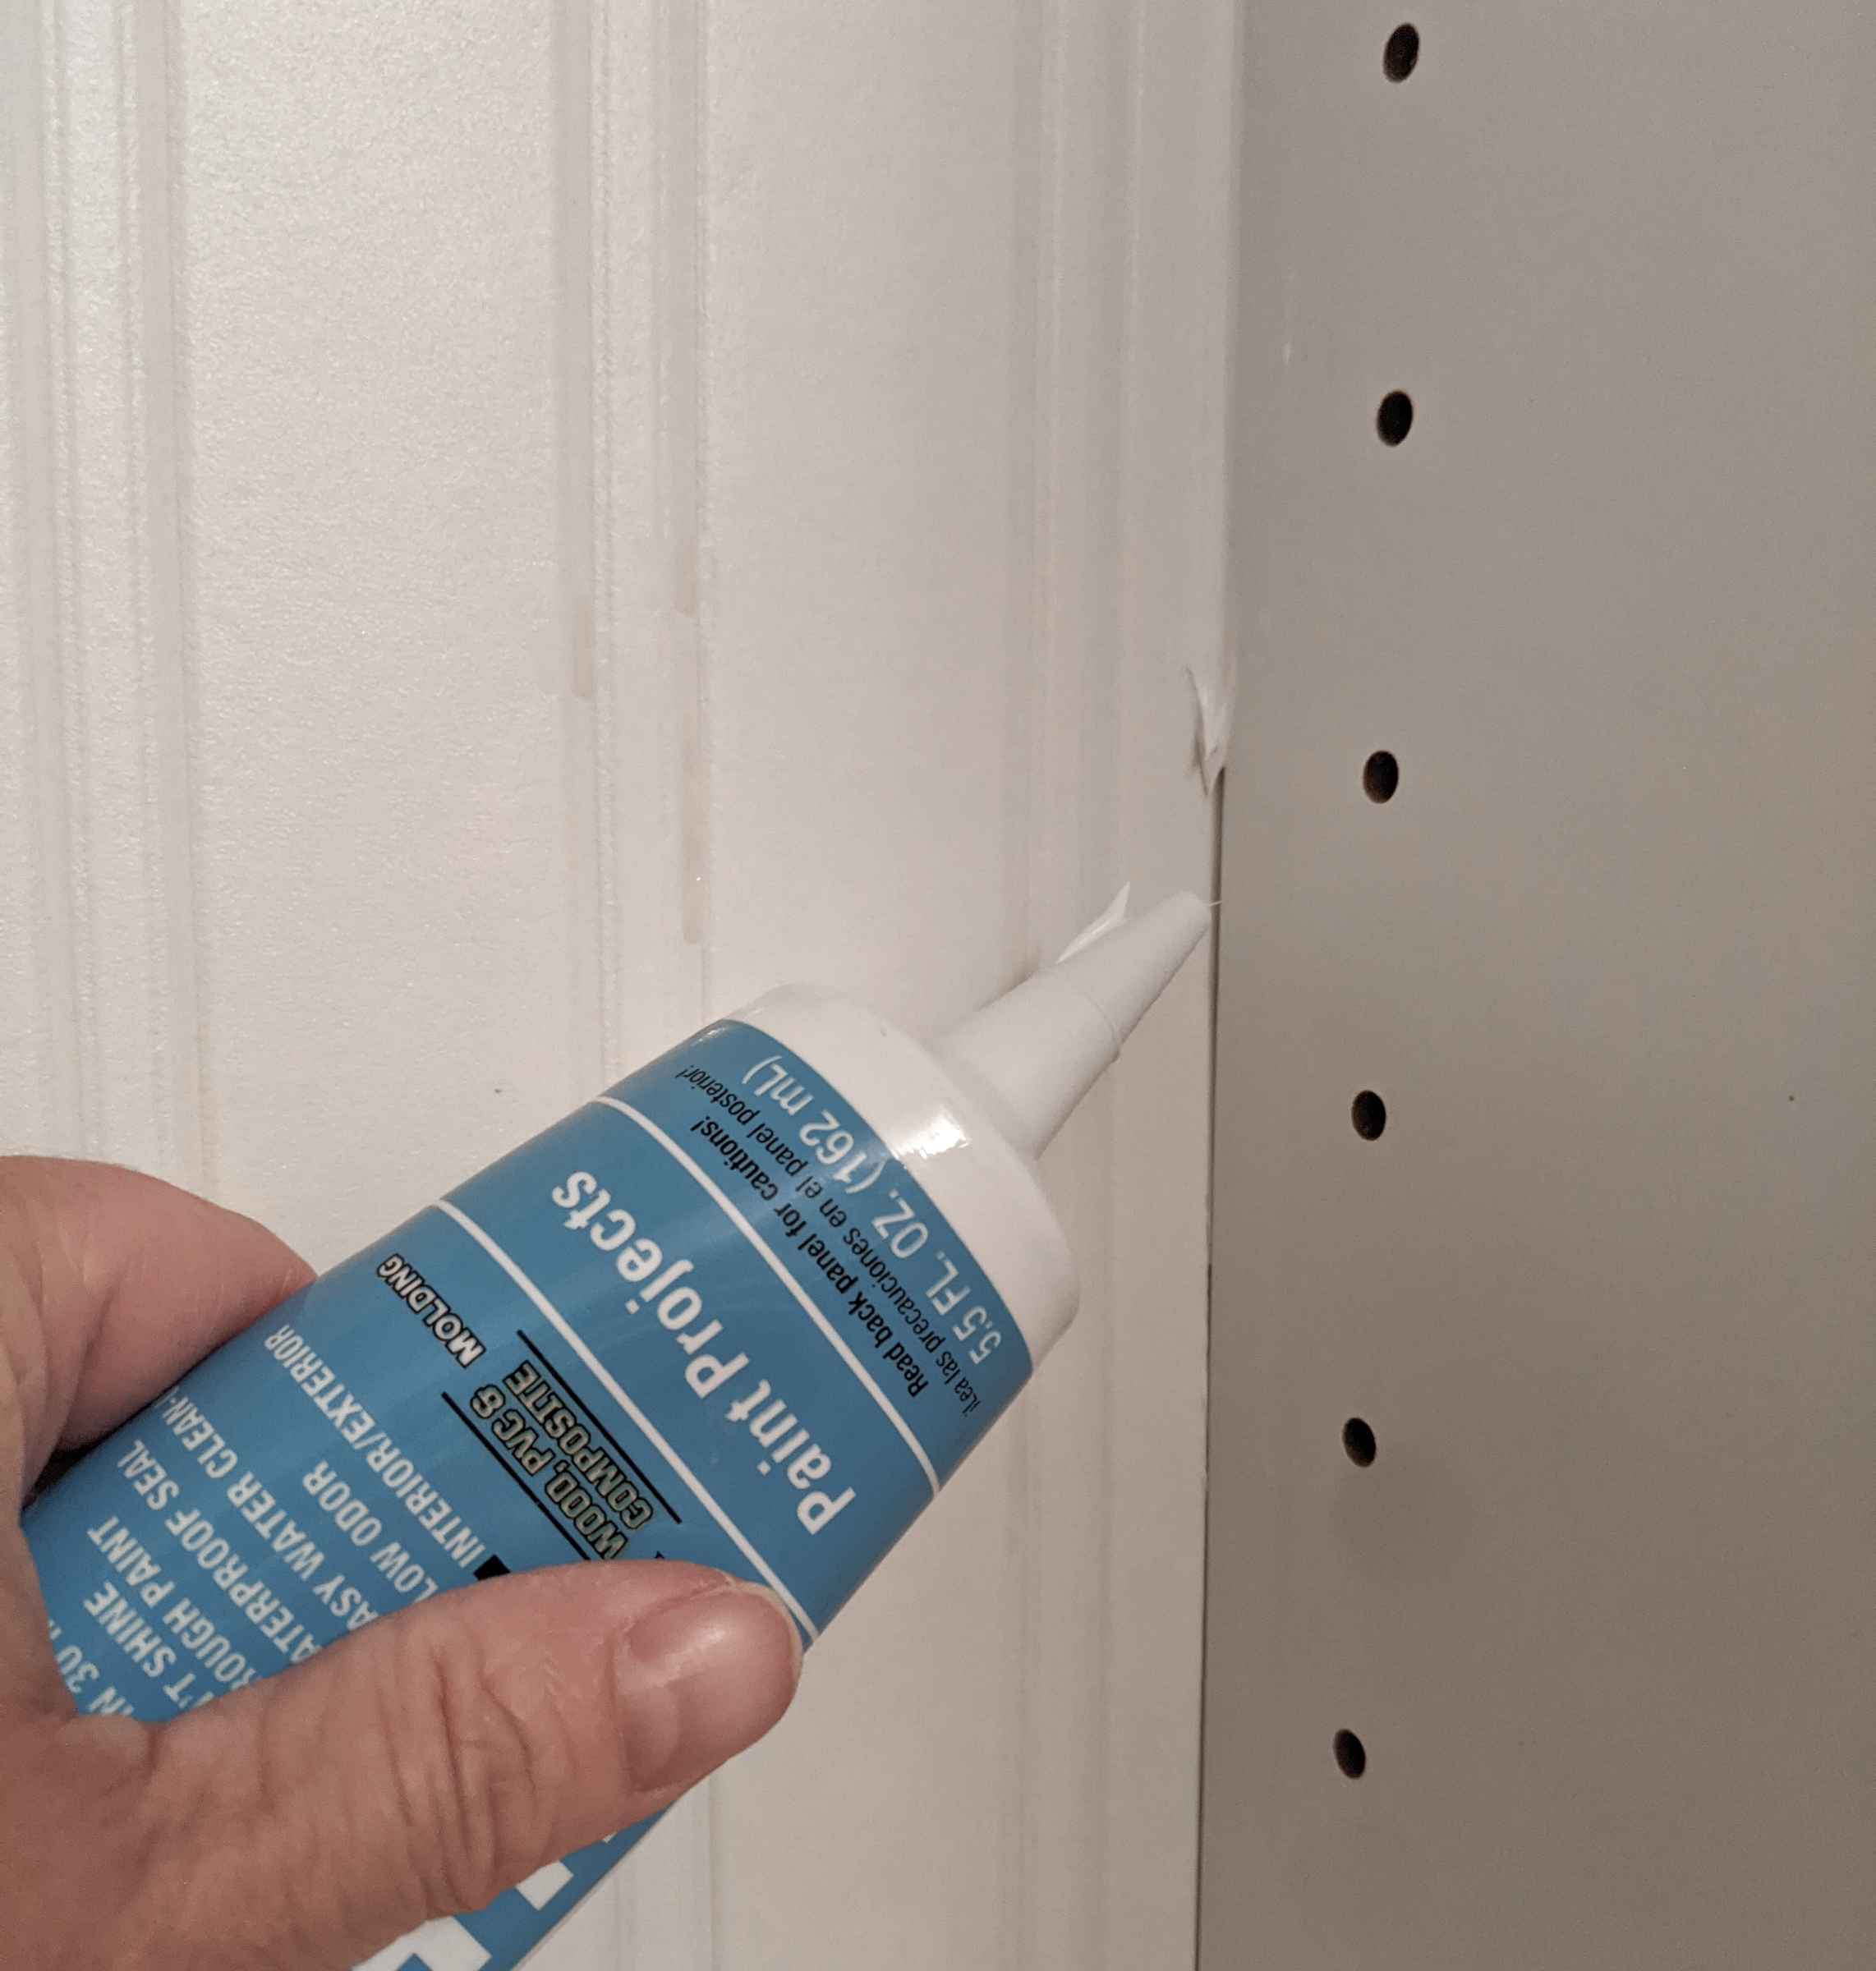
4. Caulk seams and edges
Once you’ve applied wallpaper and it has dried, you’re going to be impressed with how much better your IKEA furniture looks already, but there’s one extra step you can take that will take your furniture from “oh, nice IKEA upgrade” to “did you have that custom-built?” That step is caulking.
Grab a tube of white paintable caulk and add a bead to each of the seams around the wallpaper panel and anywhere else you can see a dark line at a joint. You may be tempted to use a caulking gun, however, for this purpose a caulking gun will shoot out way too much caulk. Instead buy a smaller tube and cut a very small hole in the tip, squeeze it out slowly along the joint, and trace a wet finger along the bead to create a smooth line of caulk (keeping your hand wet reduces the amount of caulk that will adhere to your finger. This hack is most effective for silicone-based caulk, but seems to help with other types as well).
Final Thoughts
These simple steps to add textured beadboard wallpaper and finishing caulk to an IKEA Billy bookcase or Pax wardrobe make a dramatic difference in the final look. Whether you plan to build out your IKEA furniture to make it look like a built-in or if you plan to enjoy it as is, taking these steps to finish the interior of your IKEA furniture will make a dramatic difference in the appearance of the quality of your new furniture.
Do I need any special skills to be able to add textured beadboard wallpaper and caulking to my IKEA furniture?
No! If you can assemble IKEA furniture you can definitely handle this tutorial for creating a beadboard wallpaper backing on your IKEA furniture. Caulking can be a little tricky at first, but if you practice on a out-of-the-way spot and quickly wipe away any mistakes with a wet rag, you should be able to handle this tutorial for upgrading IKEA furniture with beadboard textured wallpaper.
Types of furniture this works on
Although this tutorial is specifically about upgrading IKEA furniture with textured wallpaper and caulking, this technique can be applied to furniture from many other stores and even vintage furniture. One user of this texture beadboard wallpaper even applied it to cabinet fronts in her kitchen! You may wish to test the surface to see if the textured wallpaper’s glue adhesive will be sufficient to bind the wallcovering to the surface.
Where to do this upgrade?
The main thing about adding wallpaper to your IKEA furniture is that you’ll need a water source. Many people dip wallpaper sheets and a bathtub full of water, however, I used a Rubbermaid tote filled with a few inches of water. Some people may wish to do this upgrade in a garage or basement and carry the piece of furniture into the room where they’ll put it, but I think it makes more sense to assemble and upgrade your IKEA furniture in the room where you will be using it.

Thanks for Reading!!!
I hope you can tell that I love DIY, researching the best affordable solutions for every-day problems opportunities and documenting / sharing solutions!🙌 Hawk-Hill.com is reader-supported.
☕ Hawk-Hill.com is reader-supported. If this article saved you time or money, please consider donating $1 to help me cover the cost of hosting this website OR If you appreciate this information and want to throw a “Thanks!” my way by buying me a coffee – I would Of Course appreciate it! :]
Reader Questions and Recommendations
Readers, do you have any favorite topics / posts? What would you like to read more about in the future? As I hope you can tell from this and other articles on my site, I really enjoy DIY / a good challenge, and I’m not afraid to roll up my sleeves to figure out a great, and hopefully simple 😁 solution. So please feel free to let me know in the comments below (or reach out via social media)!
Ok Really – I’ll try to wrap this up now😂
Finally, if you’d like to continue to learn about interesting DIY options as well as how YOU can tackle creative new projects consider checking out the latest and most popular articles listed on the Hawk-Hill Home Page. I’m always trying to enjoy and write about the creative side of life so please don’t be a stranger – check back often!😍
Also chech our Pinteres account https://www.pinterest.com/curlylindsay/
If you enjoyed this post you may also enjoy reading / perusing / devouring😊 one or all of these articles as well!
- 💡4 Easy Steps to Make Your Own Sea Glass 🌊
- ❤️Bedroom Decorating Ideas for Single Women’s Master Bedrooms 🛏️
- 🏡Ikea Kitchen Cost: What I Spent for a 9×12 Kitchen Remodel 💵