
Instructions for creating antiqued finishes abound on the internet- and, trust me, I tried a lot of them in my quest for an authentic antiqued/patinaed finish.
Through trial and error, plus some old trade secrets from the coppersmith workshop where I grew up, I developed this method for antiquing frames that creates a metallic old-gold finish. The trick? Using a thin coat of high-quality acrylic paint rubbed into crevices to create a faux antique finish that softens the metallic gold with a vintage, slightly grungy feel. Here’s my technique, start to finish. Share your results in the comments below!
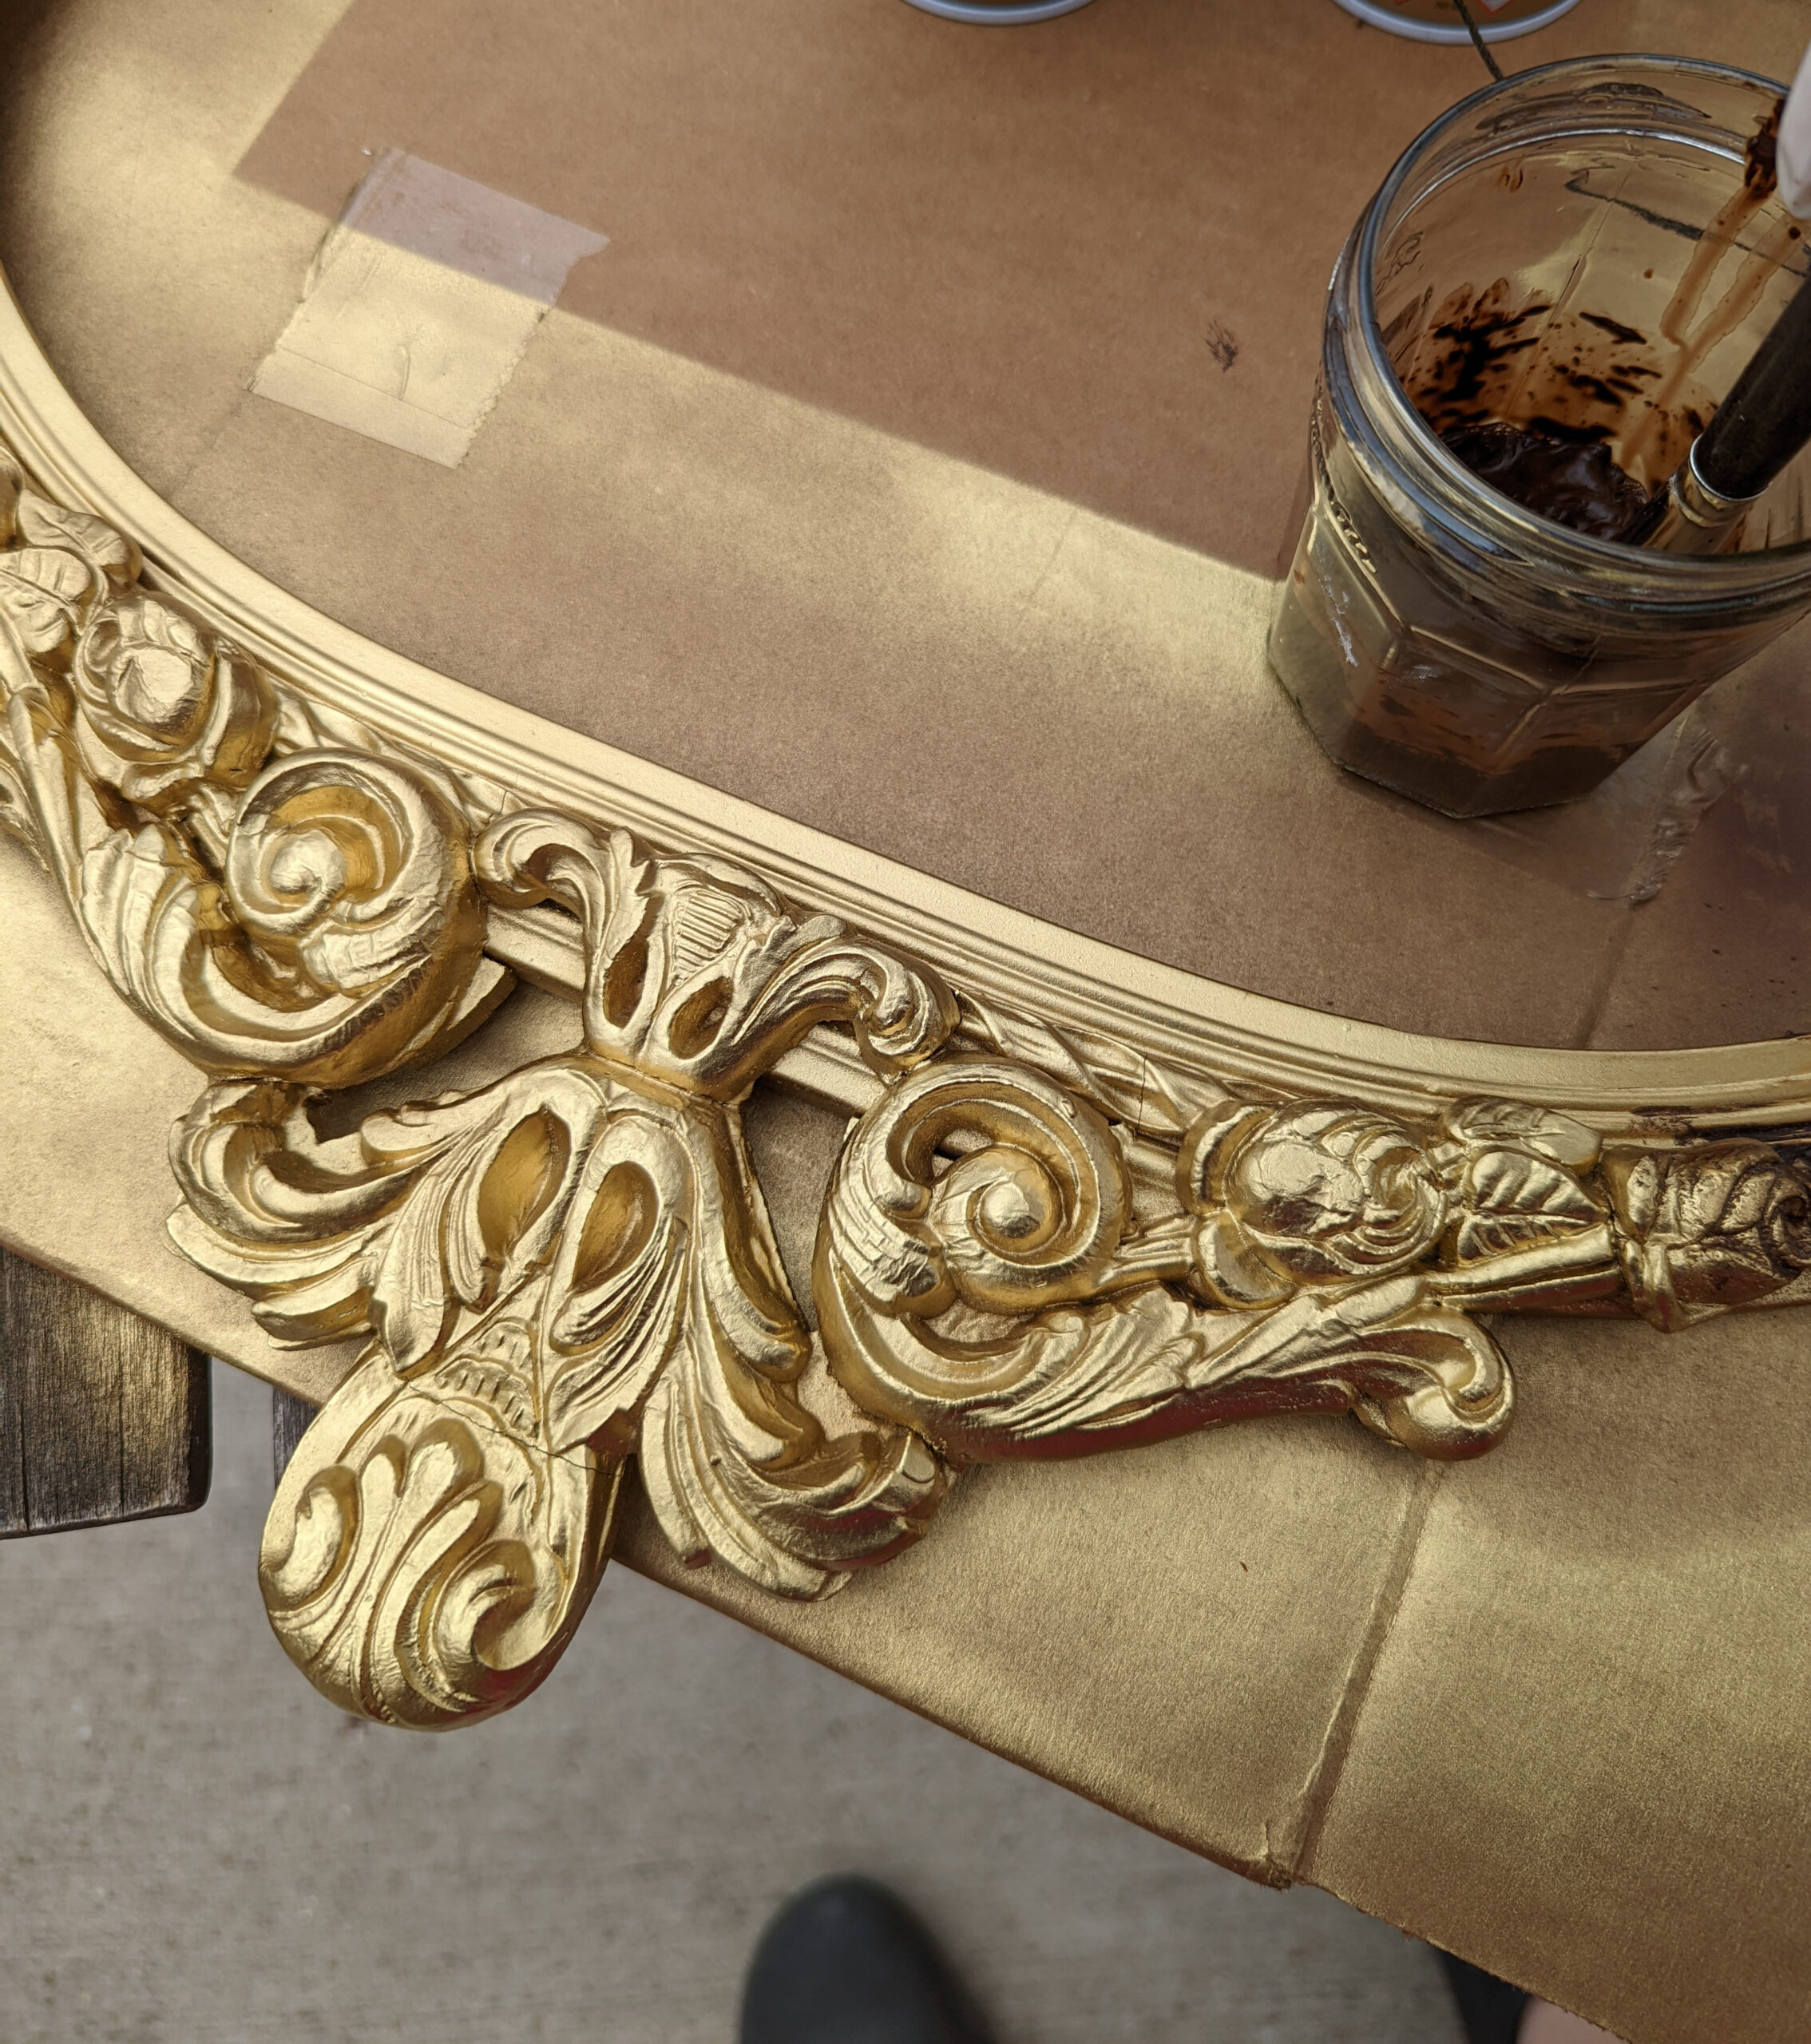
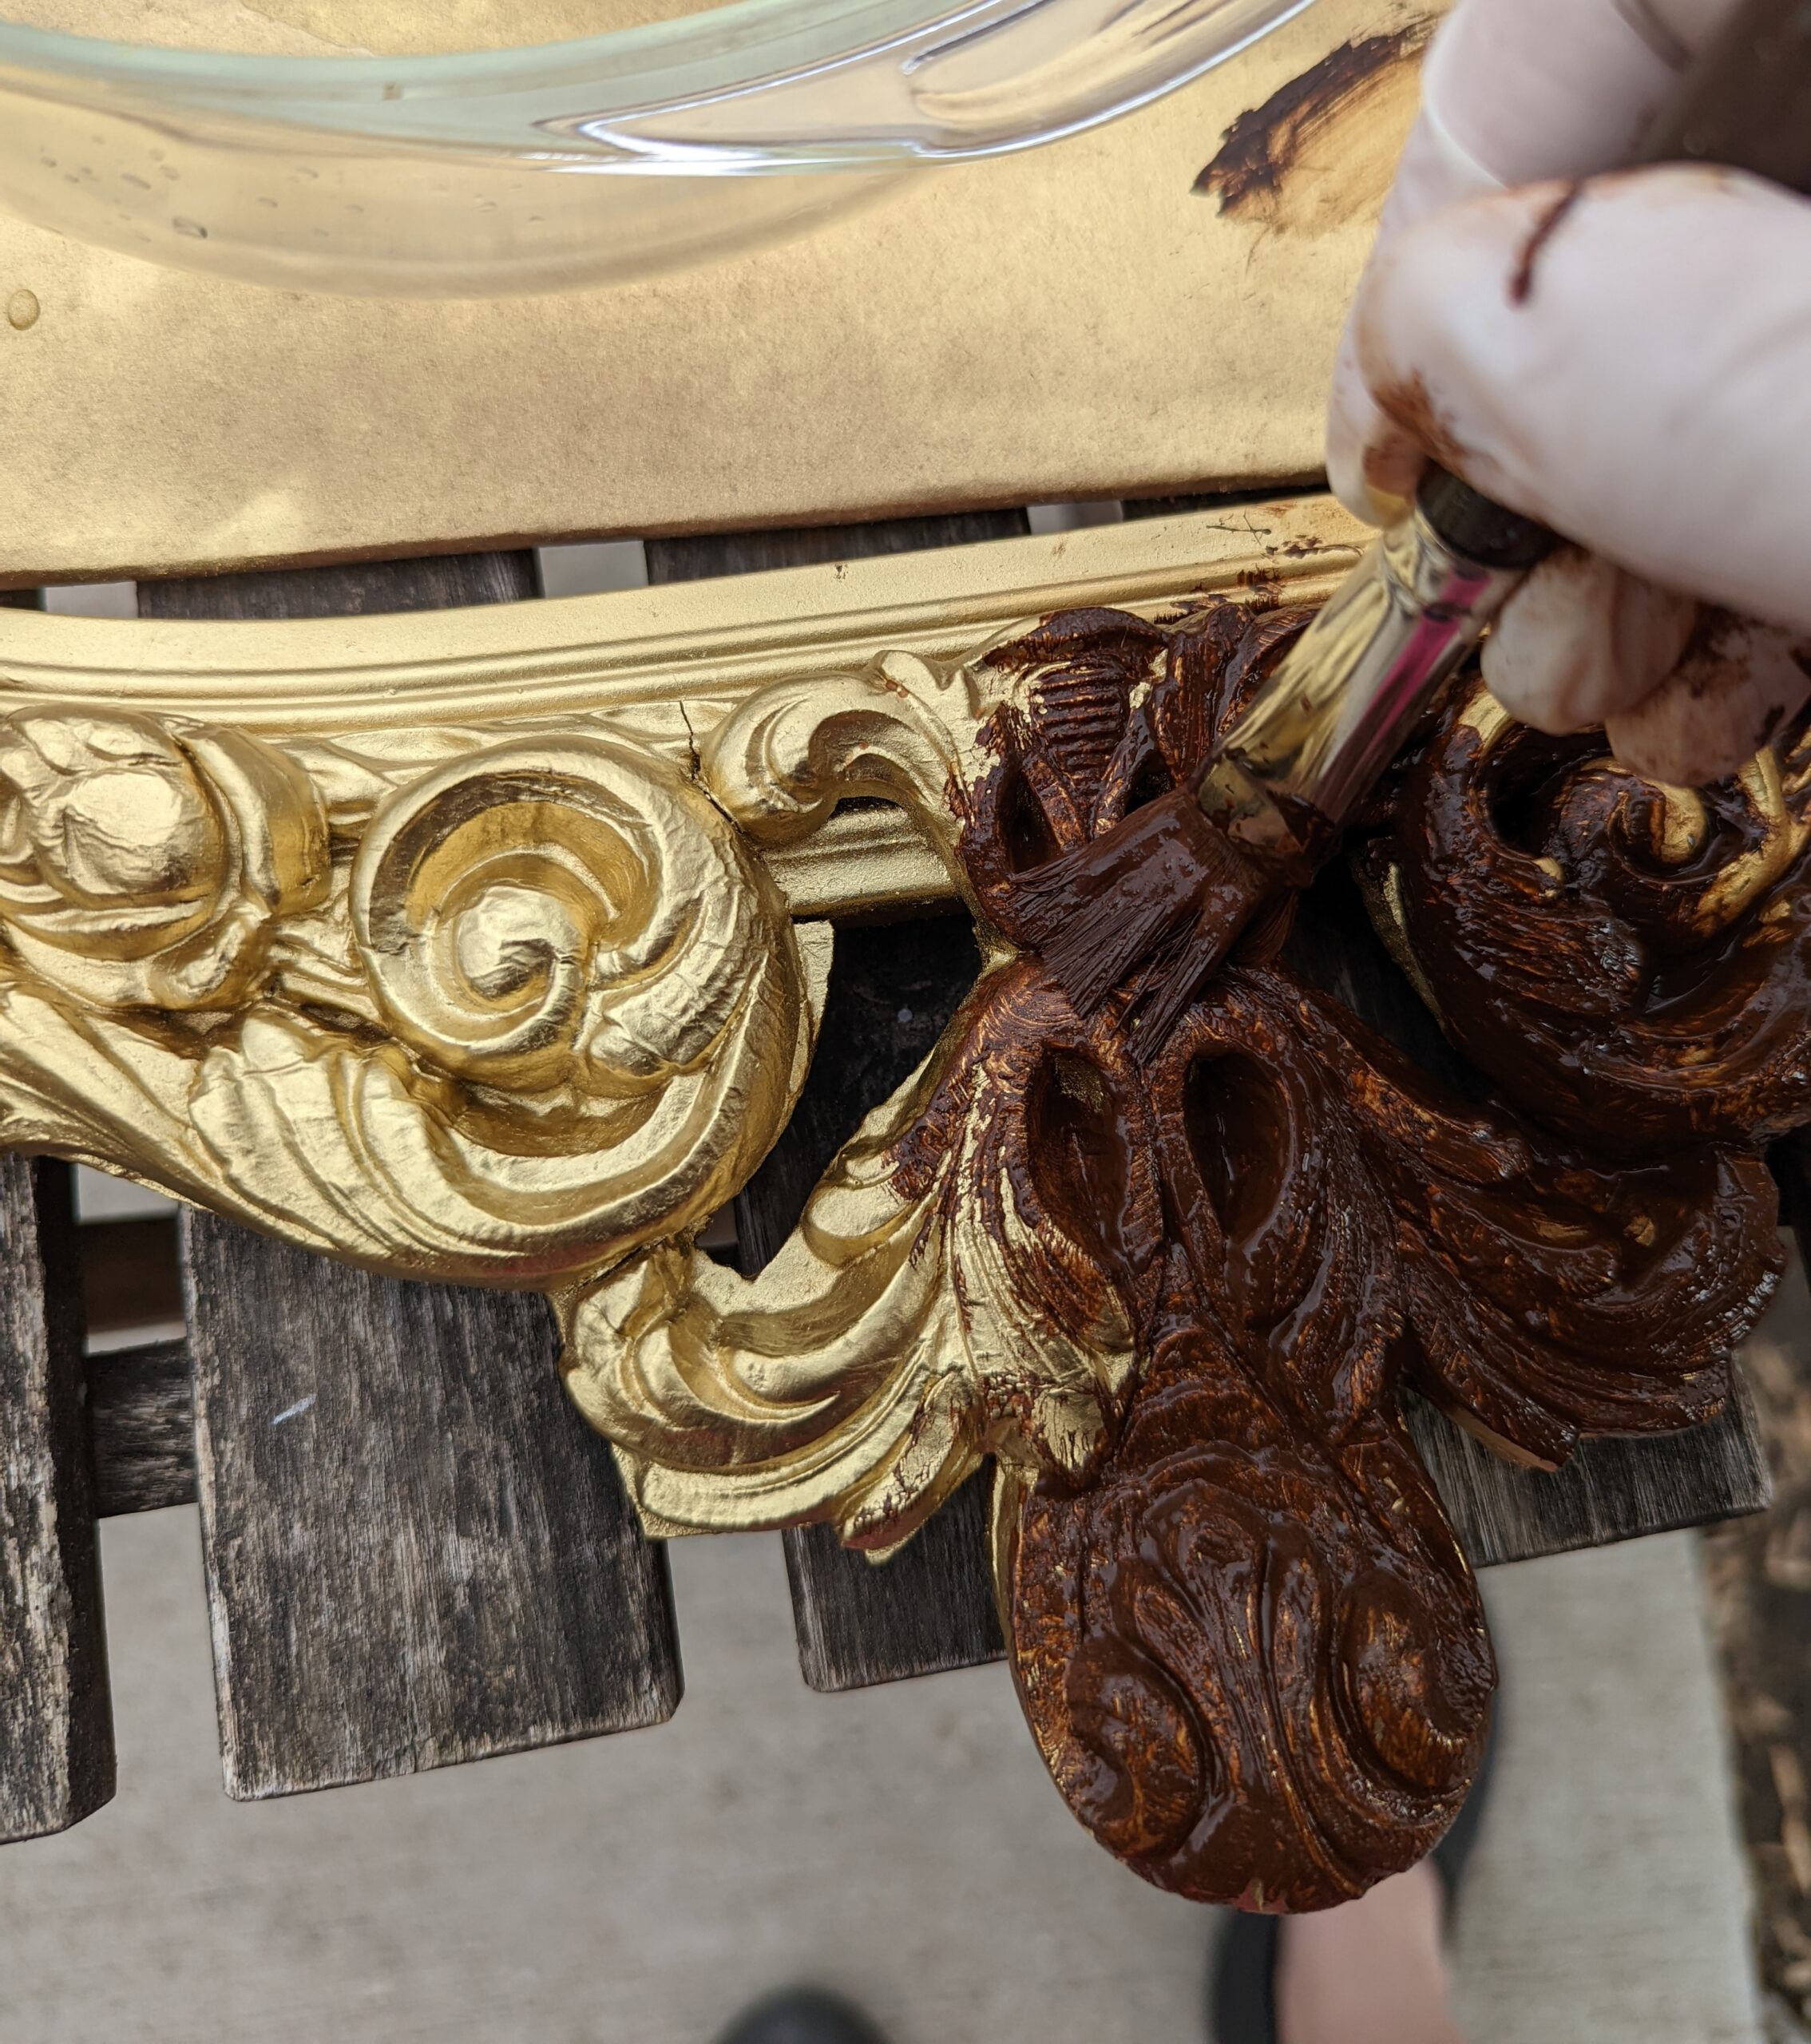
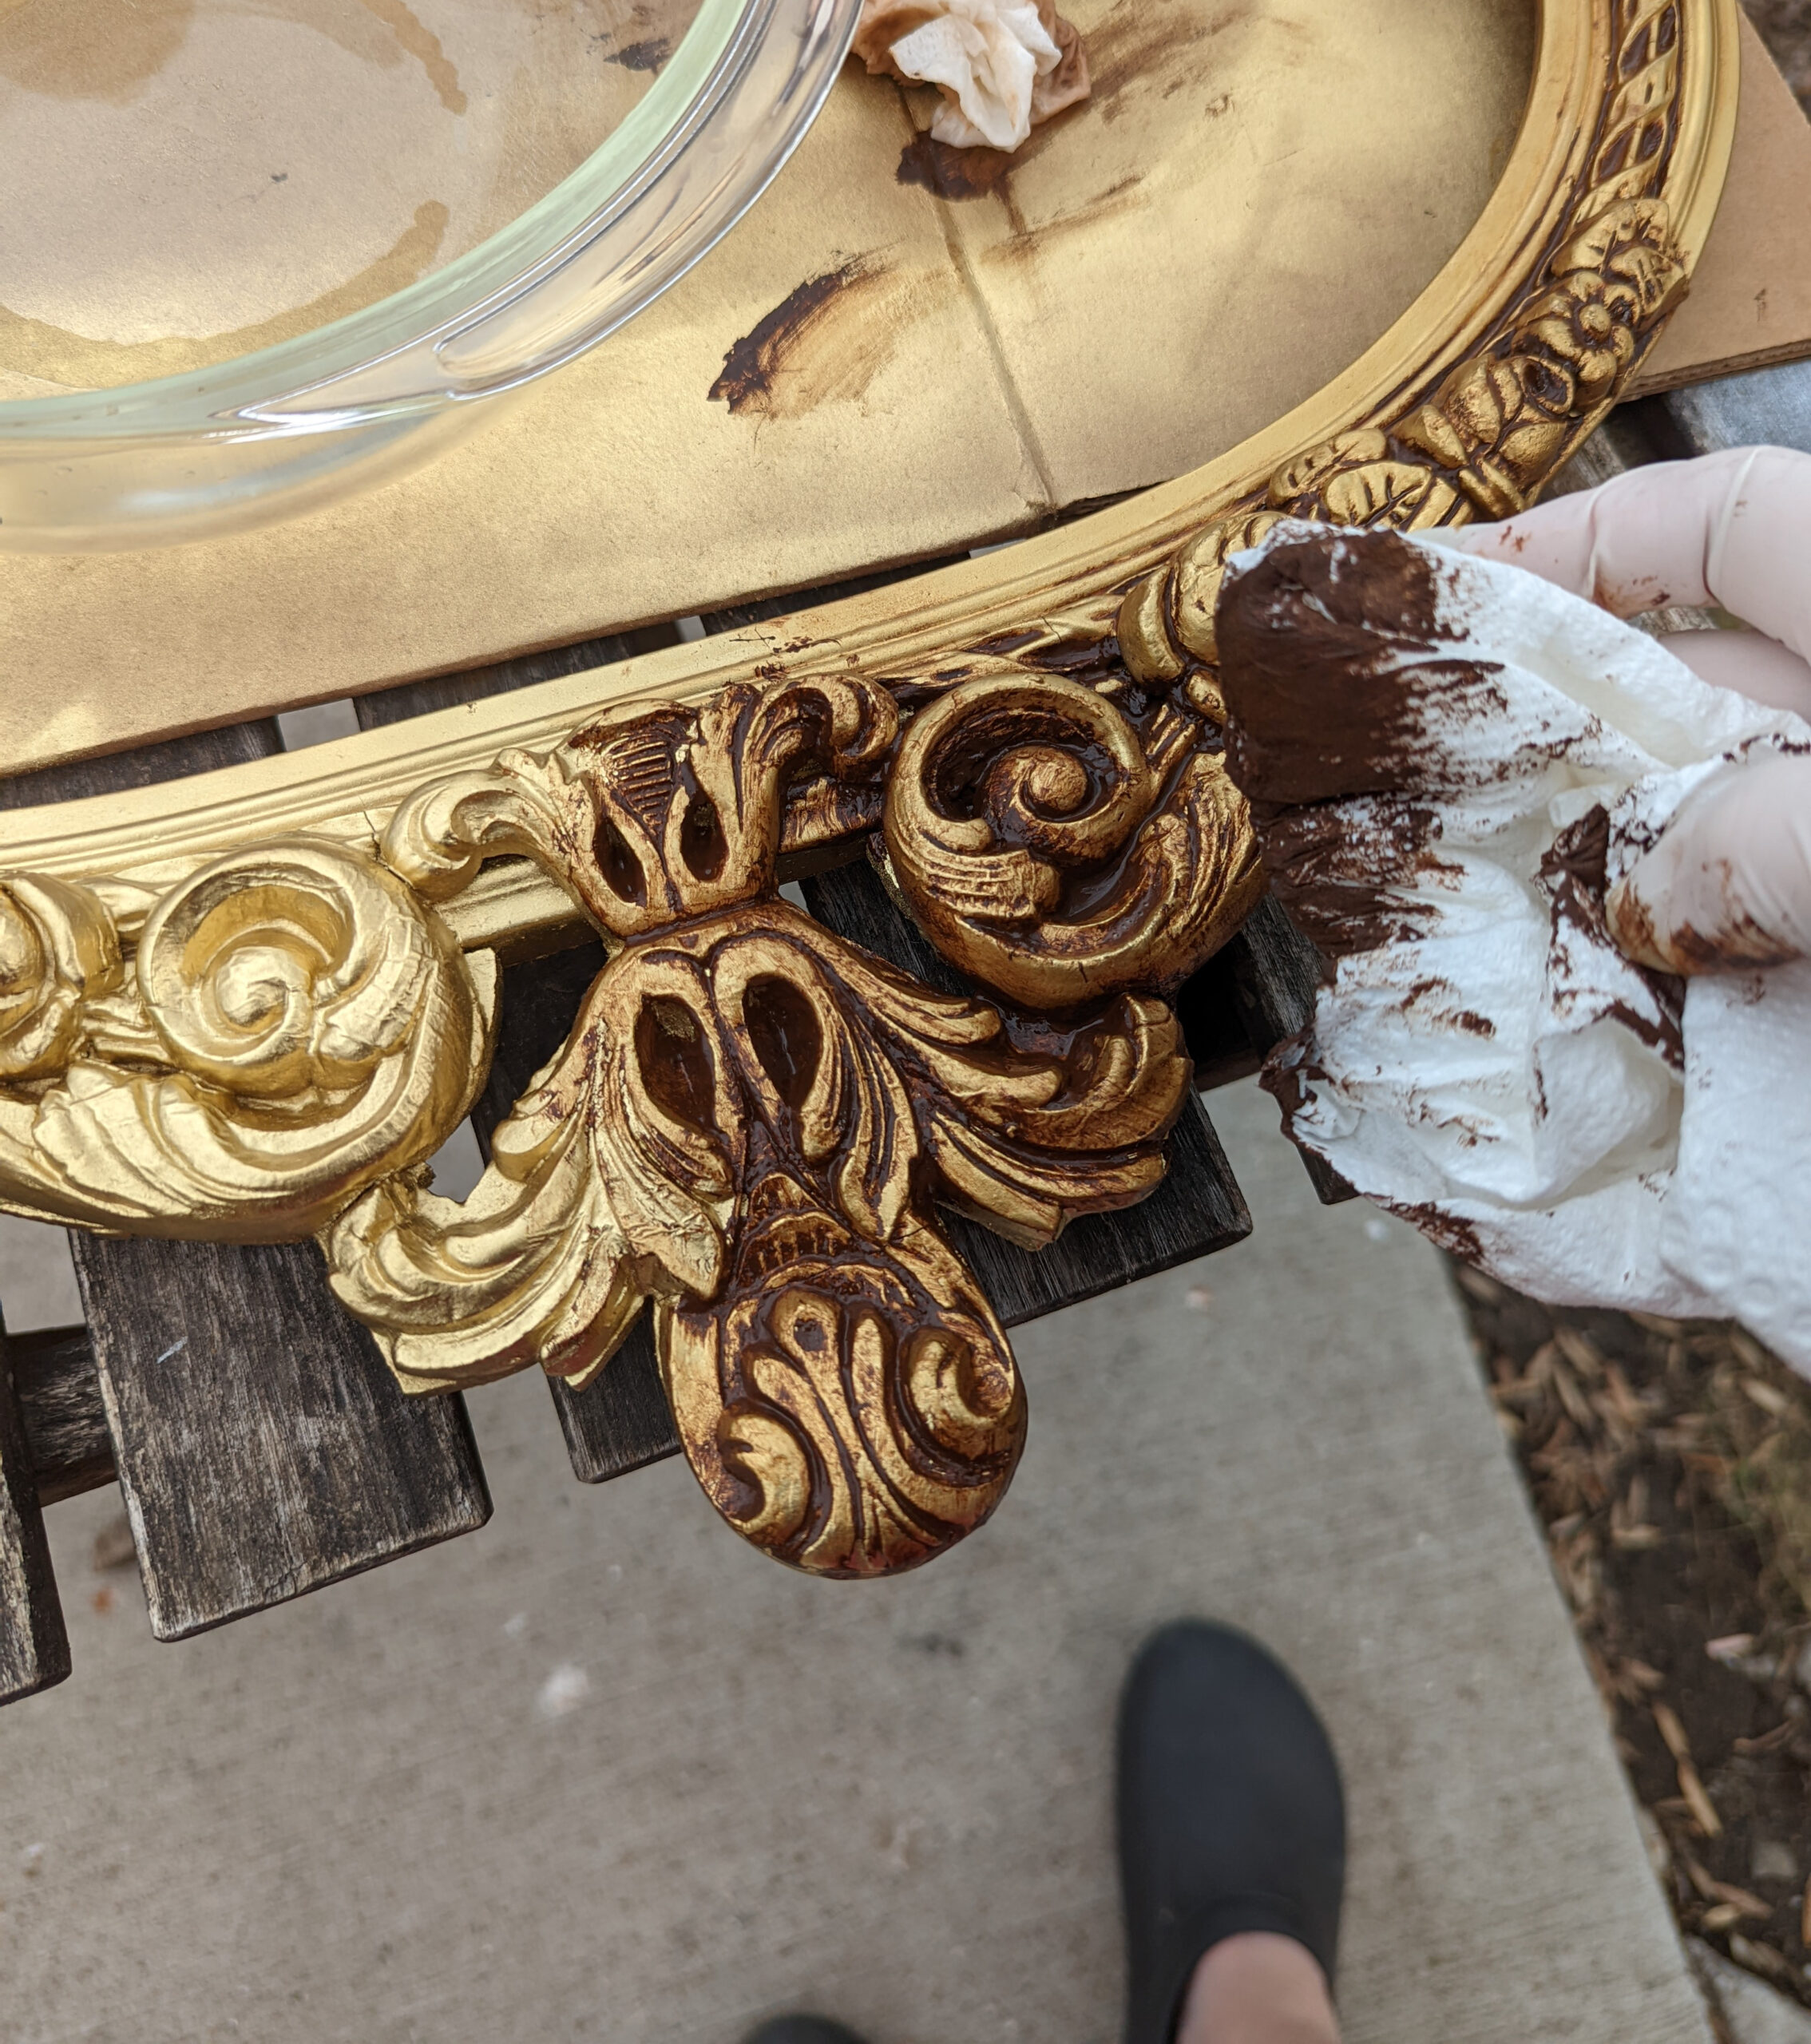
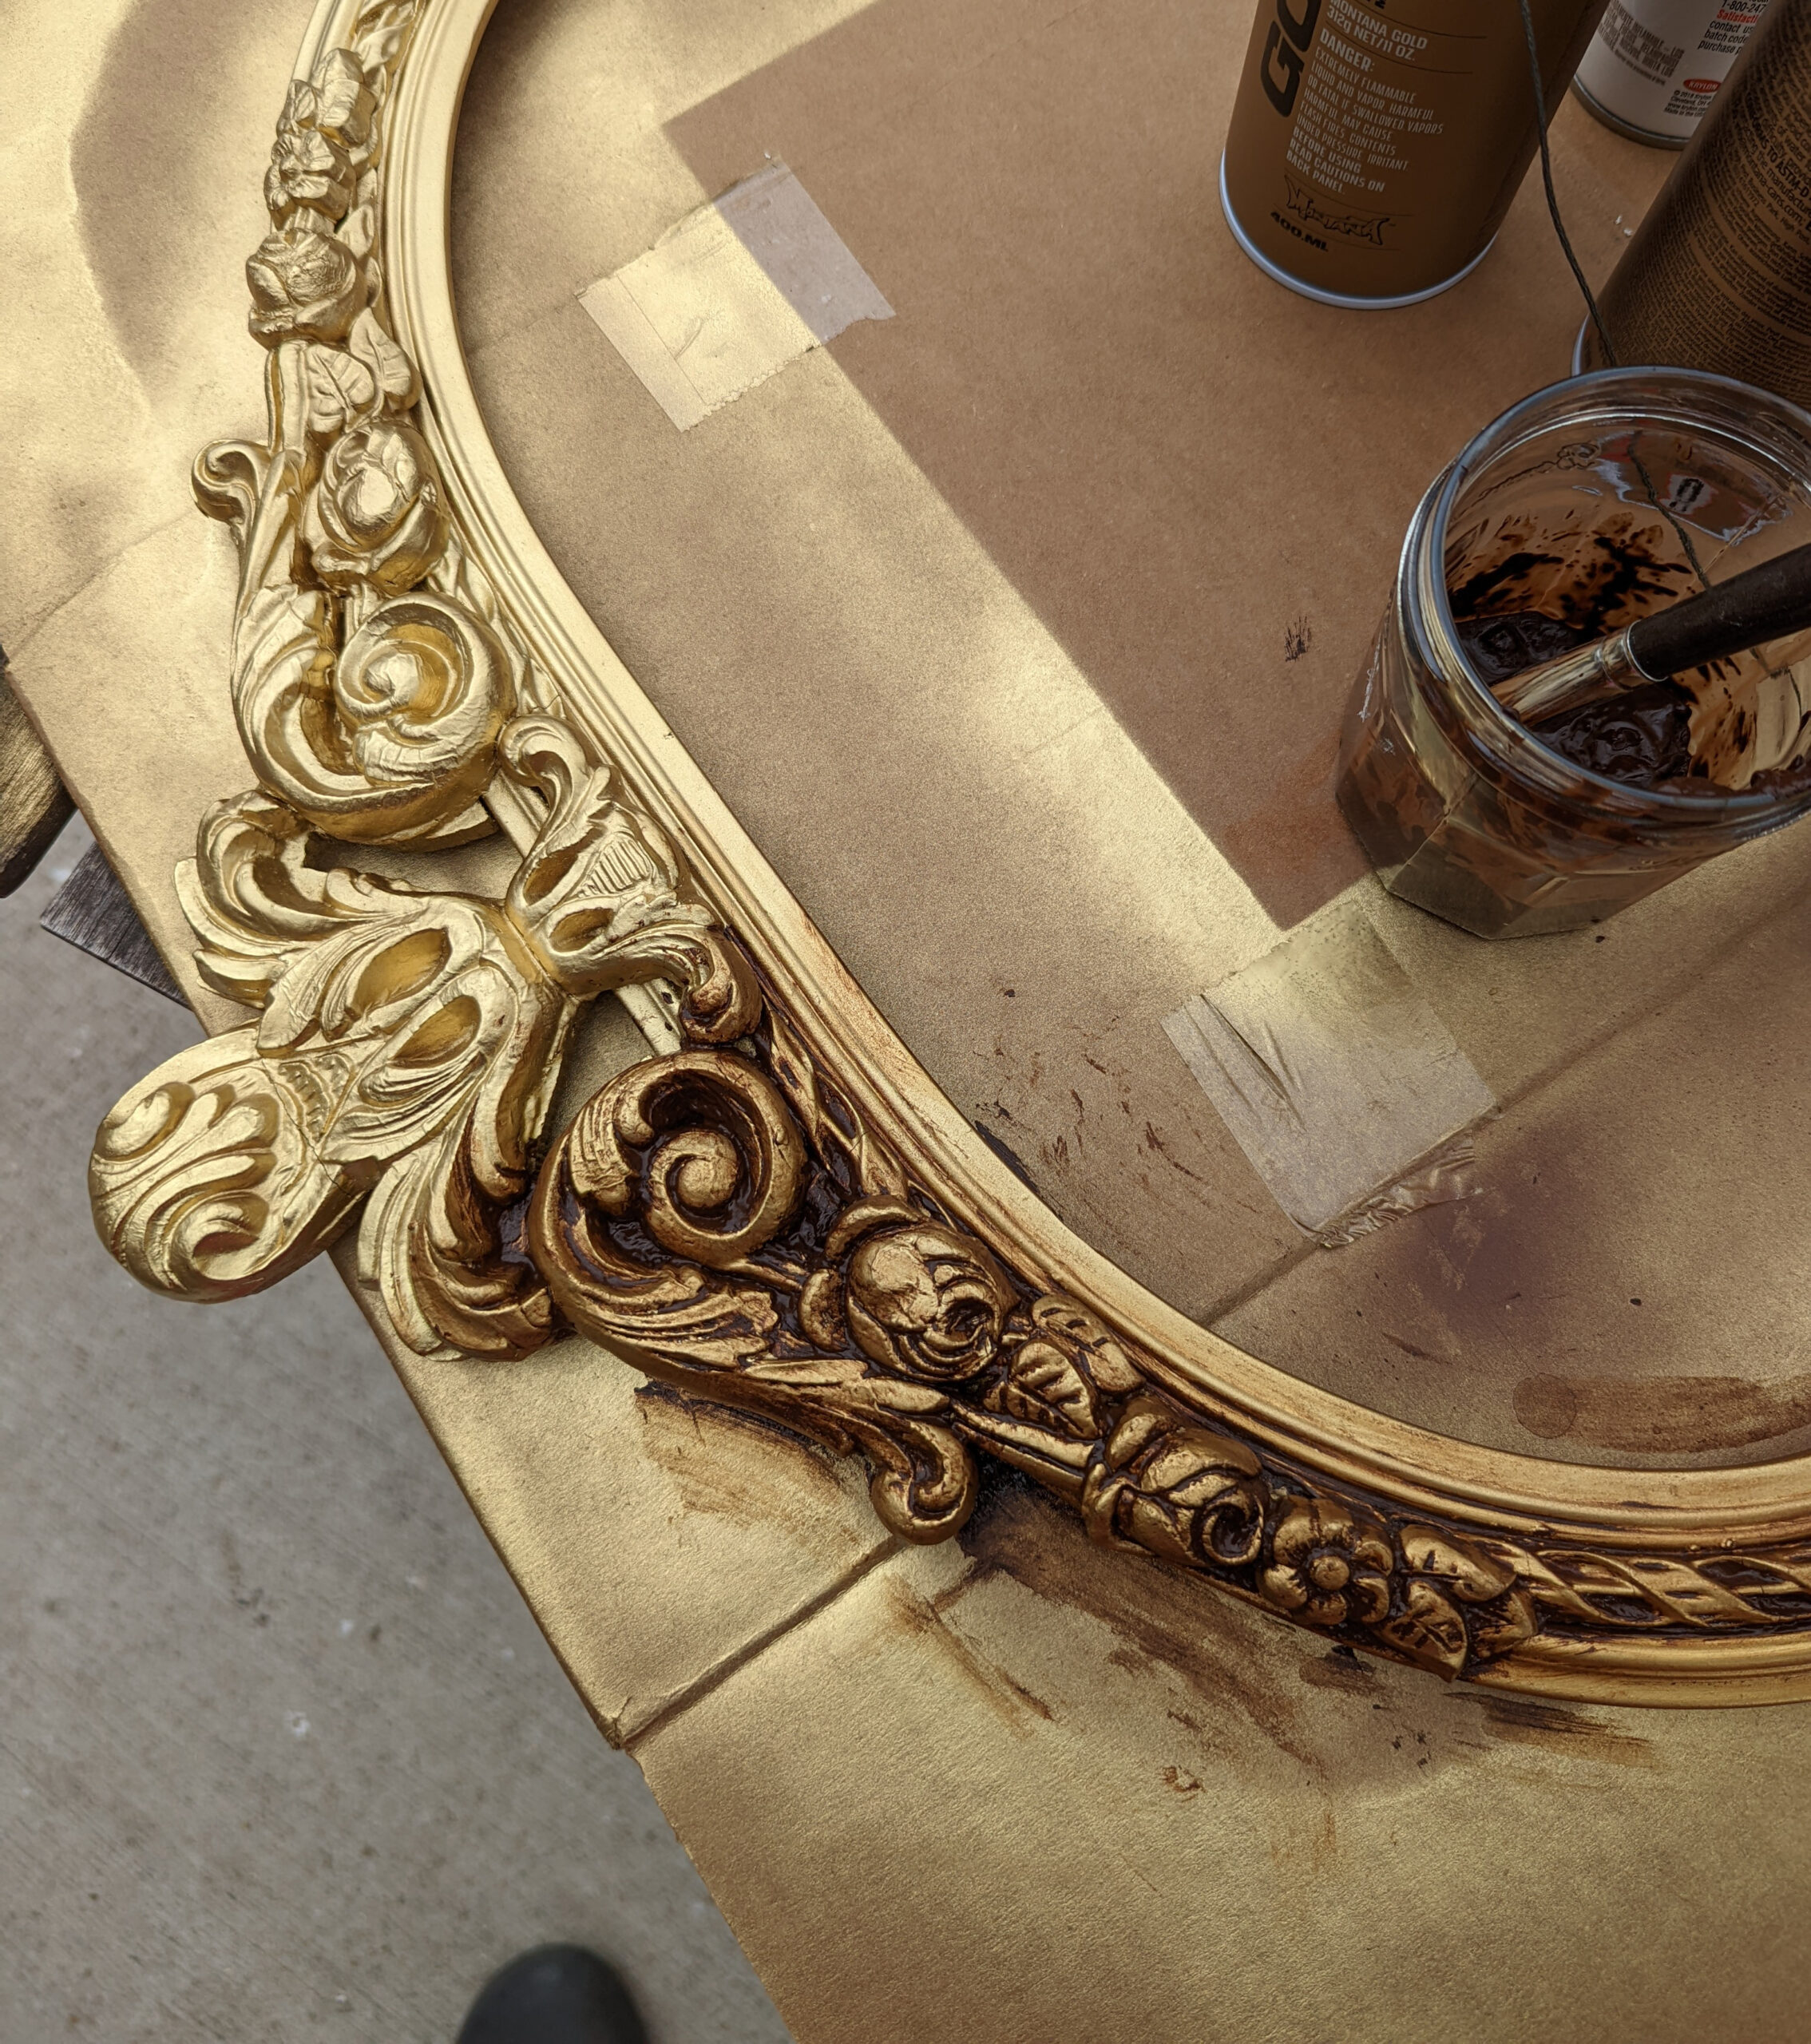
Photo showing detailed work required to develop antique gold patina on a frame
Hawk-Hill.com is a participant in the Amazon Services LLC Associates Program, an affiliate advertising program designed to provide a means for website owners to earn advertising fees by advertising and linking to Amazon.com and any other website that may be affiliated with Amazon Service LLC Associates Program
Supplies Needed for this Tutorial
- Liquitex Professional Spray Paint – Raw Umber
- Krylon Foil Metallic Gold Spray
- 1 Chip Brush (or other very large, soft-bristled brush
- Paper Towels (lots of them!) rags will work but require special cleaning*
- A box or trash can where you can toss paint-soaked paper towels
How to Paint an Antique Gold Patina Finish
Paint Metallic Gold Undercoat
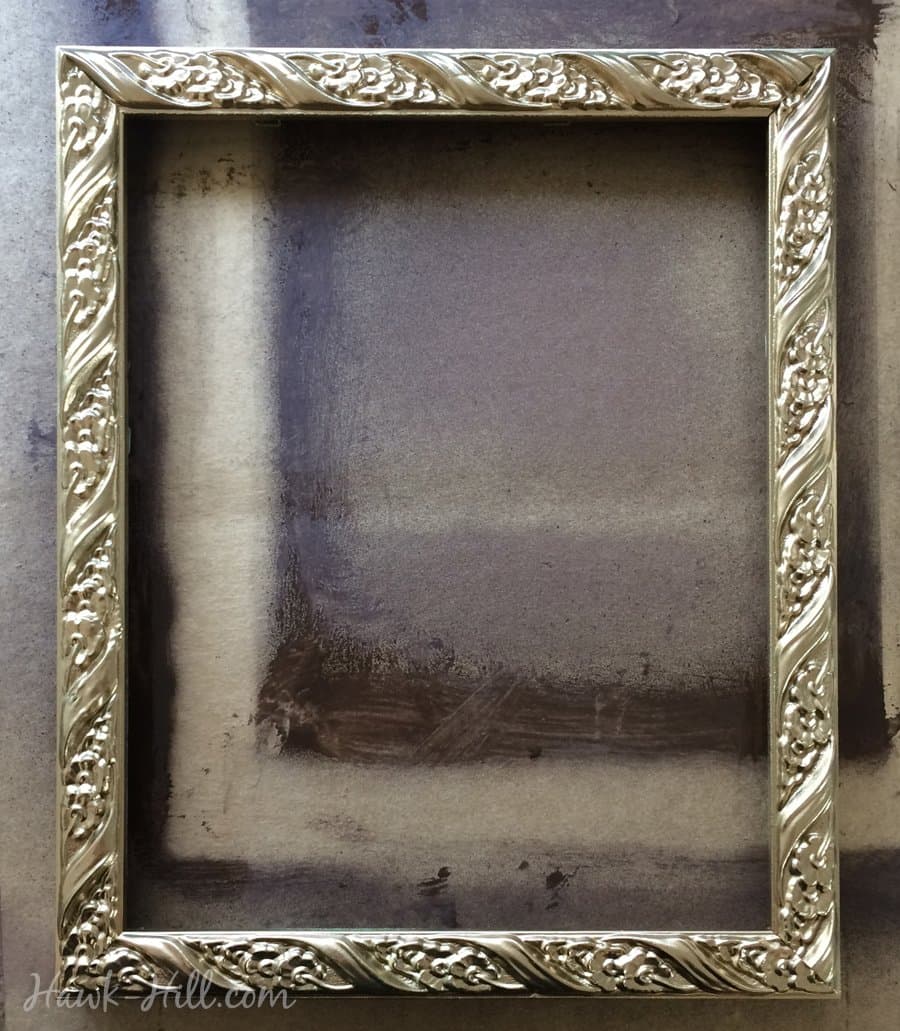
Paint frames with gold foil spray paint, taking care to cover the top and sides of the frames evenly. Gold “foil” spray is essential to get a rich sheet on the final patina. I like the foil spray paint because it’s the best for replicating a real gold brilliance, not just a “gold color”.
Metallic paint overspray can be tough to clean up- so spray paint on a protected surface. I usually paint on my driveway on top of cardboard boxes. The cardboard boxes protect permanent surfaces from overspray and lift the frames up a bit so the process doesn’t require constant bending over to reach all surfaces.
Allow Basecoat to Dry
Before continuing to the next step, the base coat of metallic foil gold paint should be fully dry. In warm air and low humidity, you should be able to continue in about an hour. Paint will dry slower in cooler temperatures and higher humidity.
Prep Towels
This method of creating an antique gold patina works by applying brown paint liberally and then wiping 80% of the paint away- which highlights raised areas and leaves brown paint in crevices. Before spraying the top coat, have towels (more than you expect to need!) handy, plus an easy way to throw them away without staining anything. It’s important to be able to work quickly- before the top coat dries- so be prepared.
Apply Brown Topcoat Paint
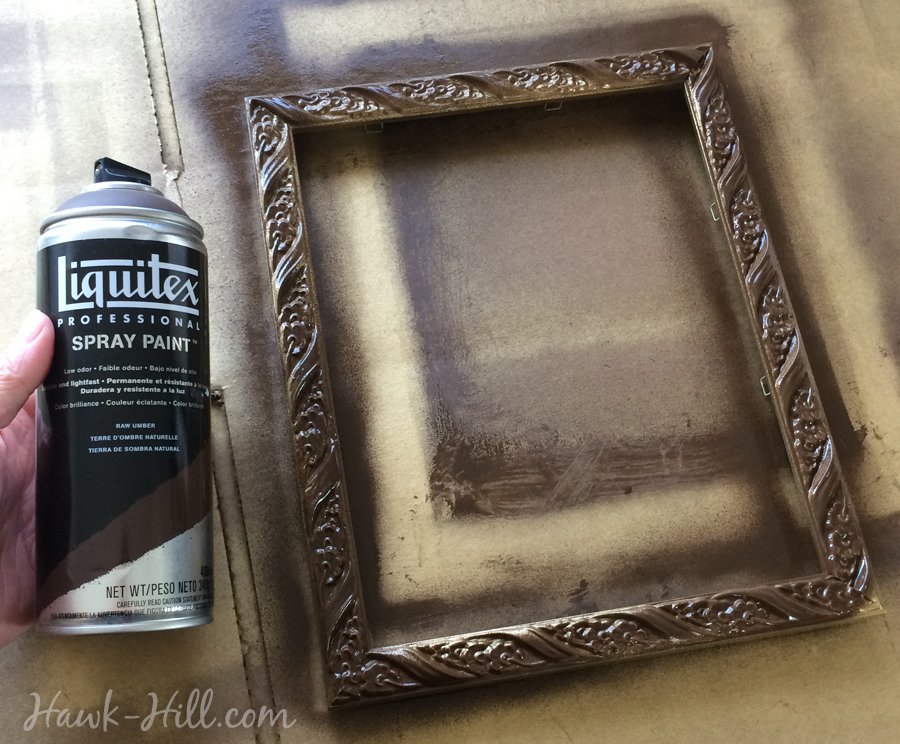
Once the gold paint is completely dry (wait a minimum of an hour or two) Add a thin coat of the Liquitex Professional Spray Paint – Raw Umber, as shown.
NOTE: Not just any brown paint will do. Trust me. I’m a penny pincher, I’ve tried the thrifty route already and resorted to this artist’s grade paint. It makes a HUGE difference.
Liquitex “raw umber” is the perfect tone of brown for creating the authenticity we’re going for. The artist-grade pigments in this spray paint make a huge difference. Rather than the typical watery-texture of spraypaint, this stuff goes on in and even, thick, and buttery coat.
Hand Paint To Get Full Coverage
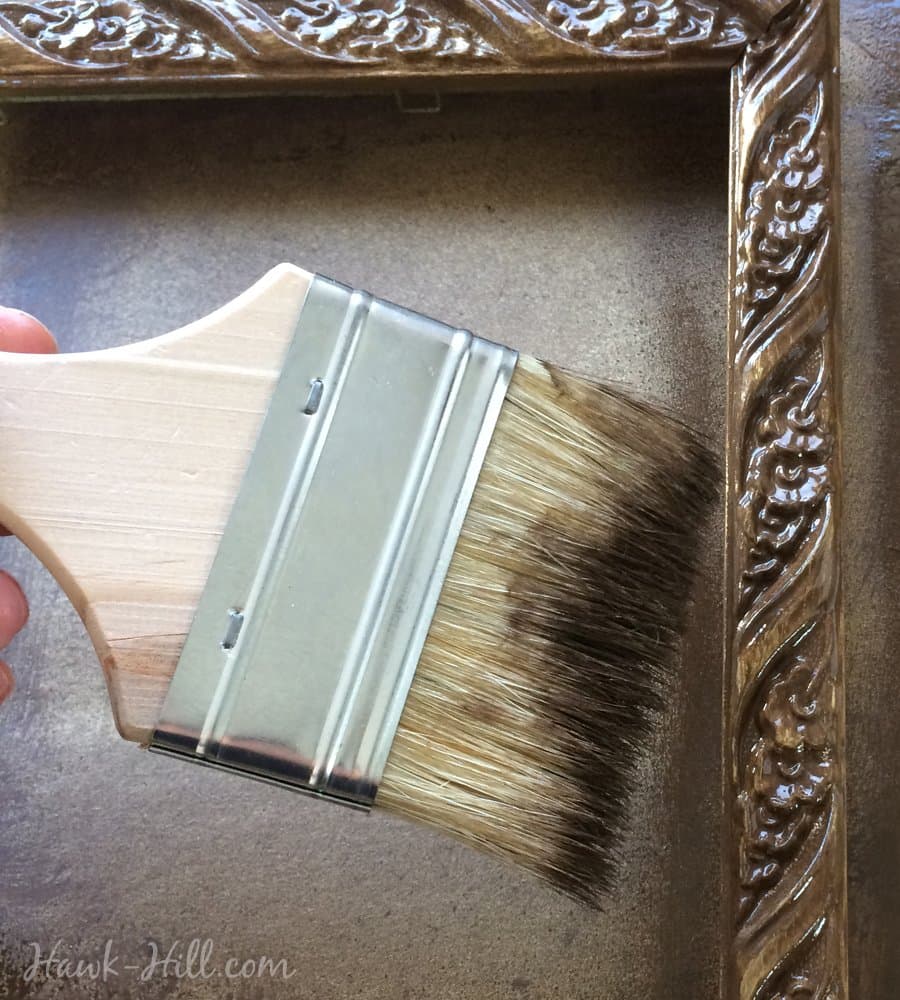
Working quickly, use the brush to work the brown paint deeper into crevices of the frame. (At first, your brush will remove more paint that it moves, keep going and add paint if needed until the paintbrush is saturated and moving excess paint into crevices)
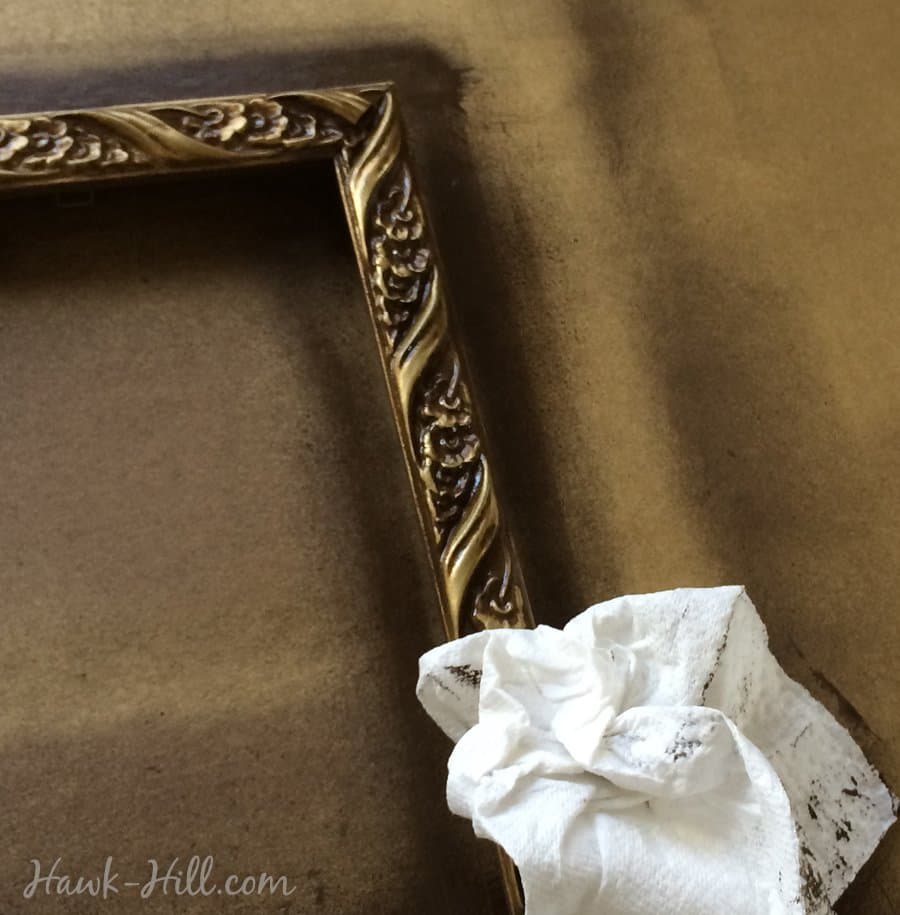
Use Towels to Add a Rubbed Finish

Now that the brown paint is deep into crevices, you’ll need to remove paint from the high points of the frame- like edges and ridges – to create that rubbed patina finish.
Wiping the still-wet brown acrylic paint off with a soft, clean rag or paper towel will remove enough acrylic paint from the points to create this effect.
To make your patina less obvious, rub a little more aggressively, clearing more of the brown paint from the crevices.
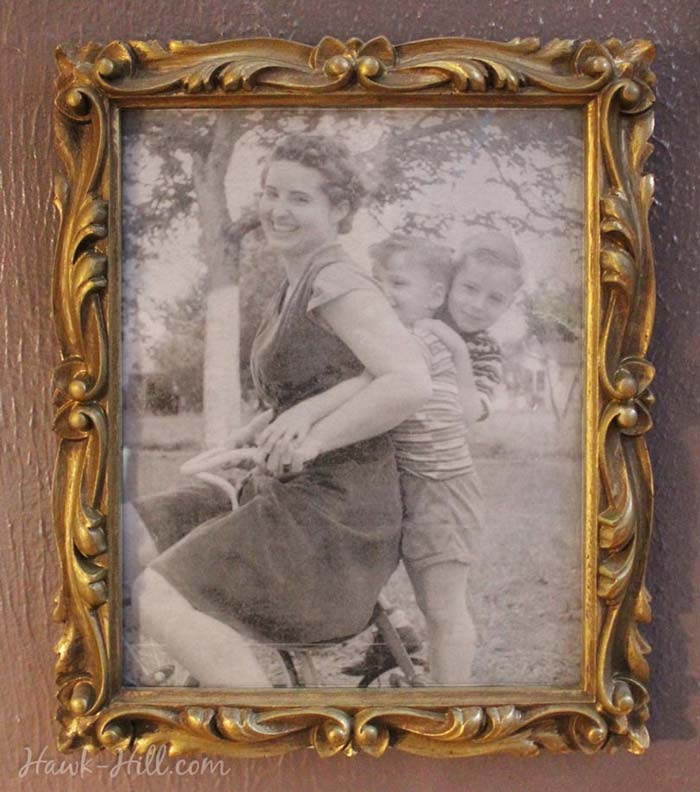
Achieving an impressive transformation is easier than you might think! Take a look at the up-close photos to witness the stunning outcome—expensive look. For optimal results, opt for frames with plenty of texture and recesses. This painting technique works wonders, turning even the simplest, flat frames into aged and elegant pieces, but it truly shines when applied to highly ornate frames. The multiple layers of paint and distressing add depth and intrigue, resulting in a captivating visual experience.
By following a few straightforward steps, you can completely revamp your frames. The proof is in the close-up pictures, showcasing the remarkable end results. The richness and sophistication of the vintage finish can rival those of pricier alternatives. Dollar store frames and thrift store discoveries become worthy of admiration thanks to this method. For an even more impressive outcome, select frames with intricate textures and recesses. Such frames provide the perfect canvas for the painting technique, as they amplify the effect and create a truly remarkable, high-end appearance.
Don’t underestimate the power of this painting technique to breathe new life into your frames. It’s a simple yet effective method that can instantly elevate their overall appeal. The end result is a visually captivating masterpiece that catches the eye and adds a touch of sophistication to any space.
Can I use non-spray paints
Can I paint a Antique Gold Patina without Spraypaint
Variations:
Creating a “Dirty Antique Gold” Patina Finish
When I was in college, I experimented with a similar antiquing method to create a grittier version of this antique gold finish. To add grit and the appearance of age, you can try the method I used: sprinkling sifted soil on the wet paint after the top coat is applied. By adding a dusting of literal grit, and then rubbing it into the cracks and crevices, you may get closer to the antique gold finish you’re looking for.

Using Cloth Rags instead of Paper Towels
I used to think Acrylic paint would stain permanently anything it touched, but hosting Bob Ross Paint-Along Parties taught me that that’s not the case! The secret? Have a big bucket of water handy and immediately submerge acrylic-paint saturated rags. As long as the paint doesn’t dry on fabric, it will wash out! Since you’ll get a LOT of paint on your rags with this method, be sure and give your rags a thorough handwash before tossing them in a washing machine, especially if your washer is a low-water washer or a portable washing machine. A prewash will prevent paint transfer onto your washer, pipes, or clothing.
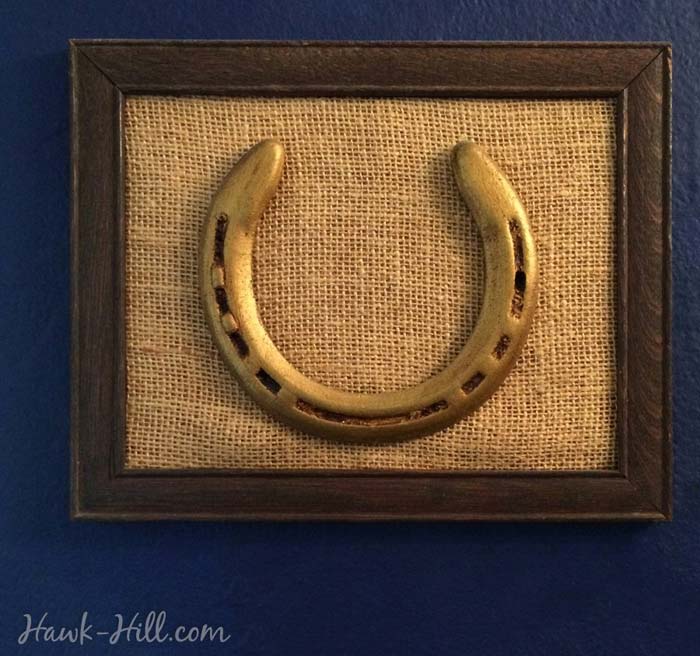
Want to learn more about using this technique on objects other than frames? I use this technique, modified slightly, to preserve and present vintage metal objects like old horse shoes. Click the image below to visit my tutorial on gilding & antiquing old horse shoes:
Thanks for Reading!!!
I hope you can tell that I love DIY, researching the best affordable solutions for every-day problems opportunities and documenting / sharing solutions!🙌 Hawk-Hill.com is reader-supported.
☕ Hawk-Hill.com is reader-supported. If this article saved you time or money, please consider donating $1 to help me cover the cost of hosting this website OR If you appreciate this information and want to throw a “Thanks!” my way by buying me a coffee – I would Of Course appreciate it! :]
Reader Questions and Recommendations
Readers, do you have any favorite topics / posts? What would you like to read more about in the future? As I hope you can tell from this and other articles on my site, I really enjoy DIY / a good challenge, and I’m not afraid to roll up my sleeves to figure out a great, and hopefully simple 😁 solution. So please feel free to let me know in the comments below (or reach out via social media)!
Ok Really – I’ll try to wrap this up now😂
Finally, if you’d like to continue to learn about interesting DIY options as well as how YOU can tackle creative new projects consider checking out the latest and most popular articles listed on the Hawk-Hill Home Page. I’m always trying to enjoy and write about the creative side of life so please don’t be a stranger – check back often!😍
Also chech our Pinteres account https://www.pinterest.com/curlylindsay/
If you enjoyed this post you may also enjoy reading / perusing / devouring😊 one or all of these articles as well!
- 💡4 Easy Steps to Make Your Own Sea Glass 🌊
- ❤️Bedroom Decorating Ideas for Single Women’s Master Bedrooms 🛏️
- 🏡Ikea Kitchen Cost: What I Spent for a 9×12 Kitchen Remodel 💵
I loved all the ideas. Especially removing rust. My dad was a blacksmith and I have forge tools that are rusted and want to clean and display them. Thank you so much!
This is exactly the finish, “Dirty Antique Gold” variation, I’ve been looking for to paint the un-pretty metal base on my thrifted coffee table! Thank you so much. I won’t be tackling the project until after I move hopefully within six months.
Hello, I ordered some of the liquitex spray in raw umber that you had recommended in your antiquing frames segment. Received the paint and it is beige, did I order the wrong color? Any idea why the color isn’t the same. Thank you
Hi Lorraine- that sounds frustrating! Was the can fully shake before spraying? Raw Umber is a pretty standardized color- especially from an artist’s grade paint manufacturer like Liquitex. If shaking it well doesn’t have it spraying a true raw Umber, you should exchange it with the store you purchased it from for another can.
Having trouble finding the Krylon Foil Metallic gold spray paint. Has it been discontinued? I can find Krylon metallic gold. Is there another brand that could work?
Excited to try this technique on some old gold color picture frames. The colors all vary and I’d like them to be the same color. I think your process may work well.
Hi Doris, from Krylon’s website, it looks like it’s still an active line. Finding a specific spray paint can be tricky, though, because online retailers don’t like to carry and ship spray paint due to the special handling required, and brick and mortar stores often don’t stock a full line. I’d recommend trying a big box hobby/craft store if you are having trouble finding it online.
I really want to try your method, but am also having trouble finding the products to buy. Michael’s has Liquitex raw umber paint in a tube. Would that be a satisfactory substitute for the spray paint? And Lowe’s doesn’t have the Krylon foil gold but they have Krylon gold that is supposed to look like gold leaf. These are the products I may have to settle for.
I have never tried this method with anything other than the spray paint- spray paint creates a brush-stroke free finish and reaches into the crevices of ornate frame- but you might be able to get similar results with a paintbrush.
I have a mirror with a frame like this that is currently antique gold, but we have changed our colors in the room and I would like to try and change it to a silver. If I try this technique with silver foil paint, would burnt umber still work or should I use a black?
GREAT question! I would use black to replicate tarnish in crevices.
Raw umber #6 is the correct one. The person who said it looked beige bought raw umber #7.
@Jack McCollum, I had the same issue and mine can is definitely raw umber 6, but it looks beige. Glad I tried it on a crap frame first and not the one I care about.
@Jody, I have the same problem. It is a beige color when sprayed. It is definitively raw umber #6.
The first few photos show you using a liquid umber but in subsequent photos and your description of the process you’re using spray with no mention of liquid. What gives?
Any tips on “antiquing” a gold guilded mirror frame that has a lot of plaster cracking and loss? I sprayed it with Krylon shiny gold, but it is so rough that I am thinking of “antiquing” it somehow.
The Liquitex ( raw umber) comes in a can, but you used a brush to apply the antiquing. Did I miss something? Thank you!