

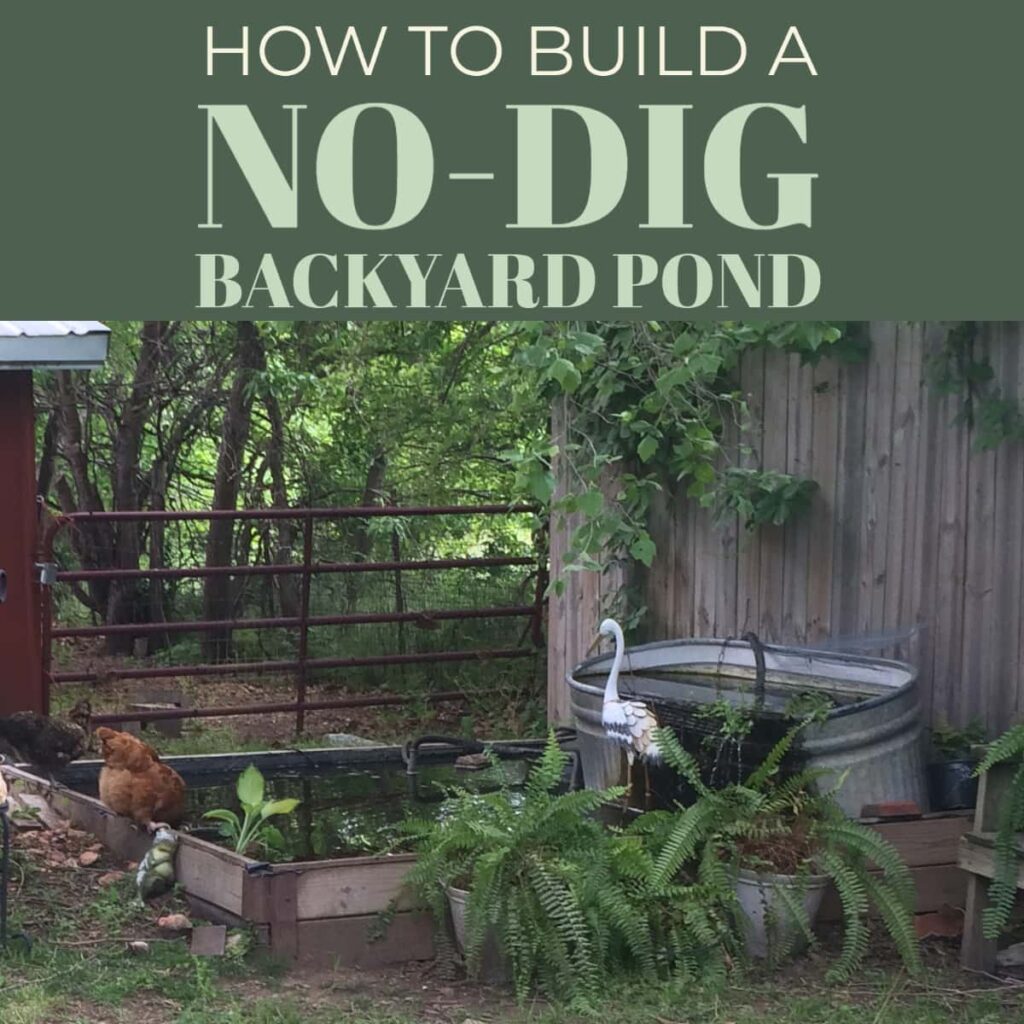
When a tornado hit my city in 2011, my summer overflowed with balancing my full-time job with lots of volunteering. When the dust finally settled in late summer, I wanted to get my hands dirty and create something peaceful in my garden space- so I built this above-ground koi pond! Unfortunately, 2011 was before I began taking photos at each step through my projects, but I’ve attempted to explain the process here in detail so you can make your own above ground pond.
This is very easy and very cheap- even I was surprised at how well this idea worked! Using shims, I was able to create my pond on rocky, uneven ground. As long as the top of the wood frame is adjusted to be level, the water level will be even and adapt around/over natural landscape. Best of all, unlike other garden pond projects, there is absolutely no digging involved! I dismantled this pond in late 2015 and repurposed the materials, but even after four summers and winters, this pond was structurally sound and leak-free.
Supplies Needed:
Hawk-Hill.com is a participant in the Amazon Services LLC Associates Program, an affiliate advertising program designed to provide a means for website owners to earn advertising fees by advertising and linking to Amazon.com and any other website that may be affiliated with Amazon Service LLC Associates Program
- Cordless drill (Electricity and water don’t mix! A small cordless drill can complete the project without dangerous voltage)
- A level
- Galvanized screws (to prevent rust)
- Raised Bed Corner Brackets – I used hinged brackets which no longer appear to be available, but if your pond will have corners that meet at 90-degree corners, these steel brackets should be stronger and more supportive than hinged ones. NOTE: Don’t cheap-out on the brackets. They need to be strong enough to support the wood planks that bear all the outward pressure of the water (and that’s a lot of pressure!).
- 2×6’s (pressure treated)
- Furring Strips (small boards that can be screwed along the narrow side of a 2×6)
- Pond Liner – You’ll need a pond liner that matches the dimensions of the raised bed you build + extra for the sides and additional overhang just in case. Use an unprinted advertising billboard tarp for a UV-protected, slightly less expensive alternative. (Or you can use a commercial pond liner.)
- Optional: Commercial pond-deicer
Step 1. Build a Sturdy Raised Garden Bed
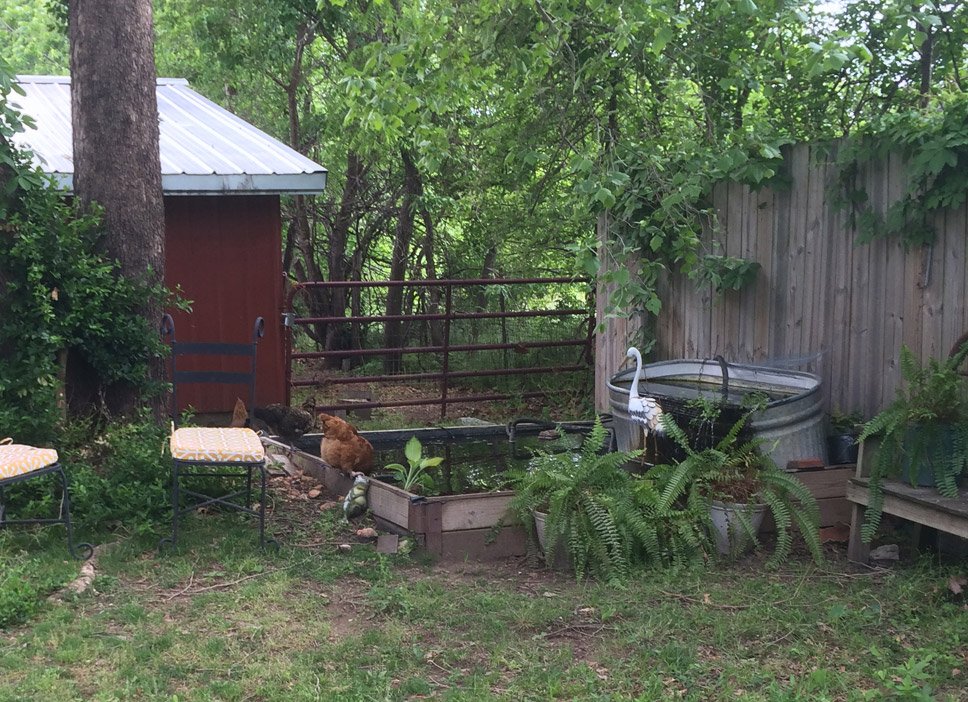
First, create an above-ground frame for the pond by constructing a basic raised garden bed using pressure treated lumber and raised-bed corner brackets. Don’t use a flimsy set of raised bed brackets- they will need to be strong to support the outward pressure of water. I built my pond on a slight hill, so 3 sides have stacked 2×6’s while the highest side has only one board.
Leveling your raised bed isn’t technically necessary, but if you want a waterline that is parallel to the top edge of your boards, you’ll need to pay attention to high and low edges. You may choose to dig an inch or two to set the boards on one side lower, or just use bricks or shims to lift the boards of the lower side.
Step 2. Acquire Pond Liner and Test Water Fill:
Next, you’ll need to find something to use as a pond liner. Commercial pond liners are easy to find and nice because they are low maintenance, but for this project, I managed to find a used advertising billboard tarp for my pond liner, helping keep my project cost very low. If you’re on a hard surface like a patio, you can purchase a patio pond kit and adapt it using the instructions below.
Spread your liner over your raised bed, with at least 3 ft of material overlapping over each side, and use a hose to fill the pond about 1/3rd of the way- just enough water to weight your liner down into the frame. STAY CLOSE while the water fills and help manipulate the liner to help it sink evenly and neatly to the bottom.
As it fills, you’ll need to create folds to make the liner accommodate the sharp corners of this pond design. This is easiest done with only as much water in the pond as is absolutely necessary to weight the liner.
If you want to be able to drain your pond (as opposed to pumping-out for cleaning) pause here check out my article on using plumbing fittings on either side of the tarp/liner to create a drain connected to a hose with a shutoff valve.
Step 3. Fill and Level Pond:
Continue filling. The rising water level will inform you how well you leveled your sides. Use shims to make slight corrections by lifting corners or adding space between sideboards.
Step 4. Finishing Sides:
At this point, you’ll have a functional pond that looks a little more like a redneck kiddie pool than a relaxing water garden! Never fear, the next step makes an enormous difference. These final steps neaten the overlapping liner and provide a finished edge:
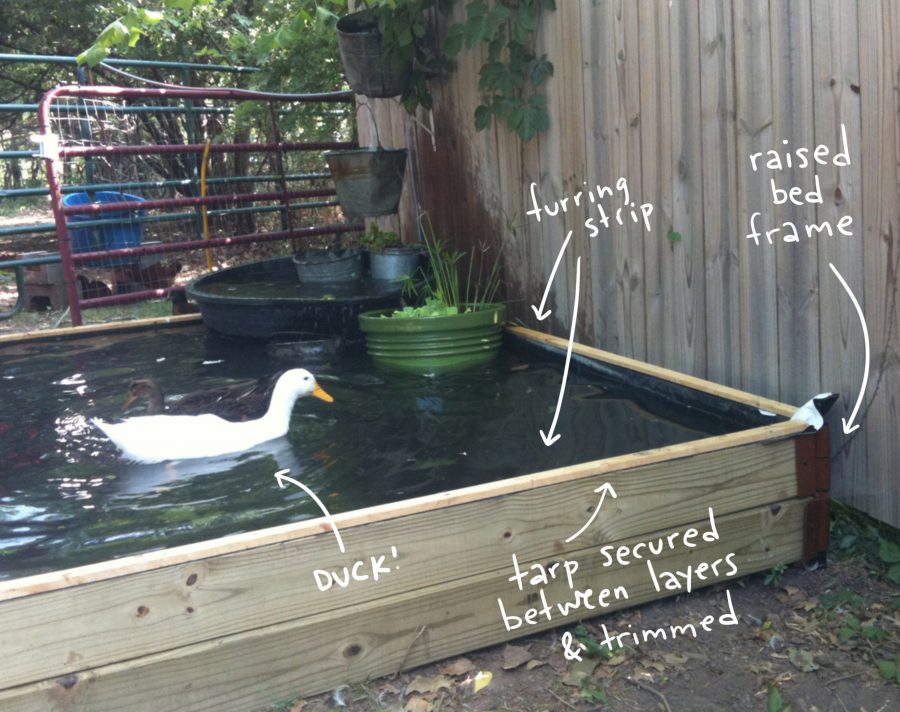
I recommend completing this step with the pond filled completely. Although you’ll probably get a bit wet, the result of finishing the edges with the liner fully weighted (as it will be when it is in use) is the best way to ensure the correct placement (and accordingly, the longevity) of your liner.
Steps to Finish and Neaten Sides:
- With the pond filled completely, go around the perimeter of your pond, cutting the liner like a pie crust (keep enough excess to let the liner drape over the edges by about 6-10″ on all sides). This first step just removes bulk to make the final steps easier.
- Pre-drill holes in the furring strips and place over the top of the first 2×6, sandwiching the liner between board and furring strip. Pull the liner taunt on the outside and then use a cordless drill and corrosion-resistant screws to screw the furring strip down, pinning the tarp between the furring strip and the 2×6″ retaining wall. (Yes, screw through the tarp.) Add 1 screw every 12″ to securely hold the tarp edges in place. (Note: According to Google, which may or may not be reliable, using a small cordless drill in or around water is not an electric shock risk, but NEVER use a corded drill while standing in or around your pond!)
- Continue around the sides of your pond, taking care at corners to fold and tuck excess tarp material.
- Once the furring strip board is added on each side, use a sharp knife to carefully trim any tarp edges showing on the outside of your pond.
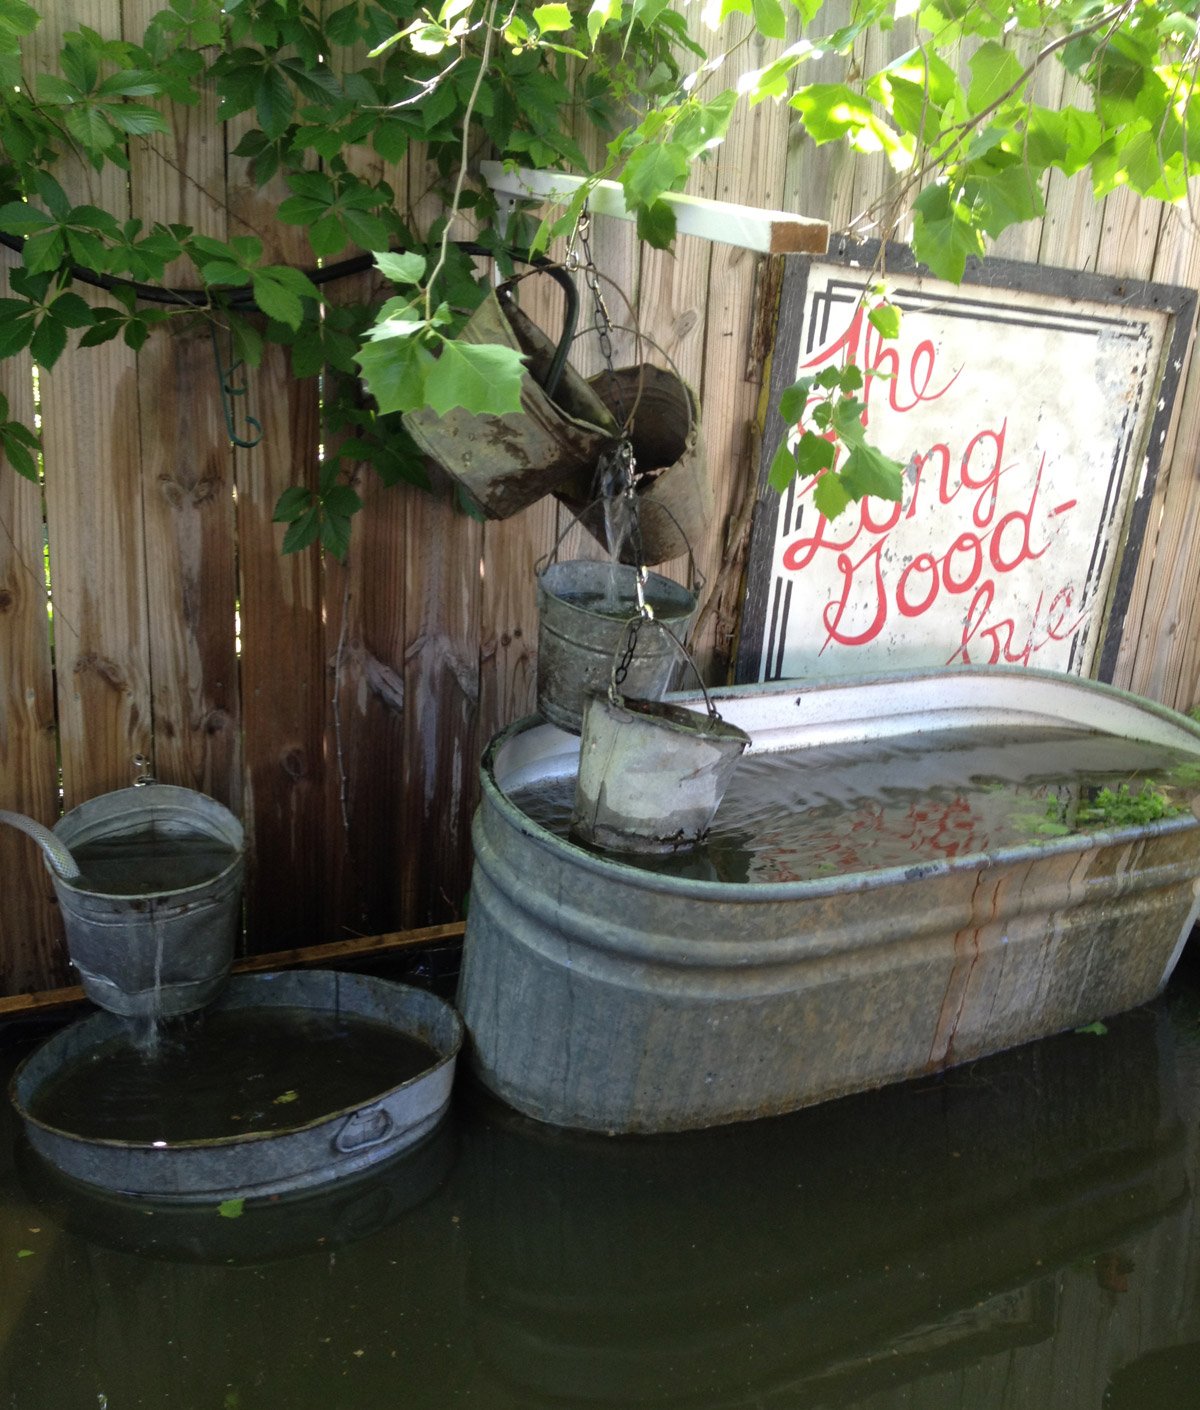
Once the sides are finished using these final steps, you have a complete garden pond ready for koi, water features, or aquatic plants for only the cost of lumber, brackets, and a tarp! You can create an endless assortment of water features by adding pumps, troughs, and raised vessels to your pond.
Maintaining an Above Ground Pond Year-Round:
Maintaining an above ground pond in the winter can be a challenge. You may choose to drain your pond- although if your pond supports fish you may want to try and keep your pond partially thawed all winter to help your pond fish survive and grow larger.
An above-ground pond will freeze more quickly than in-ground garden ponds. That said, my fish have survived Zone 6 winters without a pond deicer. Even in hard winters with sustained temperatures below 10 degrees F, the fish survived with some help.
I give my pond fish winter support in two ways:
- Keeping water circulating with a pump all winter, and
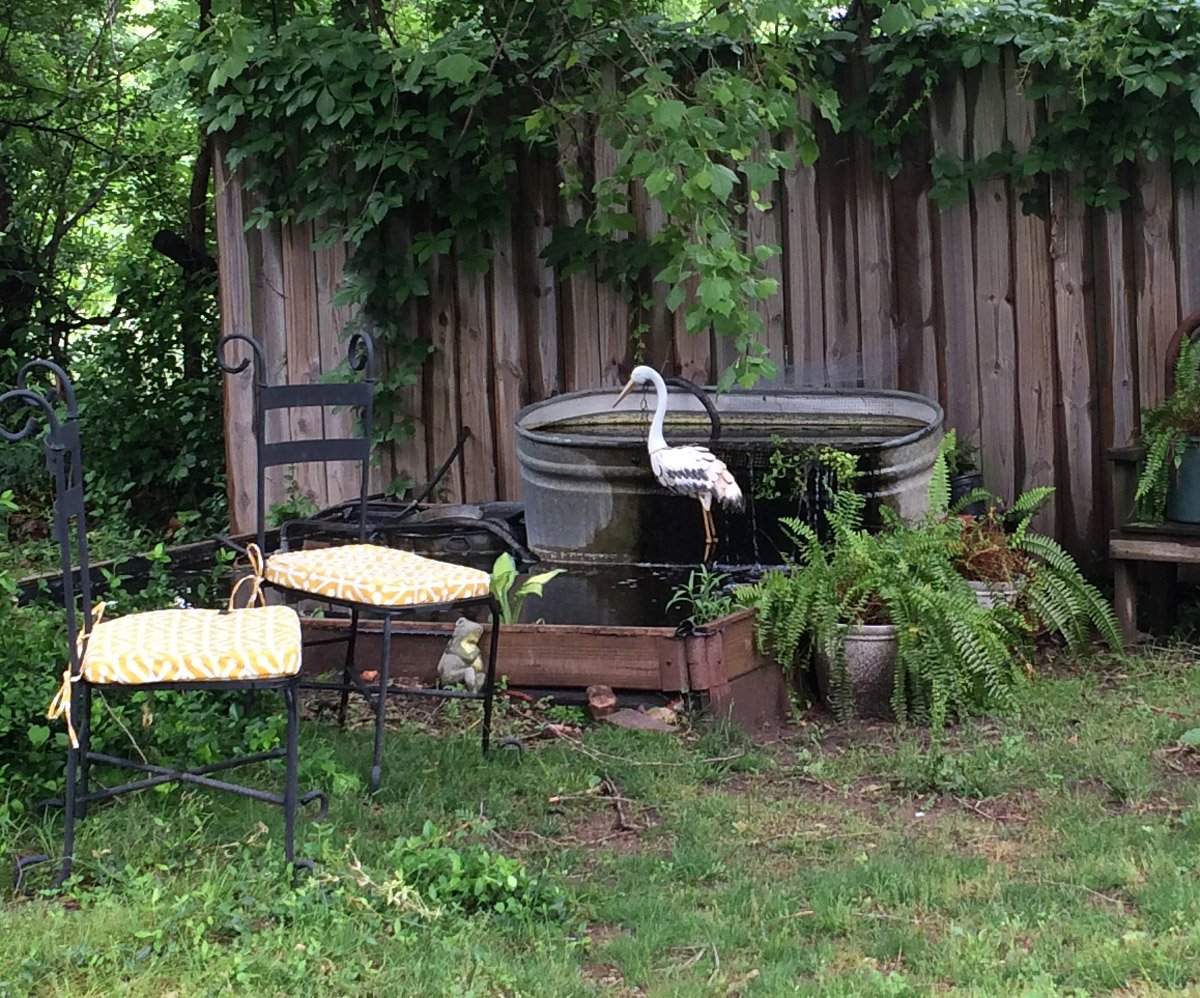
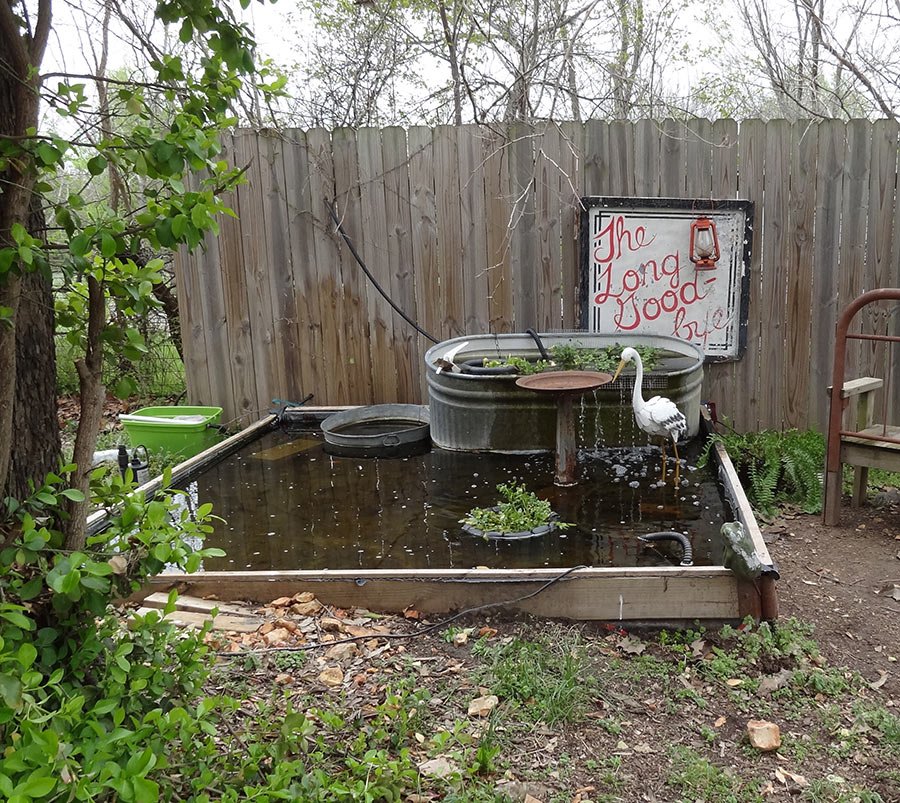
- Providing insulation in the form of a 100 gallon trough (filled with water) sitting in the lower pond propped up on cinder blocks. The extra stock tank provides insulation, and also a deep crevice where predators can’t reach them. The combination of insulation and moving water has produced hardy fish that thrive.
You may wish to purchase a commercial pond-deicer that will maintain your pond at just-below freezing. This will give fish a much better shot at surviving in an above ground garden pond over winter.
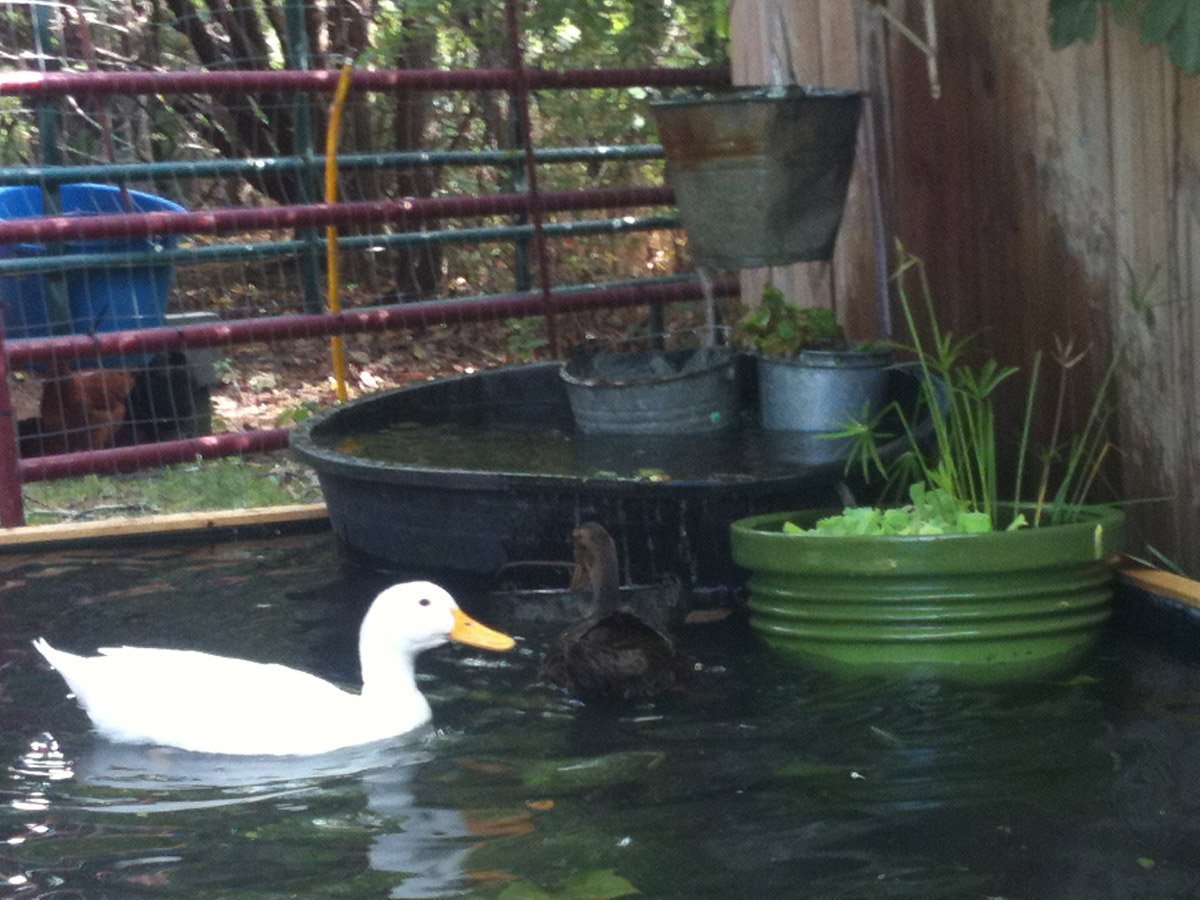
Fish in a DIY Above Ground Koi Pond
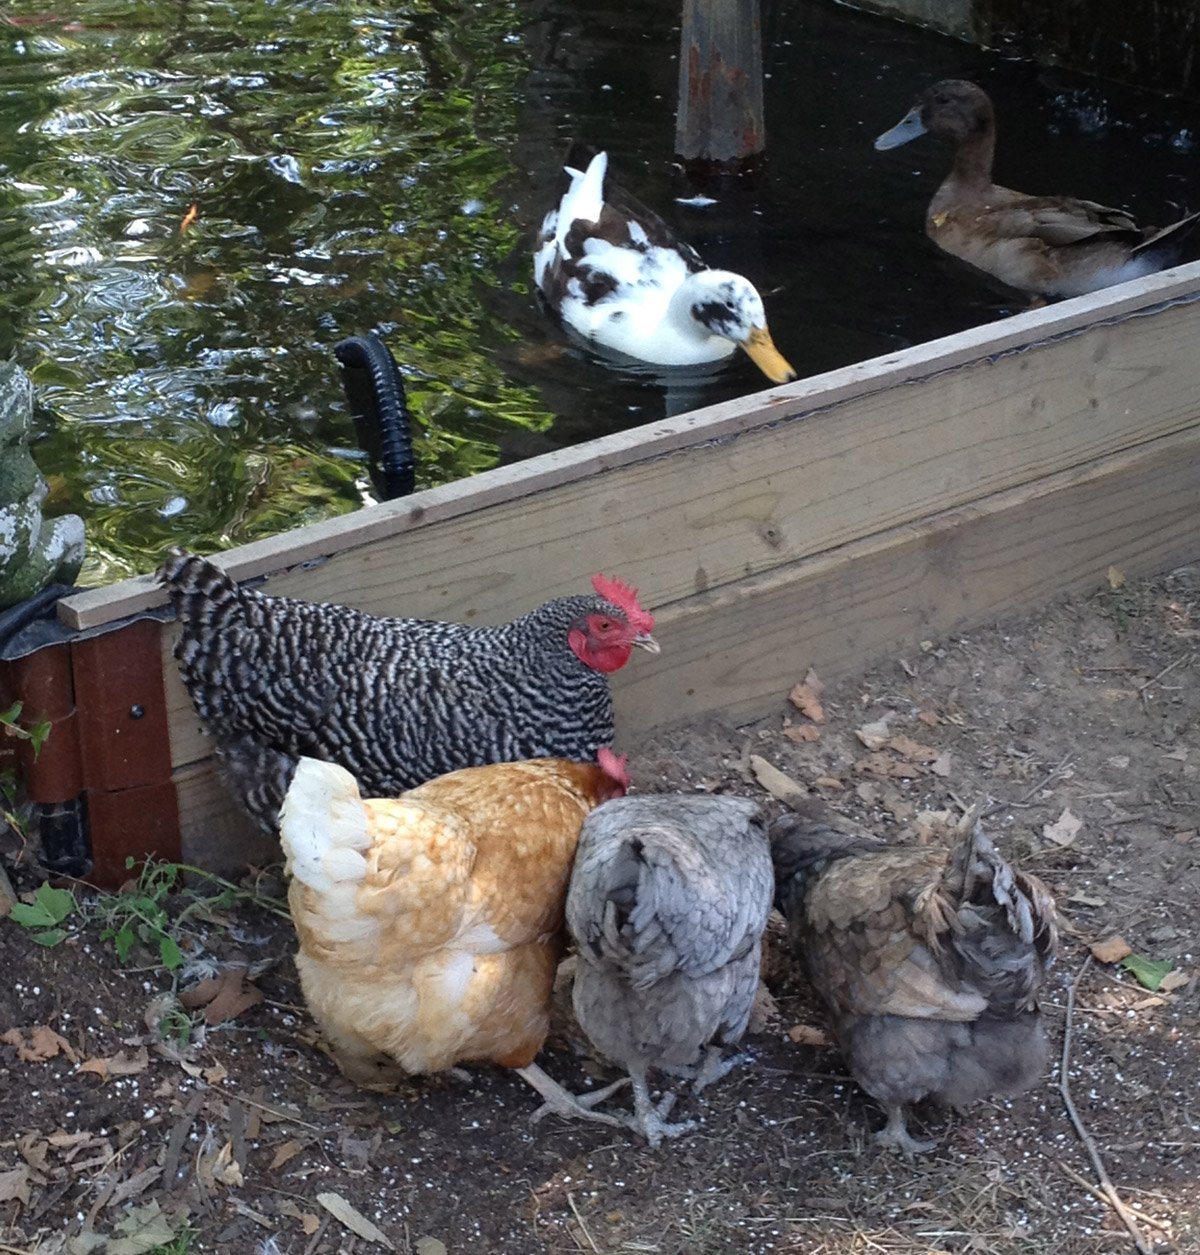
Goldfish thrived in this pond in the same way they would have in a traditional garden pond. Although I did not build my pond specifically as a koi pond, I did wind up keeping fish in the pond year round.
Initially I built this pond for the ducks I was raising at the time. If you’ve had ducks, perhaps you know that one way to supplement their feed and provide some stimulation for their natural instincts is by placing tiny feeder goldfish in the duck swimming area. Thanks to the shelter of aquatic plants and reservoirs, about 6 of those tiny goldfish flourished in the pond and outlived the ducks!
With a large surface area to oxygenate the water and plenty of water to swim freely in, my tiny feeder goldfish grew rapidly and, functionally, turned my little garden duck pond into a koi pond. Thanks to the depth at the deep end, even a little crust of ice didn’t kill these hardy fish. Each winter, I’d place a deicer in the koi pond on the coldest nights and each spring the goldfish would surface, still alive.
Like most koi pond owners, I did deal with predators. Predators were especially an issue because I started with tiny koi. I did not install a net, as many garden pond owners do. Instead, I added plenty of plants, ledges, and overhangs to my pond. By giving my koi places to hide, they were able to use their natural survival instincts. I like to think my decorative metal heron helped too!

Edible Gardening in a Water Garden: Growing Watercress
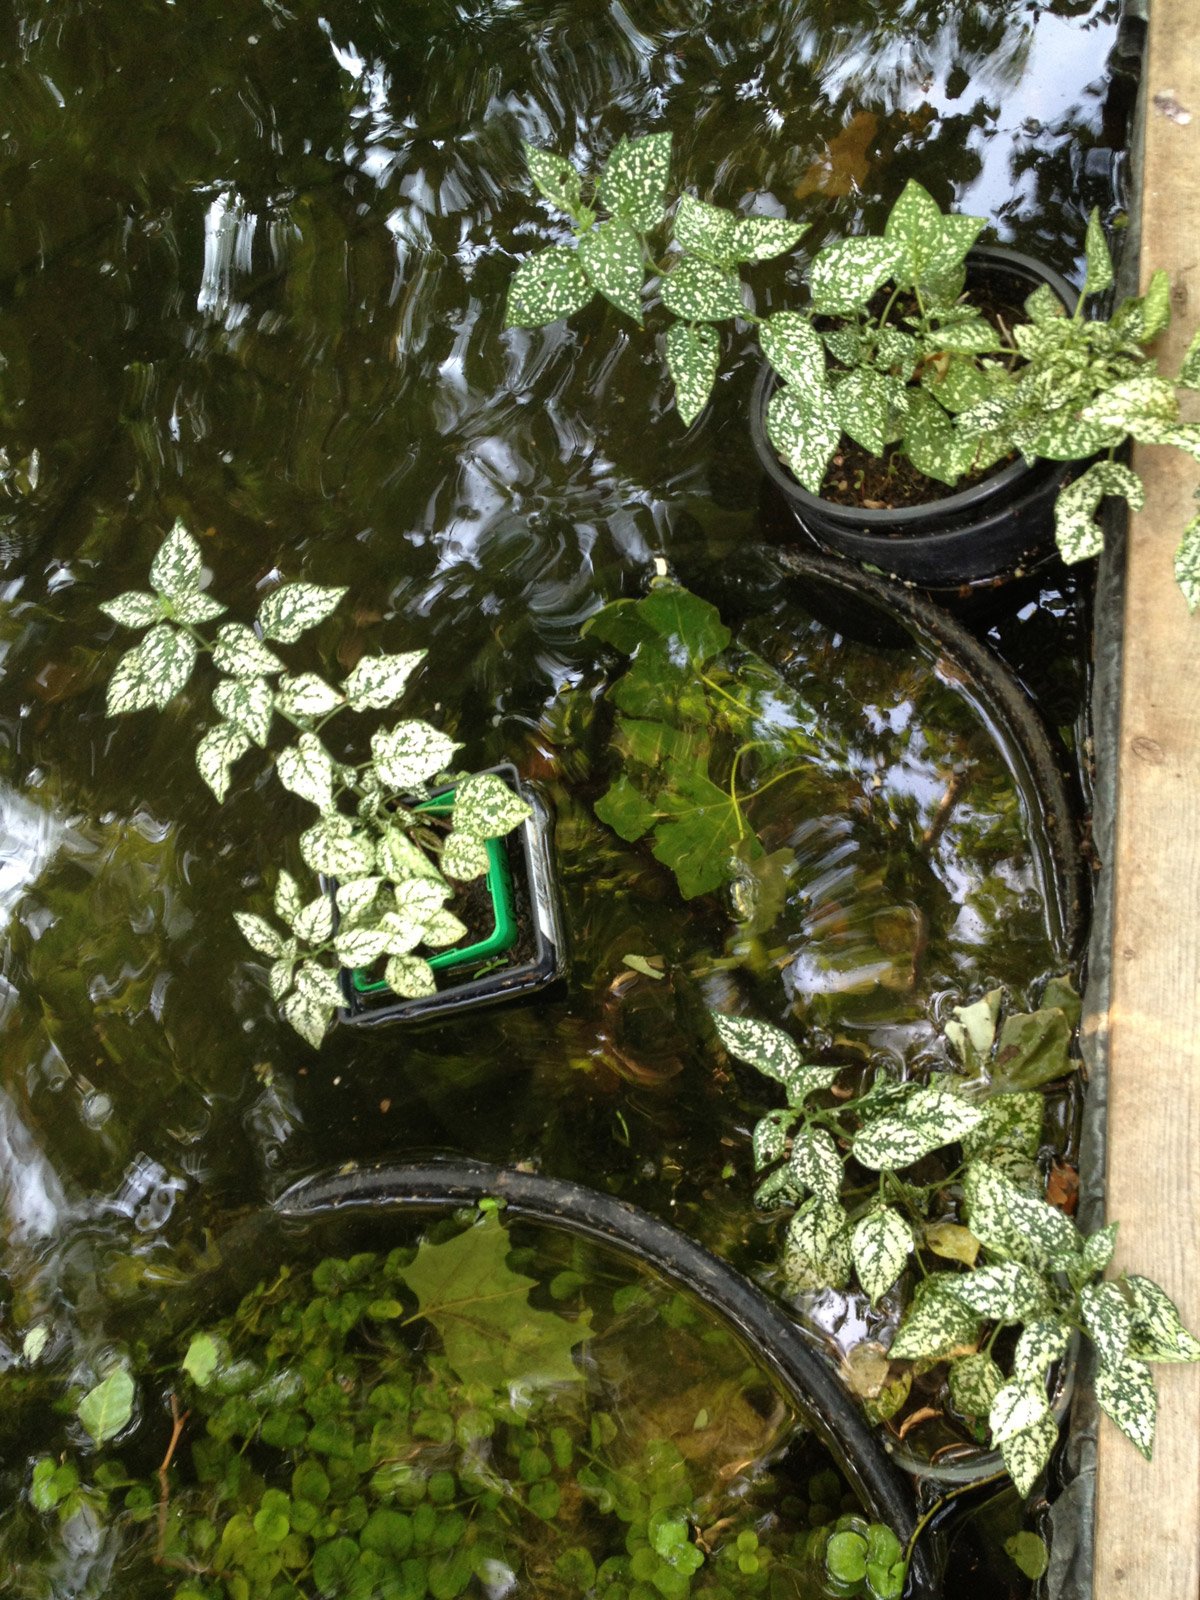
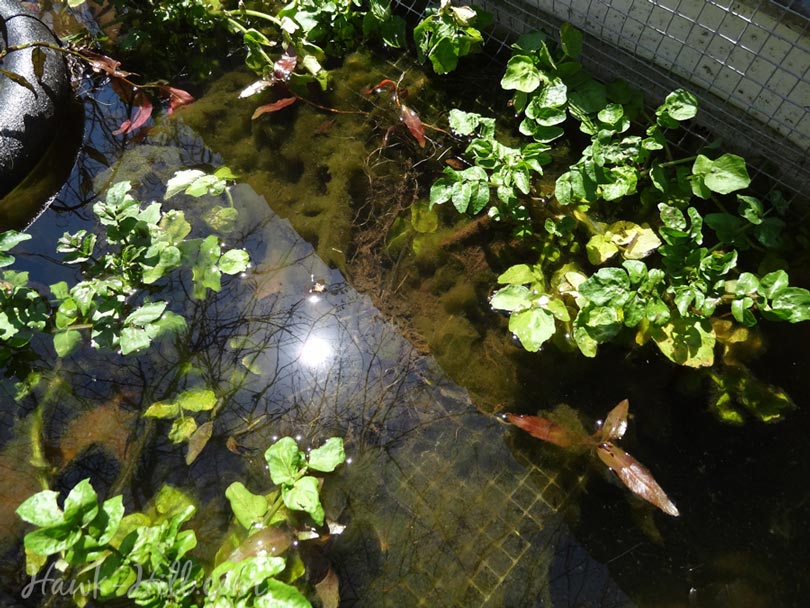
It’s easy to turn a backyard water feature into a productive element in a vegetable garden. I’ve had success growing strawberries in a floating planter, growing chickweed around my pond, and particularly in growing watercress in my water feature. Watercress grows best in cool moving water and needs no soil- in fact, the copious and thick root system works as an effective natural water filter when grown in a garden pond (but, unlike other aggressively growing water plants, watercress will die back fully in the heat of the summer- requiring little to no maintenance controlling it)
To grow watercress in your garden’s water feature, you can buy starts at the grocery store or farmers market. (You do want to be careful to be sure and purchase true watercress, though, not “upland watercress” which has a very different growing pattern and won’t thrive in a water feature) Once you have shoots of watercress, you can easily root the shoots in your water feature by securing the shoots to a stable area so they won’t be caught in your fountain or filter. Even if the watercress doesn’t have significant roots still attached, placing the sprigs in a nutrient-rich environment of moving water should ensure that rooting occurs quickly.
How to root watercress in a Backyard Pond:
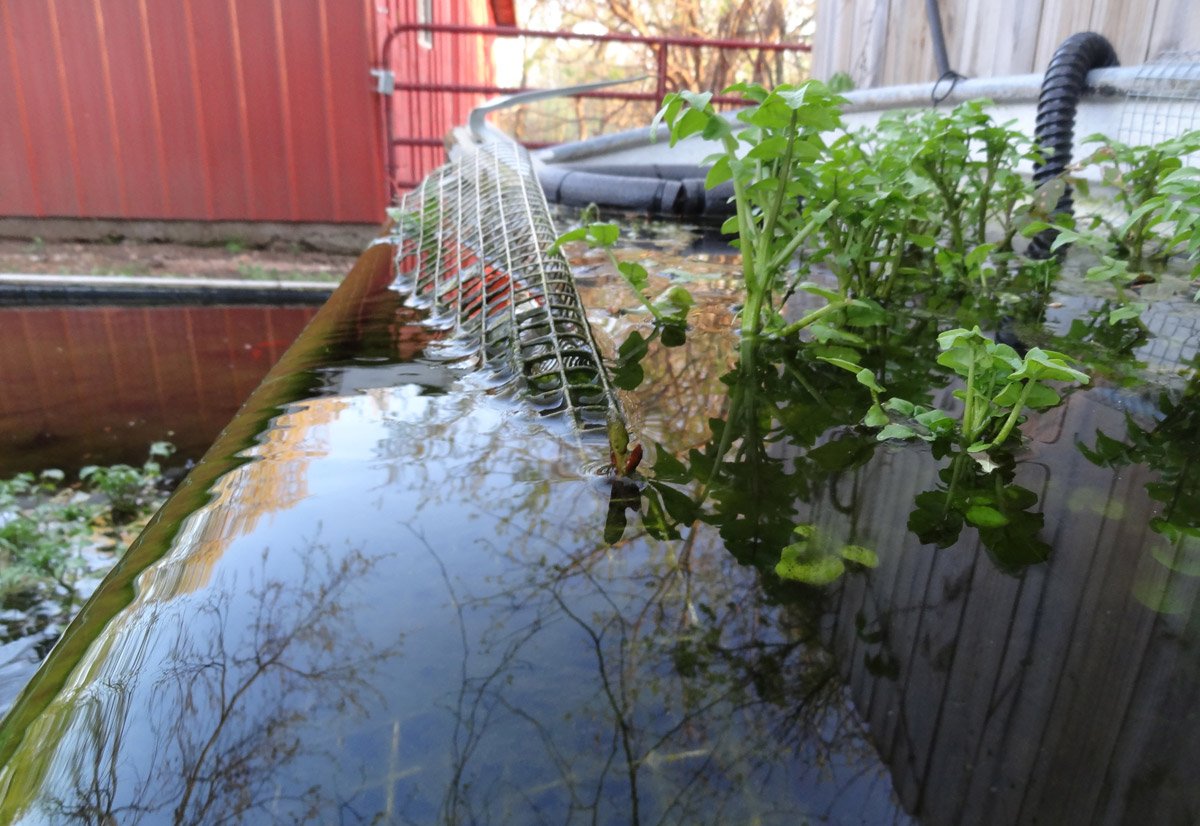
I use metal hardware cloth to hold my watercress in place near my pond’s waterfall. This allows the plants roots to form a mat that feeds on moving water. The metal mesh prevents the plant from splashing into the water below.
I get new watercress each spring and place each sprig into an opening in the wire mesh. Simply holding it in place for a few days will be sufficient to let the roots begin to grow and intertwine with the mesh. Soon, you’ll find it difficult to remove the watercress from the hardware cloth!
When growing watercress in the early spring, it is prolific and grows in large masses. It also loves early spring temperatures. It can be harvested far earlier in the growing season than other vegetable garden plants begin producing.
Using this method, you can help your backyard garden pond become a part of your vegetable garden. Watercress can be harvested continuously from early spring into summer. It provides fresh greens for for salads, sandwiches, and snacks while offering effective and chemical-free water filtering for your backyard pond.
Using Compost to Keep a Garden Pond Thawed in Winter
One of my most popular posts on this blog is about how to build a DIY above ground pond, but whether your pond is above ground or in ground, compost can be one way to insulate it from the freezing and thawing cycle that can be so damaging to garden pond plants, fish, and pond materials.
Pond bases dug out and lined with 3-4 inches of fresh compost materials can expect a slightly higher water temperature for 12-18 months after the compost placement.
Your local county extension office should be able to help you with compost “recipes” with nitrogen balances that will heat up quickly or create a long, slow release of heat as the compost breaks down. As a bonus- when you eventually remove your pond for cleaning or liner replacement, you’ll have rich, soft compost to cart to your garden or plant in directly!
Thanks for Reading!!!
I hope you can tell that I love DIY, researching the best affordable solutions for every-day problems opportunities and documenting / sharing solutions!🙌 Hawk-Hill.com is reader-supported.
☕ Hawk-Hill.com is reader-supported. If this article saved you time or money, please consider donating $1 to help me cover the cost of hosting this website OR If you appreciate this information and want to throw a “Thanks!” my way by buying me a coffee – I would Of Course appreciate it! :]
Reader Questions and Recommendations
Readers, do you have any favorite topics / posts? What would you like to read more about in the future? As I hope you can tell from this and other articles on my site, I really enjoy DIY / a good challenge, and I’m not afraid to roll up my sleeves to figure out a great, and hopefully simple 😁 solution. So please feel free to let me know in the comments below (or reach out via social media)!
Ok Really – I’ll try to wrap this up now😂
Finally, if you’d like to continue to learn about interesting DIY options as well as how YOU can tackle creative new projects consider checking out the latest and most popular articles listed on the Hawk-Hill Home Page. I’m always trying to enjoy and write about the creative side of life so please don’t be a stranger – check back often!😍
Also chech our Pinteres account https://www.pinterest.com/curlylindsay/
If you enjoyed this post you may also enjoy reading / perusing / devouring😊 one or all of these articles as well!
- 💡4 Easy Steps to Make Your Own Sea Glass 🌊
- ❤️Bedroom Decorating Ideas for Single Women’s Master Bedrooms 🛏️
- 🏡Ikea Kitchen Cost: What I Spent for a 9×12 Kitchen Remodel 💵
Want more pond DIY? Check out my article on adding a drain:
4 Easy Steps to Make Your Own Sea Glass
How to Decrystallize Honey Permanently with Simple Chemistry
I love, love, love your website!! I began by looking at your horse head Christmas wreath and just could not stop checking out your great ideas. This above ground pond is just what I have been looking for.
Thanks so much for sharing your creations with the rest of us.
Sheila
Awesome! Thanks for letting me know you liked it! I would love to see how your pond turns out!
How did you keep it clean with ducks?
It was really hard! But easier because I had well water (free) and so just added a flange and spout with screw-on cover to the tarp at the point where the ground was the lowest, so when the water got gross I could drain and refill.
@Lindsayanne, I love the drain idea and read the article on that topic, but I am having a hard time visualizing where/how the water actually drains out. If in an in-ground pond, do you need to dig a hose underground to connect to the drain?
Hi Kate! Great question! So, unless your yard has been commercially graded to be totally level, your above ground pond will probably have a high spot and a low spot. If you wait until a test fill to place a drain, the water will tell you what the lowest part of the pond is. Pick a corner or edge near the lowest spot, dig a very small hole so you can access the underside (you shouldn’t need to dig a hole any larger than 6x6x6) and install the drain in the liner near that low spot. Connect a hose and make sure that when you drain, the end of the hose is slightly downhill from the pond, and you should be set!
I like this! I’m buying a home with 2 raised bed planters in ATL and would like to do this to one of them for my lab pup to play in who loves water! Any suggestions for making this pup friendly? any plants or items that I should not use?
ooh! i want this pond but with a fountain in it! can it be done???
i meant just a large pump spouting water, not a separate decorative fountain. how would you plug it in?
Totally! You can install a fountain in an above ground pond in exactly the same way you would for a dug in pond. Just drop it in the center so the spout faces up and connect the pump’s cord to an outdoor extension cord (buried or hidden with rocks, etc) using a waterproof cord box.
thank you!
Love love your page thanks for sharing your ideas
What at ehe dimensions of your finished pond?
This pond was 10ft x 10ft x 8-12″. This design is scalable, but beyond 10 ft you’ll need to add support for the sides to keep the pressure of the larger amount of water from bowing the sides outward.
Truly loved your idea and I also liked all the tiny details. Thank you! Windriver
Hi Lindsayanne;
Your backyard pond article Is a delight to read, and full of good information.
We have had above ground ponds at our last two homes, and greatly enjoyed them. Unfortunately, the second pond failed because we couldn’t shade it well enough from the sun.
The pond we will be building at our new home will be on an existing slab, with a sturdy existing roof overhead. I know we’ll be incorporating some of your ideas.
Thank you so much, I look forward to reading more of your adventures.
DeDe
Really grateful for this article right here. I’m a newbie pond owner and I’m really doing some research on pond maintenance. I just had my pond construction here last week. I hope I can pull it off and really make the Koi and the pond itself flourish!
Thanks for the inexpensive above ground pond idea! I just wanted to comment that for clarification, this would not work as a Koi pond. Koi are a large carp fish that need a bare minimum of 3′ deep water. However, little Comet goldfish, aka feeder fish would be happy enough in this and I assume that’s what you had in your pond 🙂
Happy ponding everyone!